


Introduction
Olight is a well-known torch brand with devoted fans and some rather controversial marketing practices. Personally, I try to keep a neutral perspactive and really enjoy some of their offerings while staying away from both the cult-like fan camp and the haters.
It is standard for Olight to use high output, low CRI emitters with - honestly - ghastly green tints, so modability is a must for me to consider one of their products.
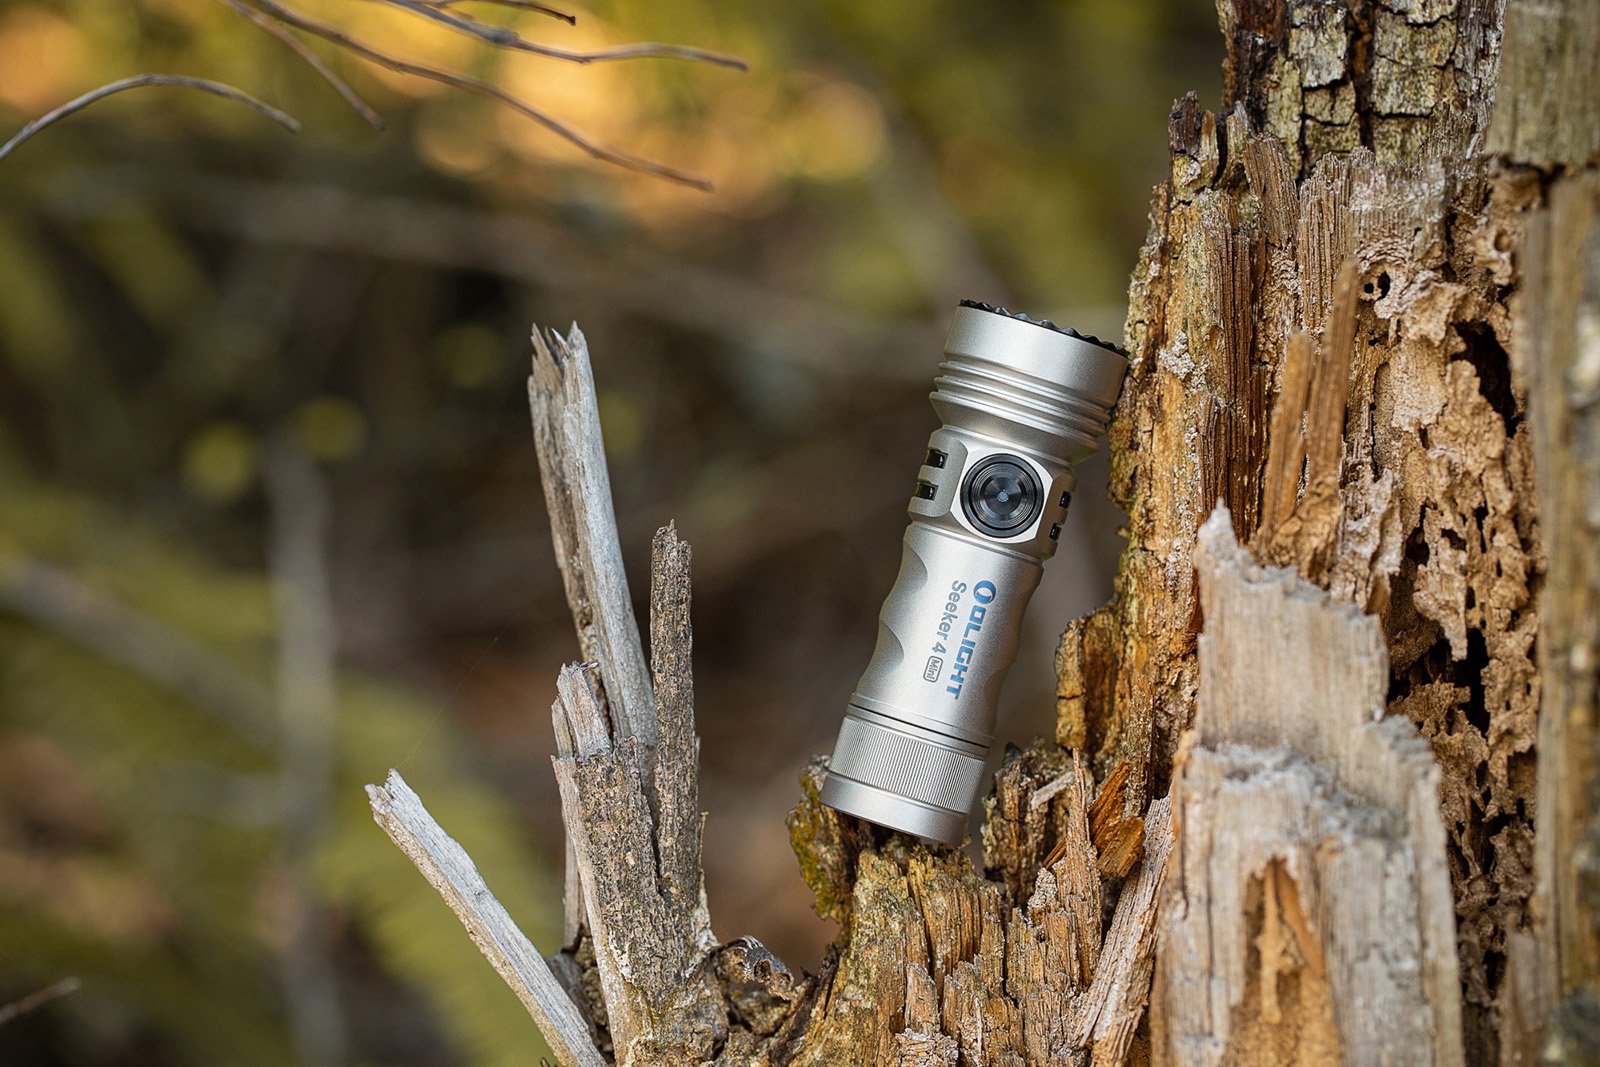
Which brings us to a torch that really caught my eye, as it ticks all the boxes for me. The Olight Seeker 4 Mini comes in aluminium, with several anodization options, or sandblasted Titanium. I opted for the Titanium version.
The Olight Seeker 4 Mini Ti is a torch that can output either white light or UV.


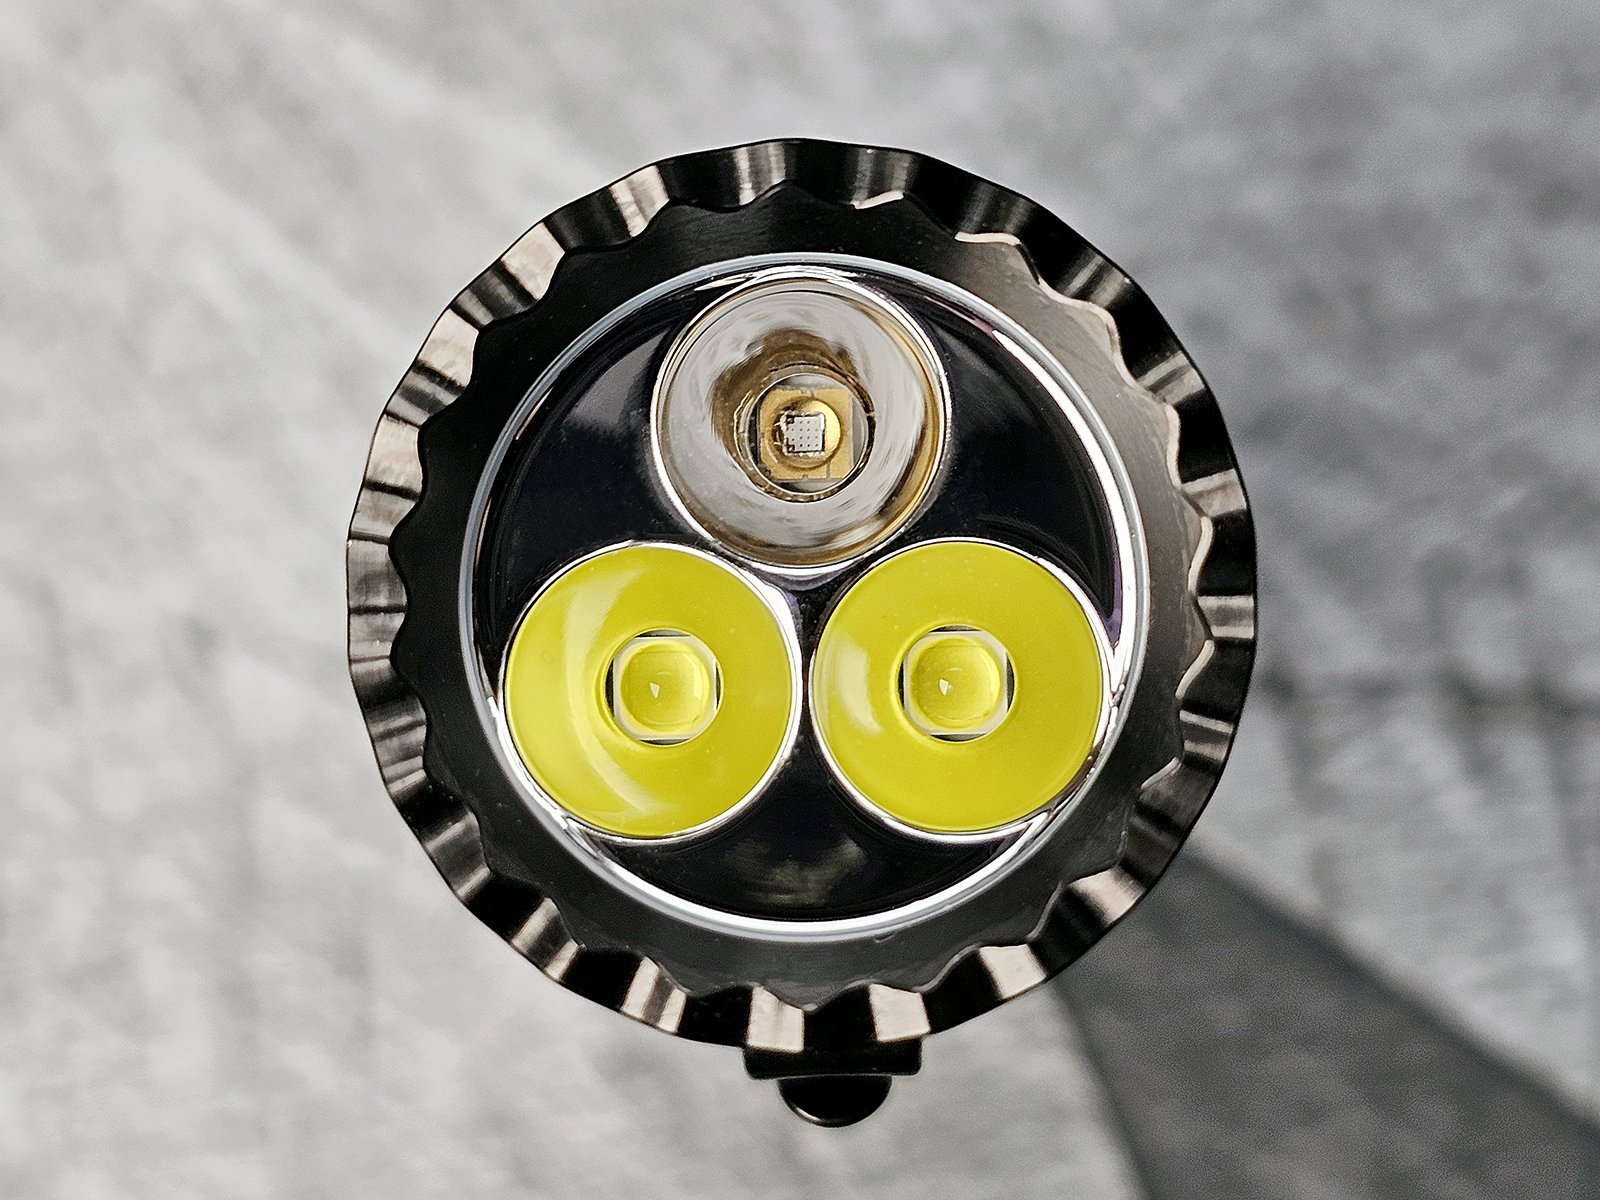
It is an EDC sized triple emitter torch, of which the 2 emitters are white and the 3rd is the UV emitter.
Unboxing
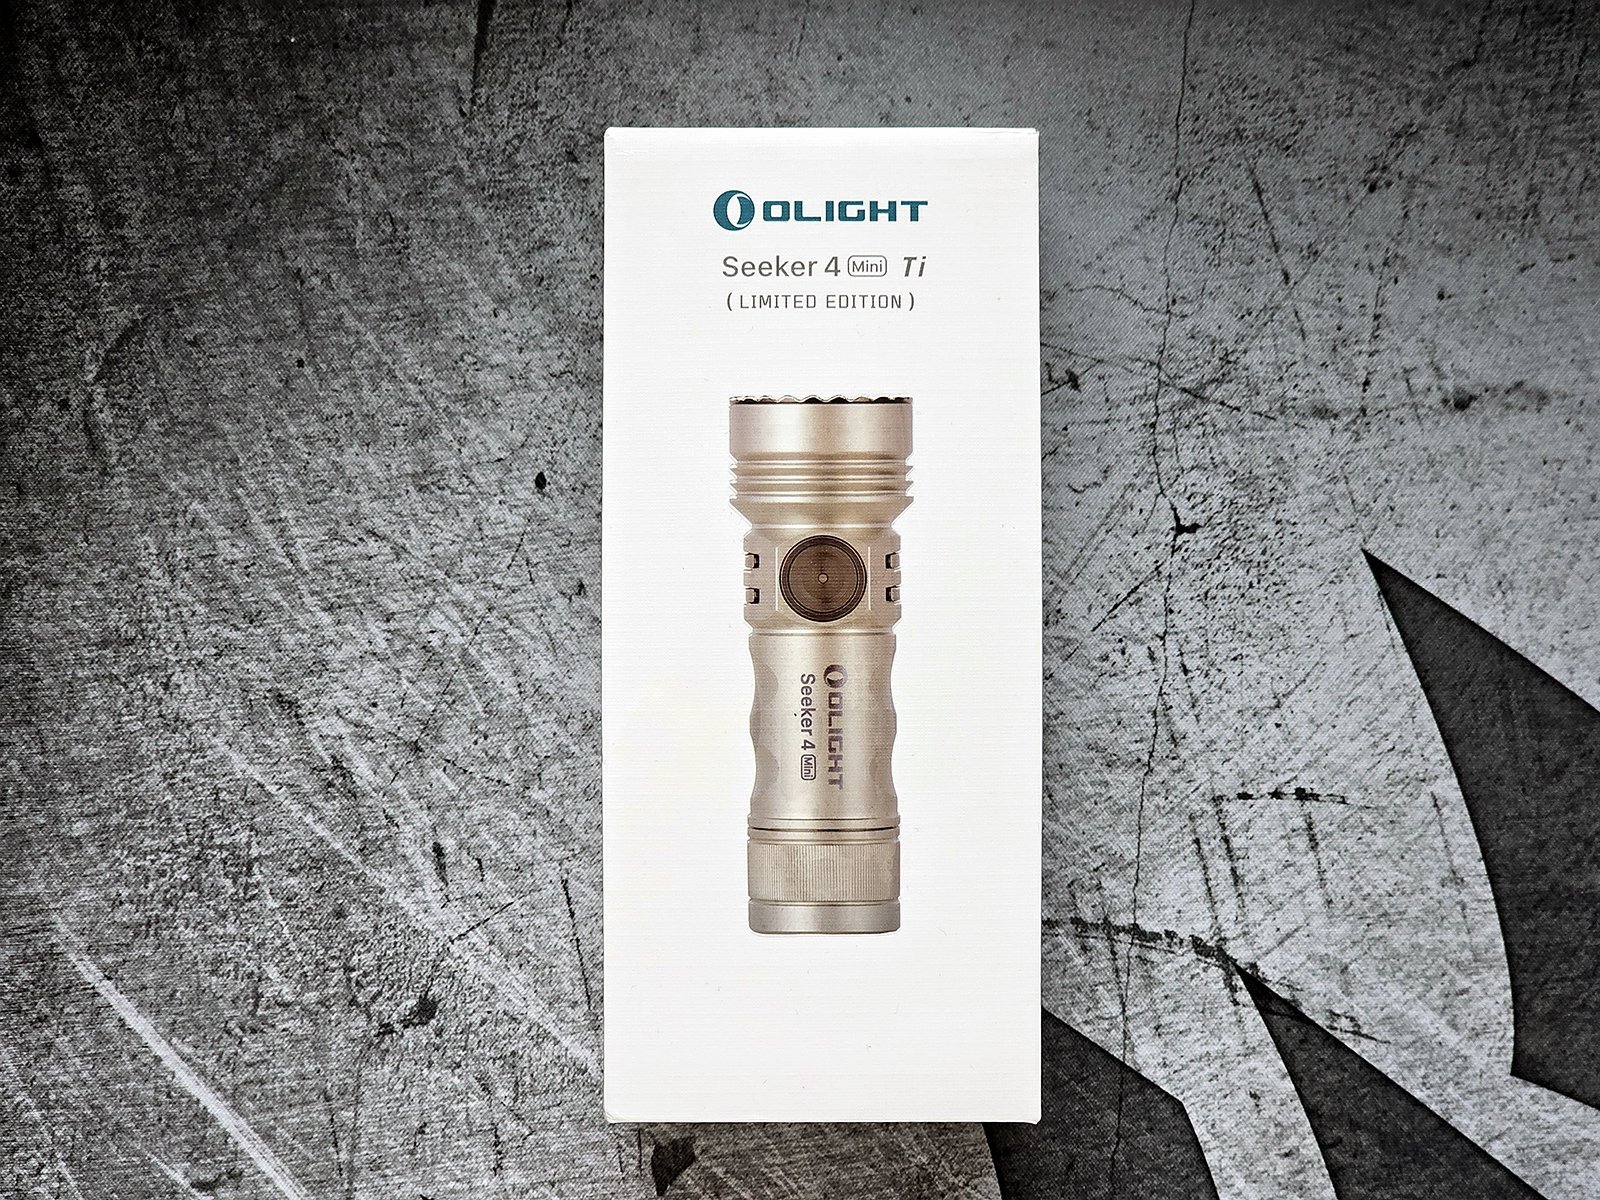
As with most Olight torches, the Olight Seeker 4 Mini Ti comes in a very premium looking box with excellent presentation.


Opening the box, you are greeted with a thank you and the instructions on how to remove the insulating film from the battery to allow for normal operation and charge the torch. The film is there to prevent accidental activation of the light during shipping.

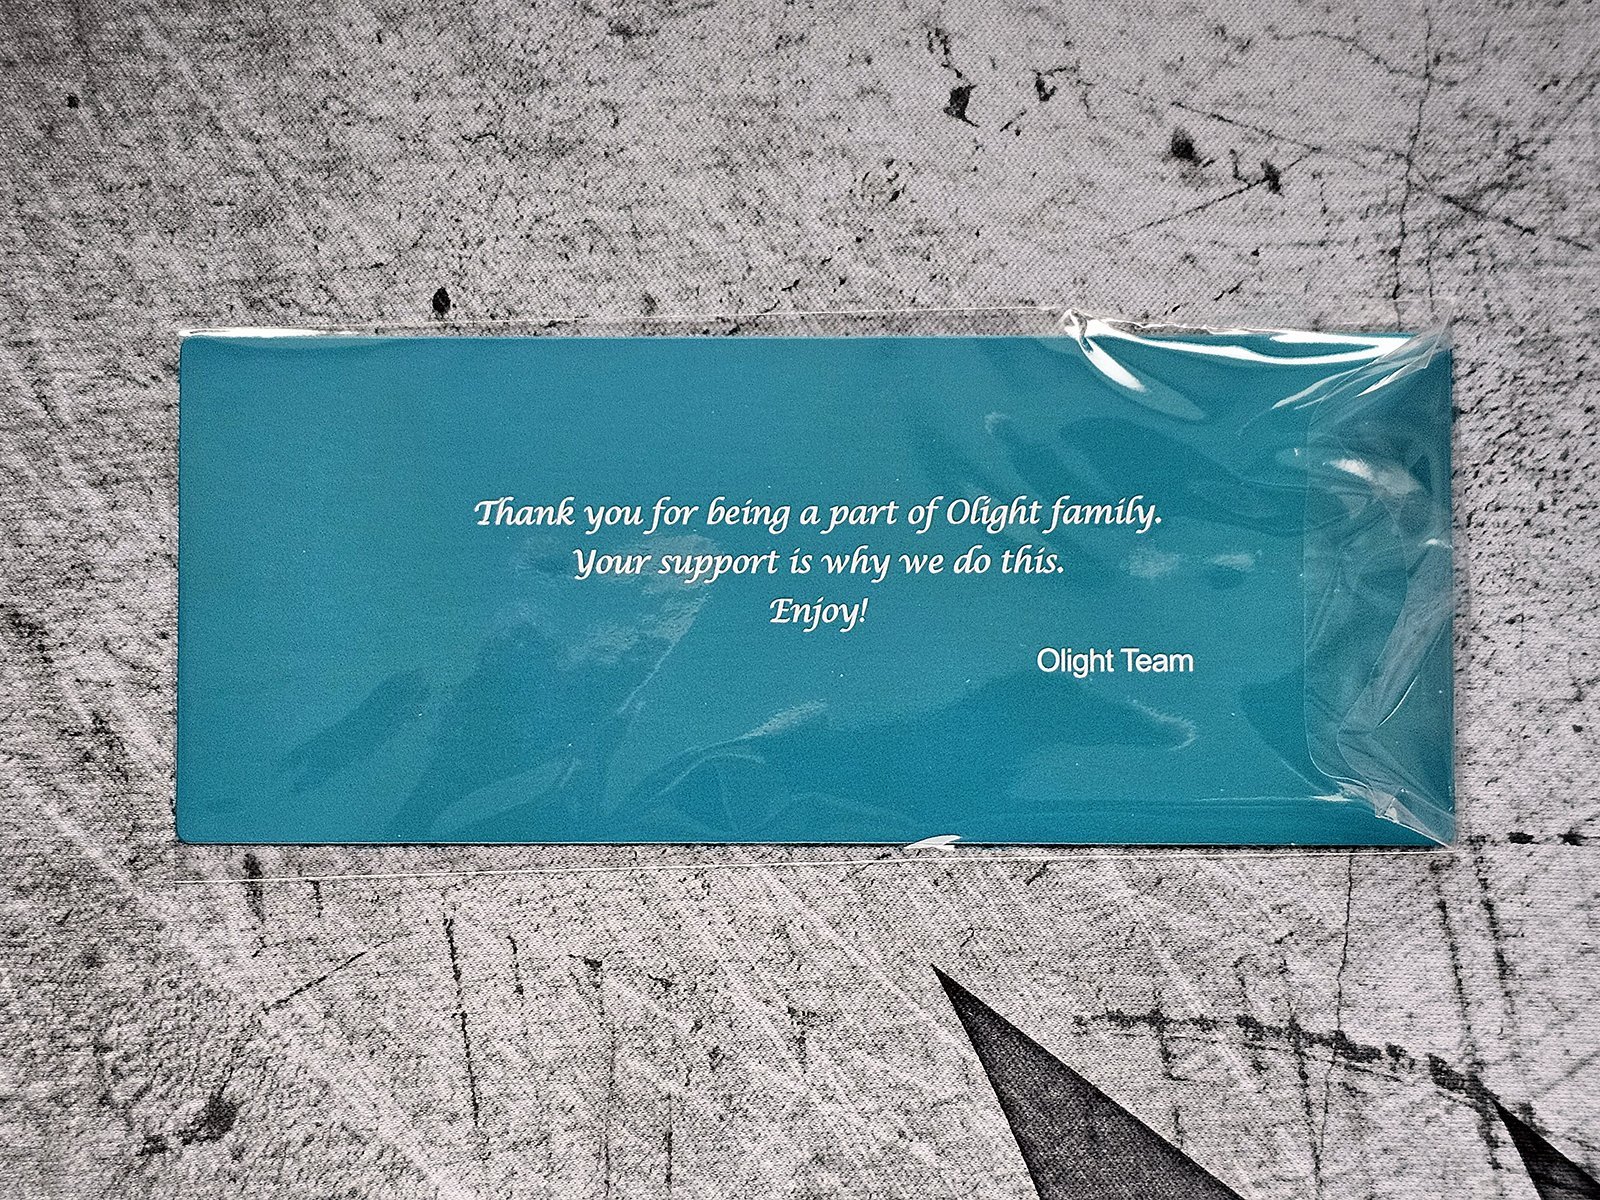
The other side of the film removal and charging instructions card is a nice thank you note from the company.

Under the note we find the torch, nicely encased in foam. There is even a ribbon to help get it out and, of course, a little box with accessories.

The accessories are a standard Olight lanyard and the charging cable.
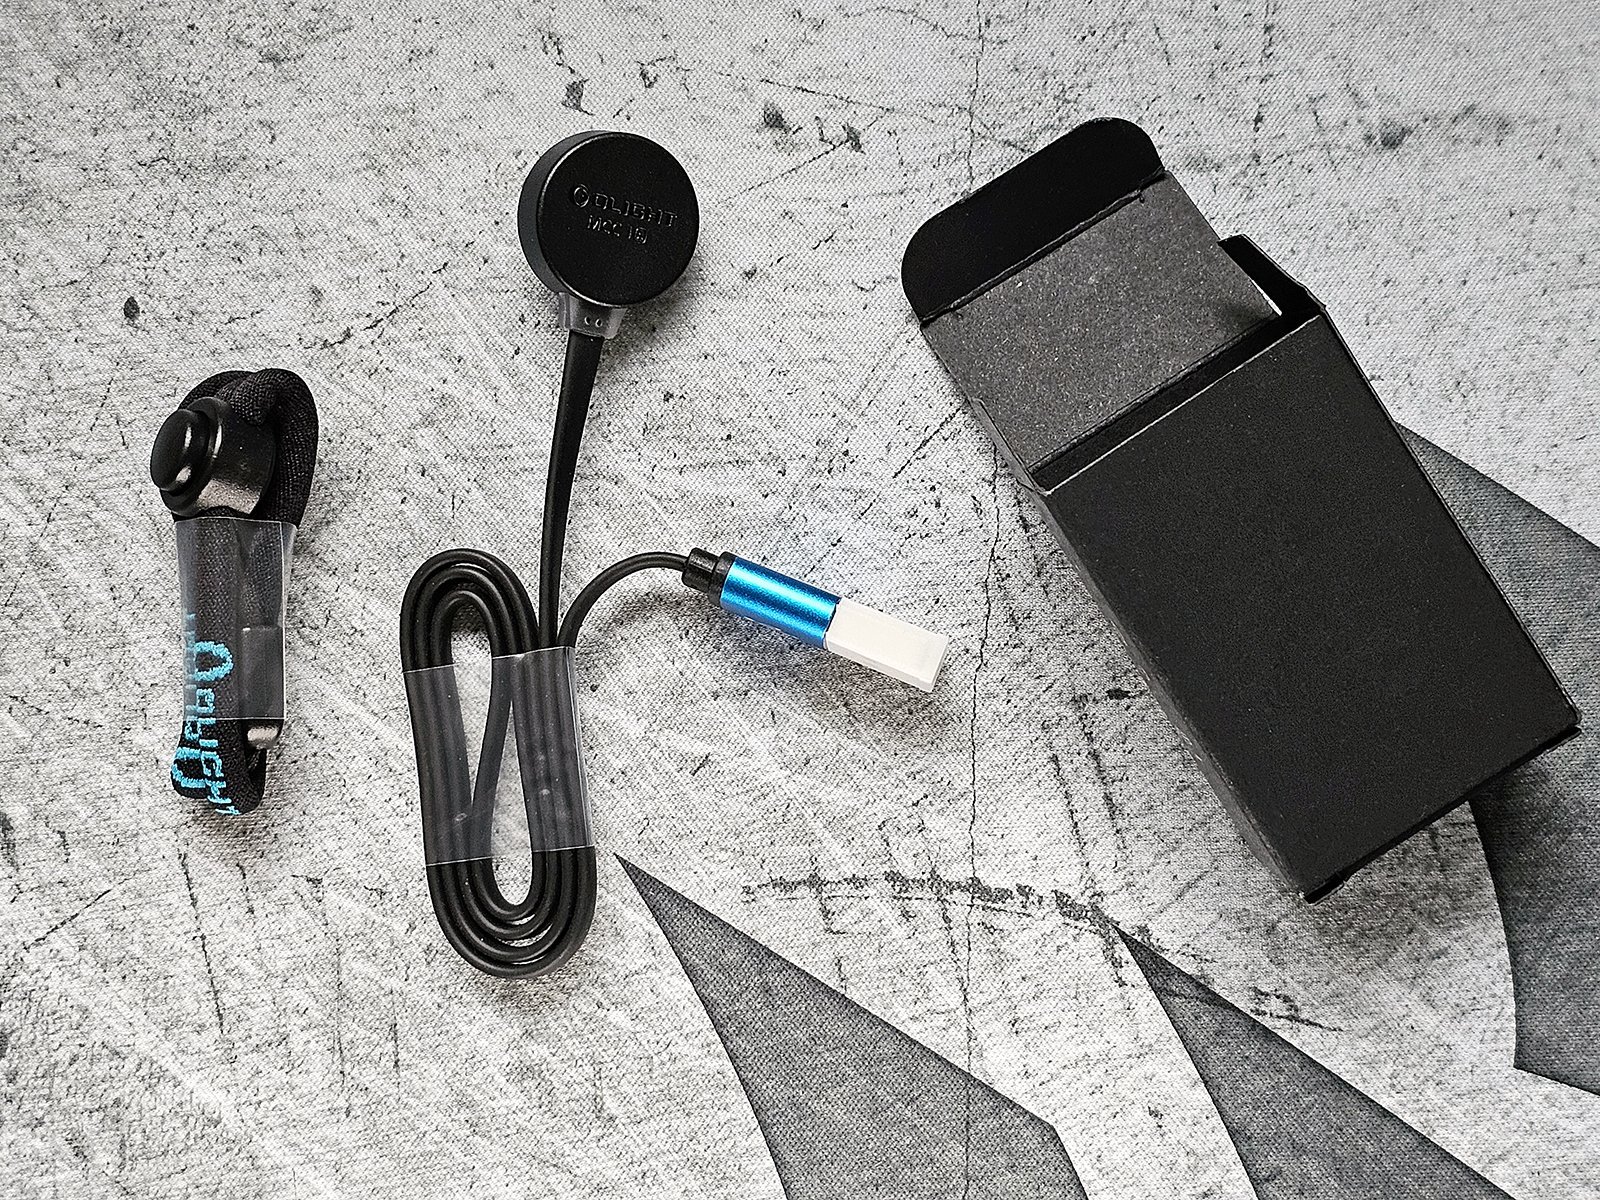
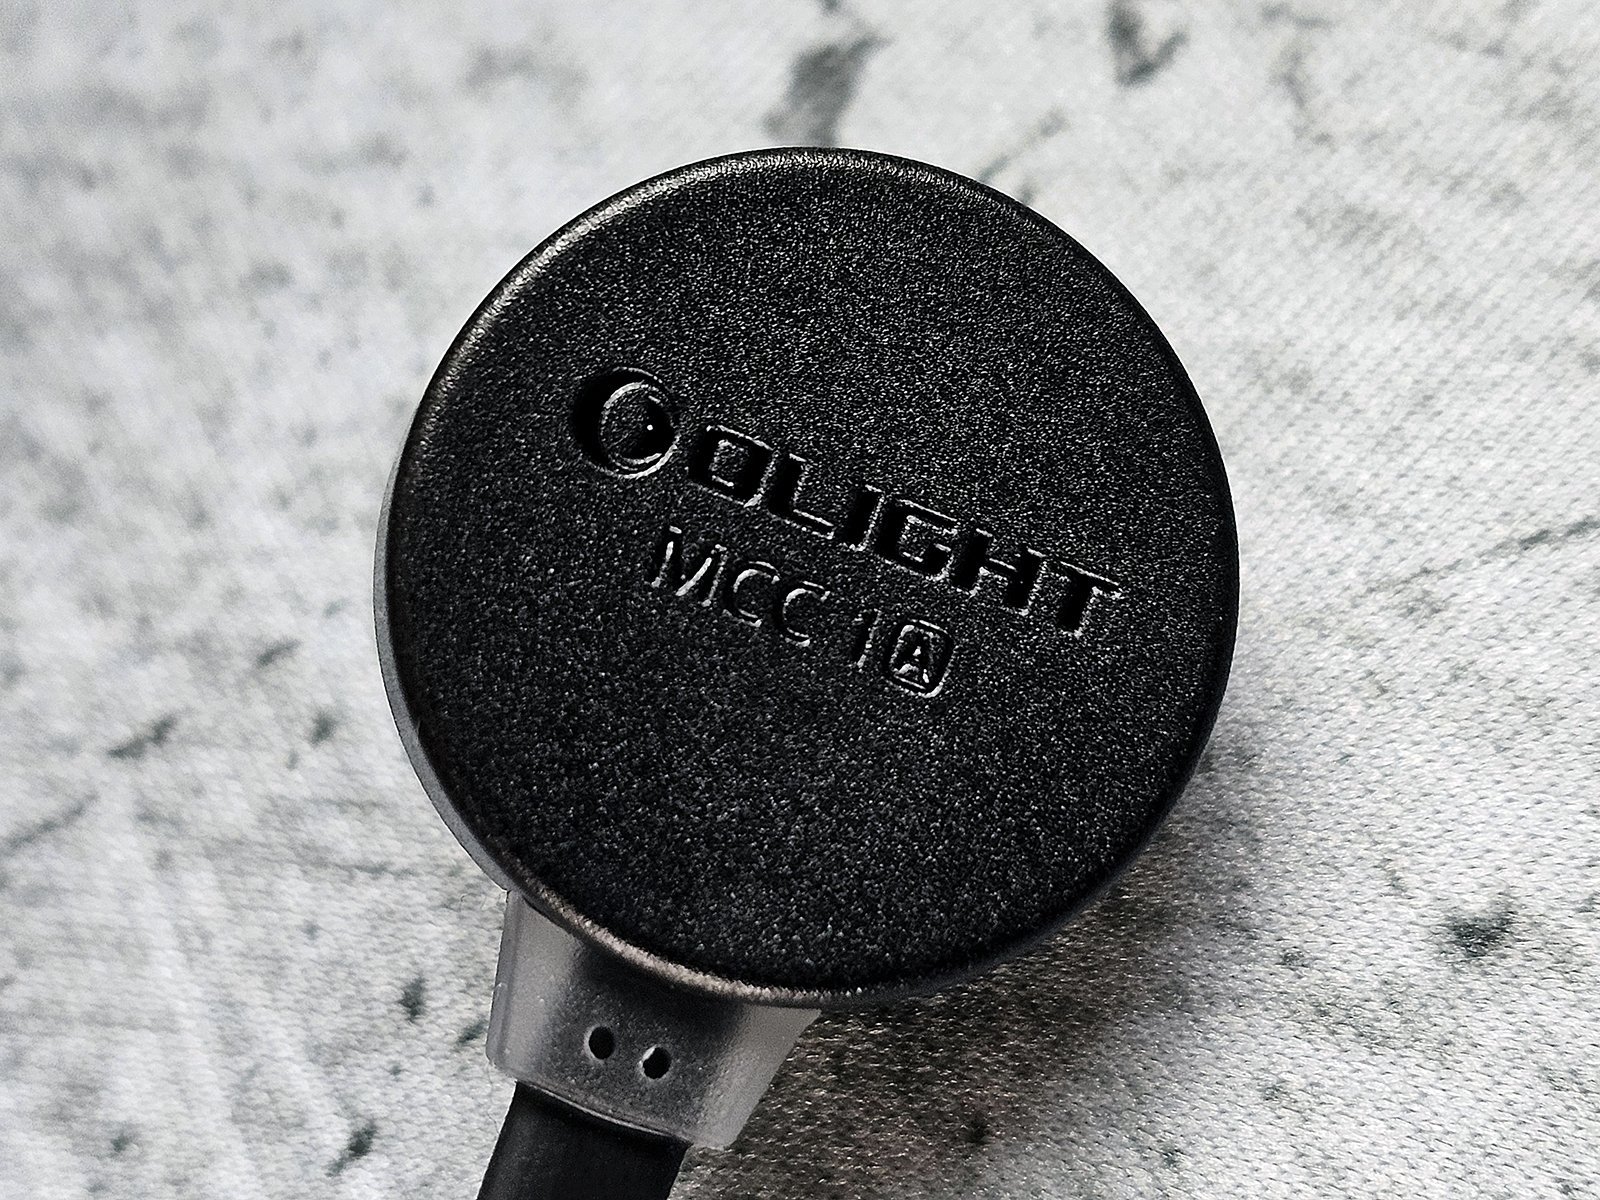
The cable has a magnetic end which attaches to the tail of the torch to charge it, as is the norm with Olight torches. This particular version is rated at 1A.
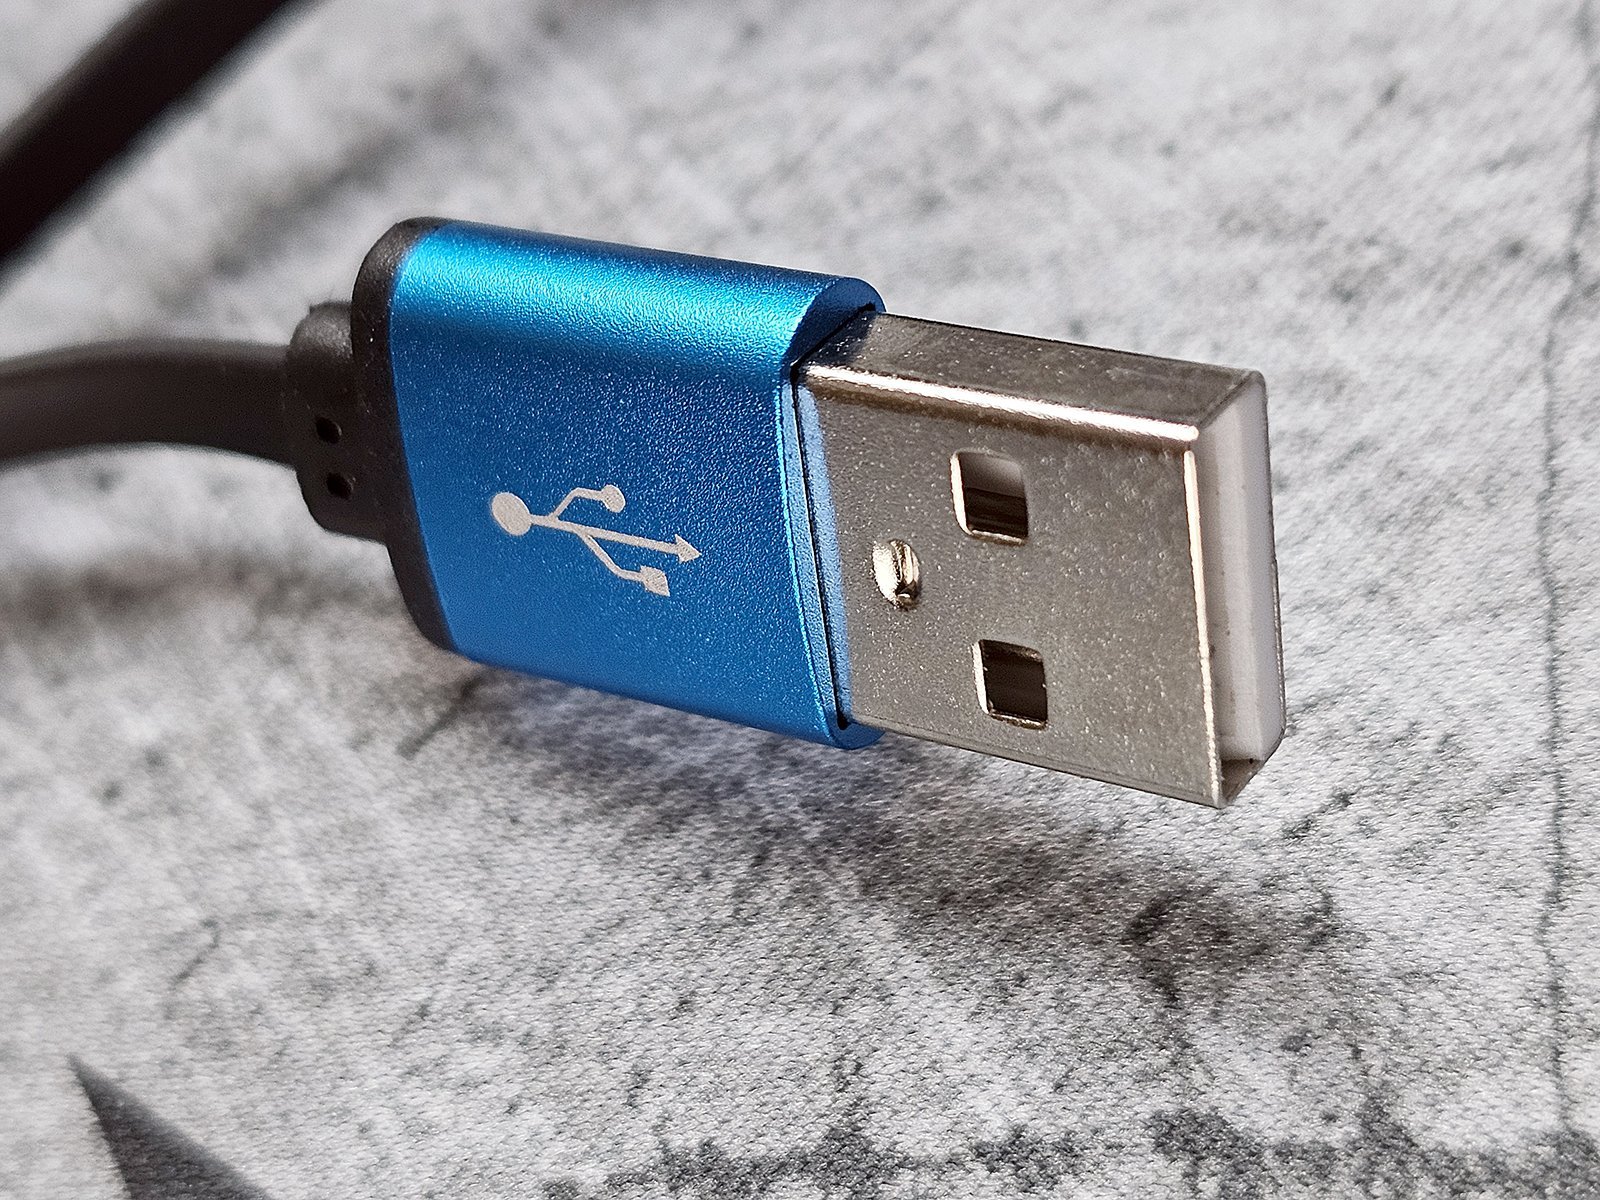
The other side of the charging cable is a standard USB type A plug. I believe it's time to move to USB C for all devices as USB A is bulky and not reversible while most phone chargers now come with USB C.
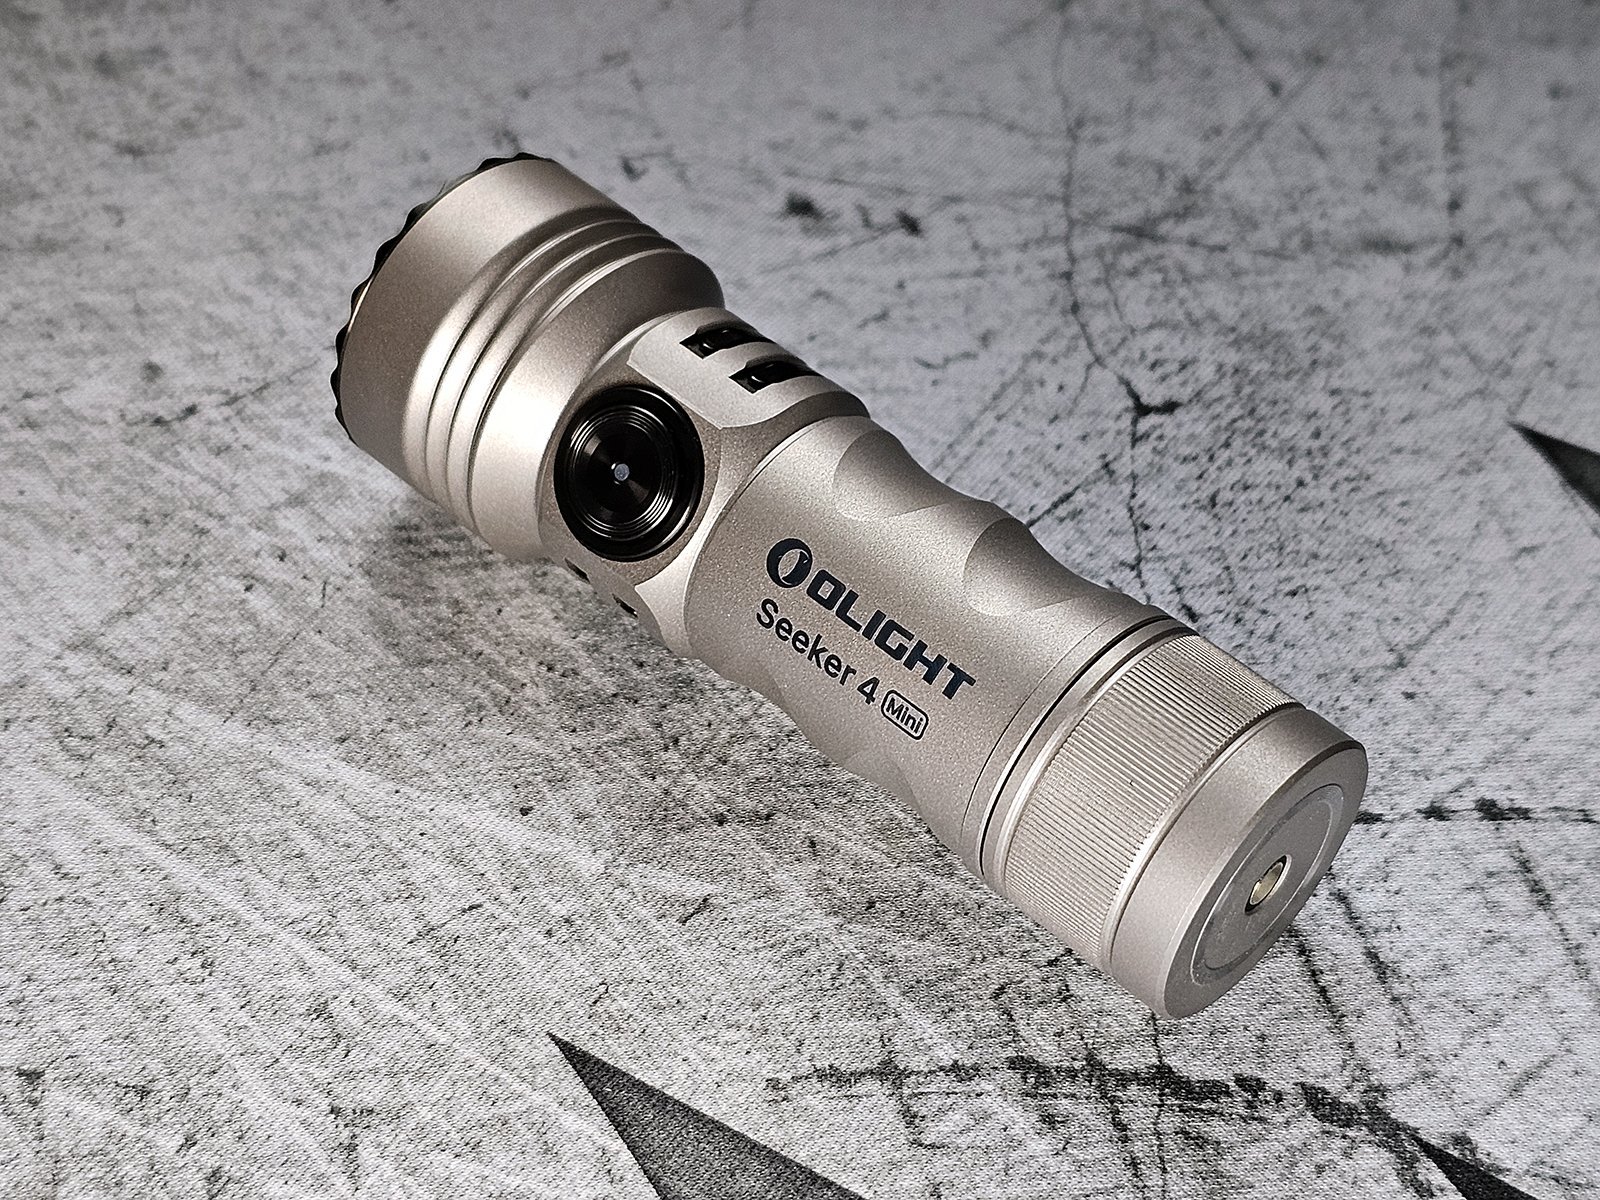
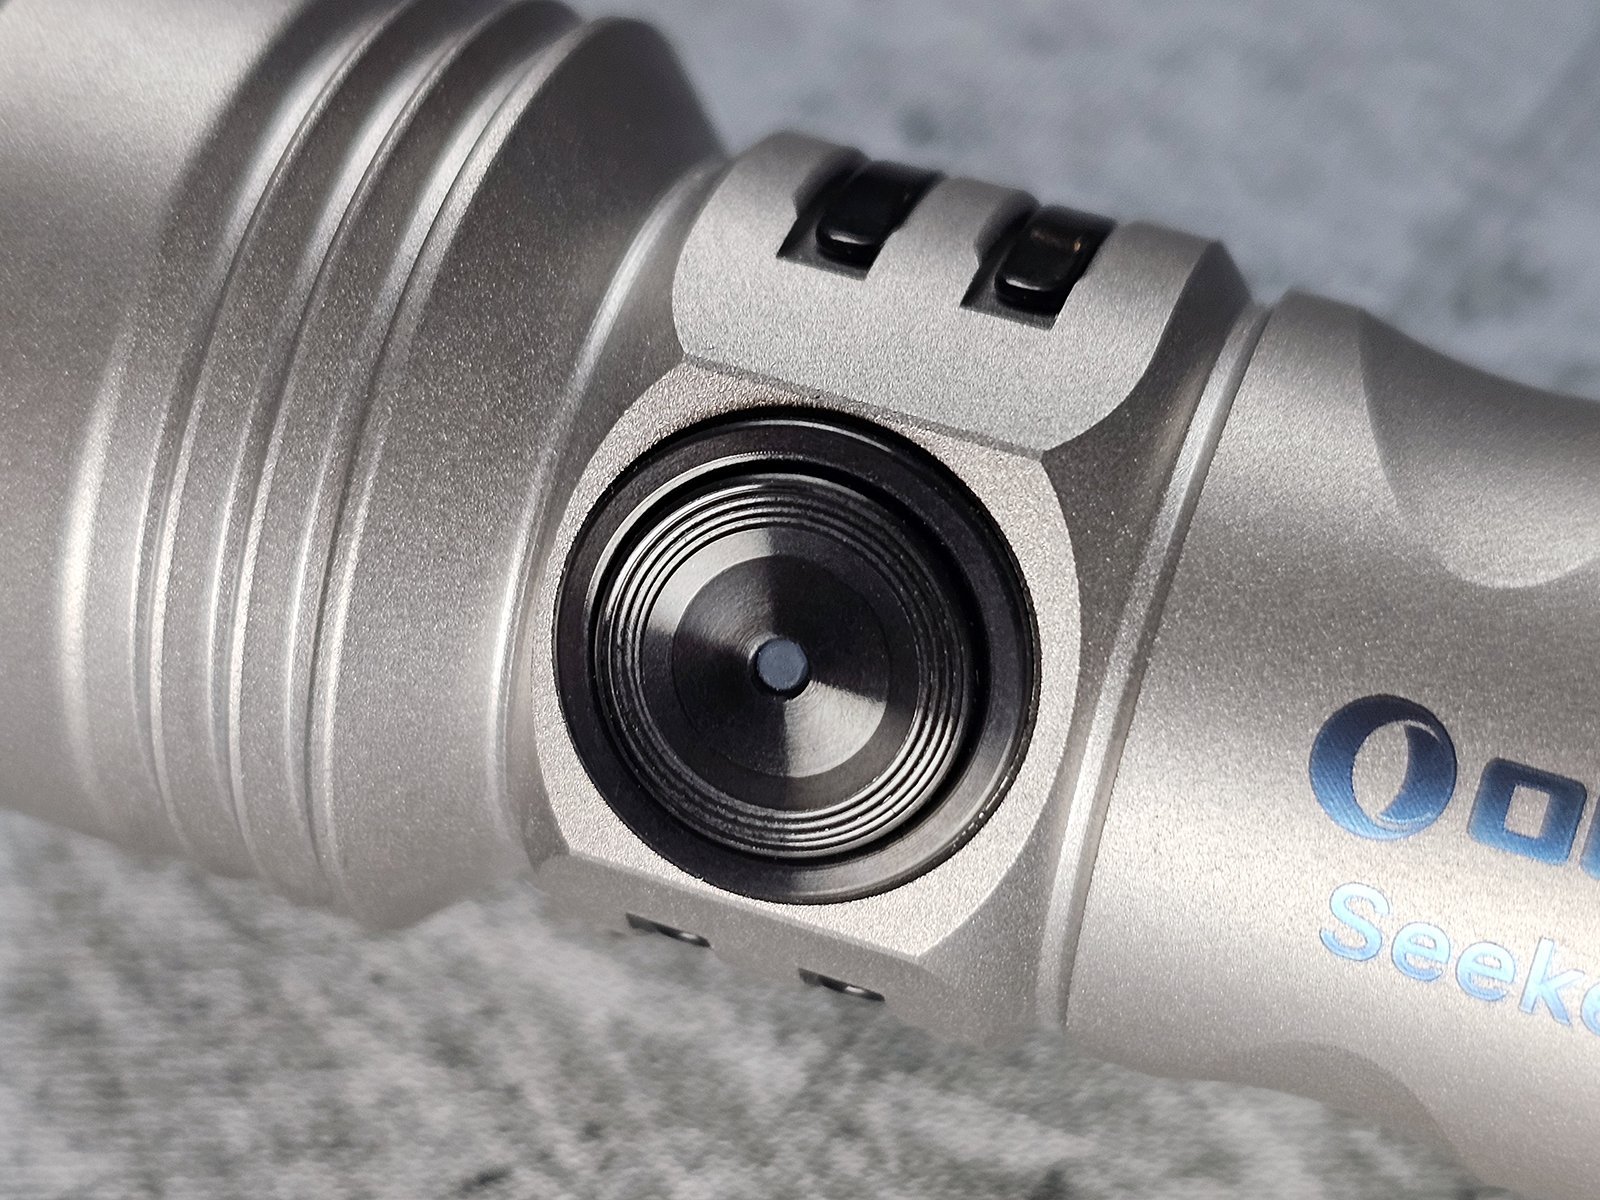
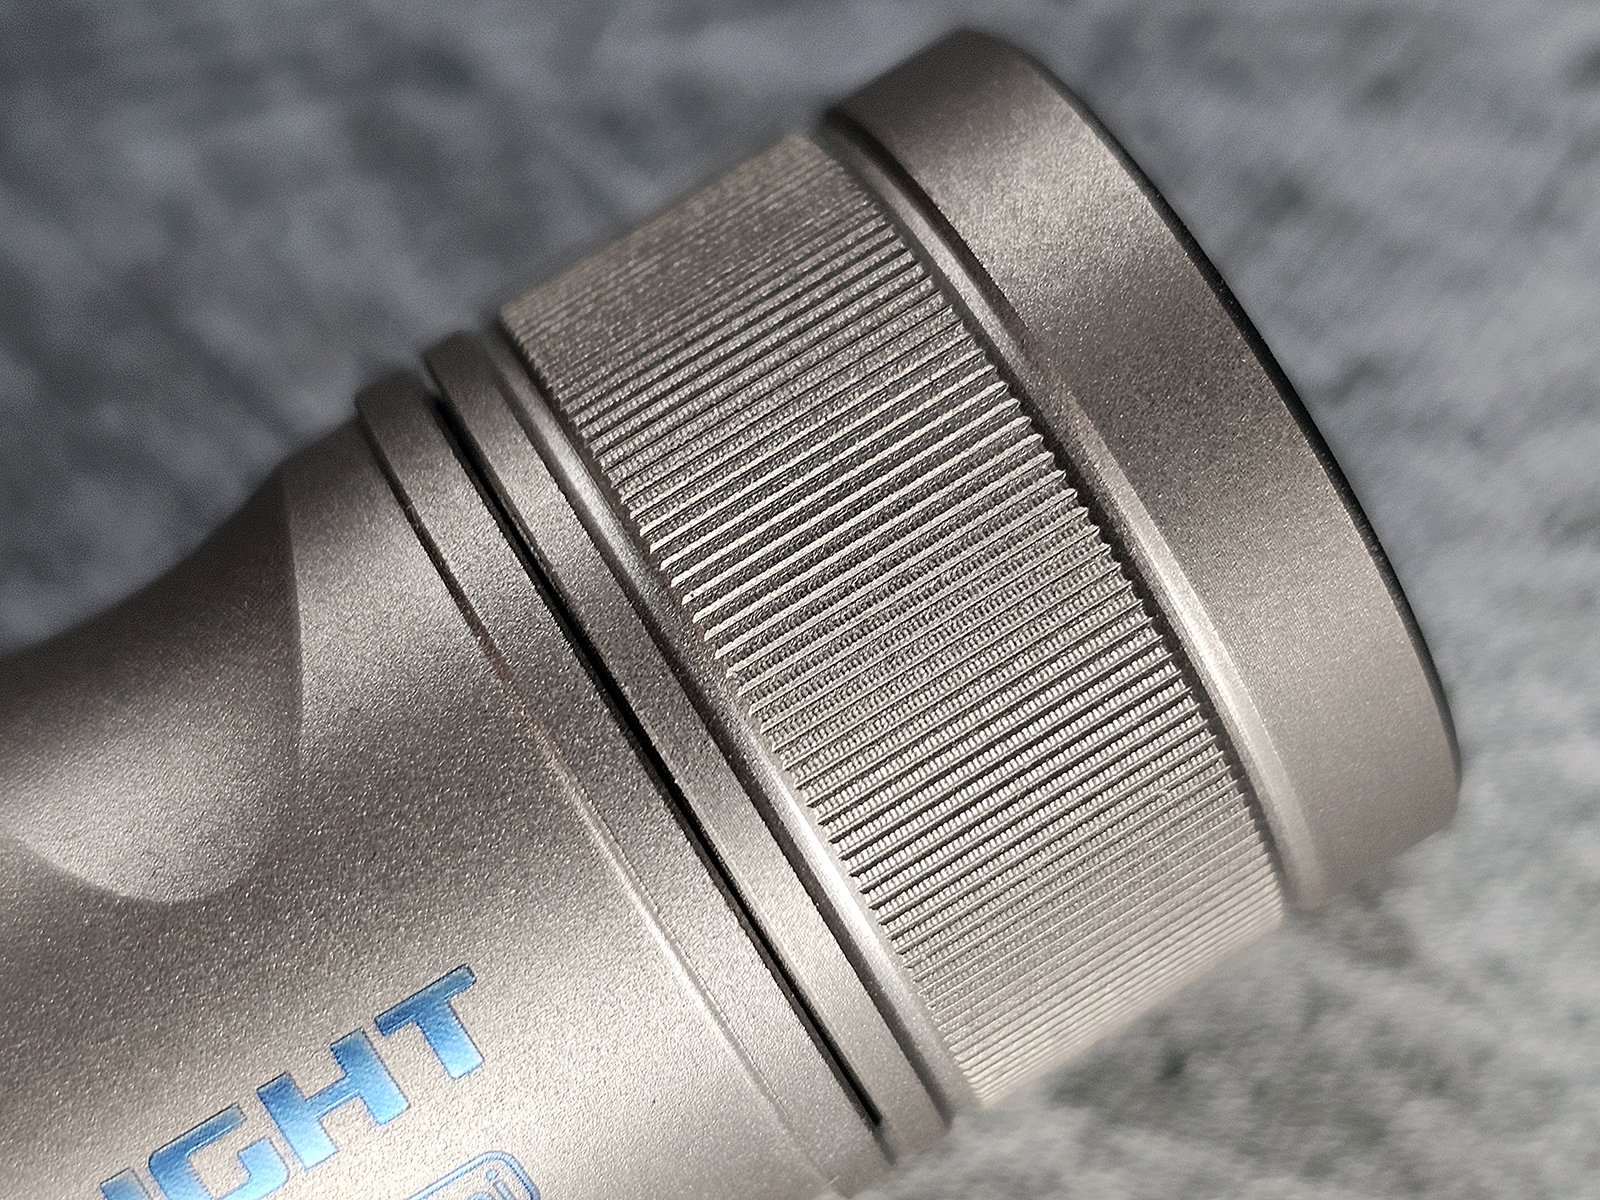
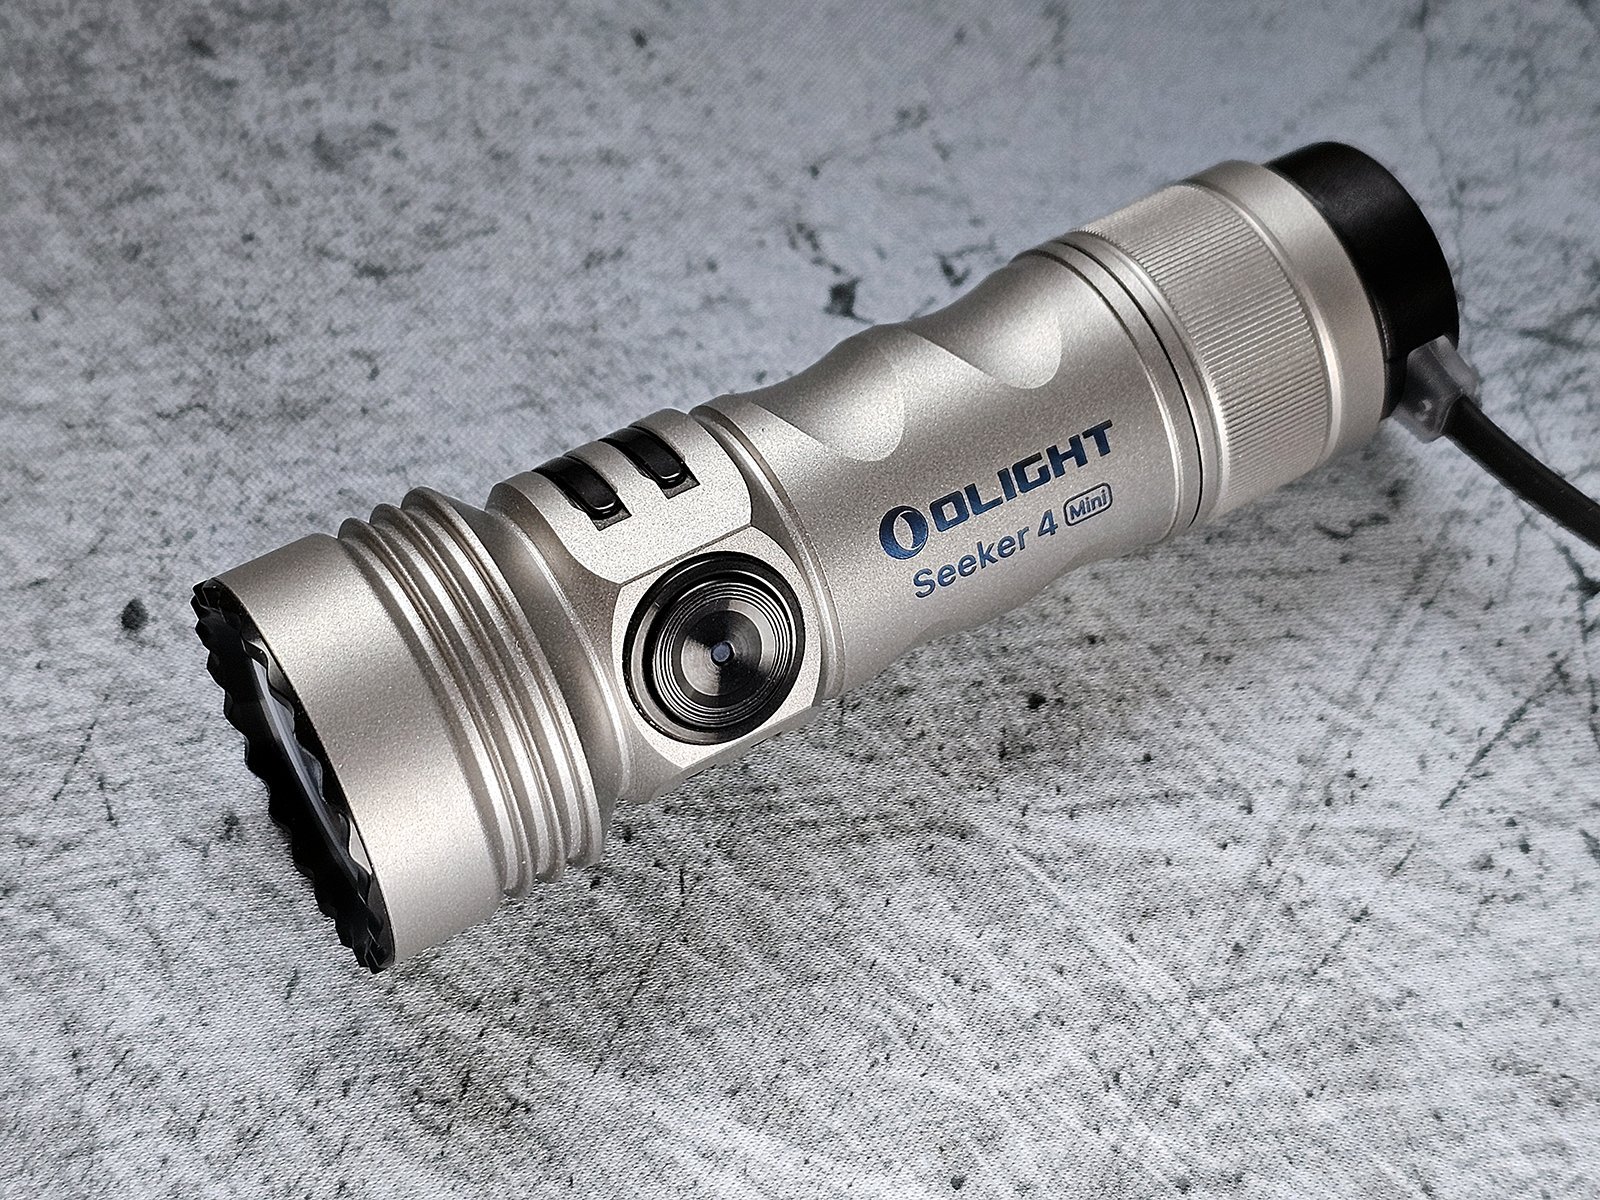
The Olight Seeker 4 Mini Ti is a nice EDC torch with a rather large head and a side button.
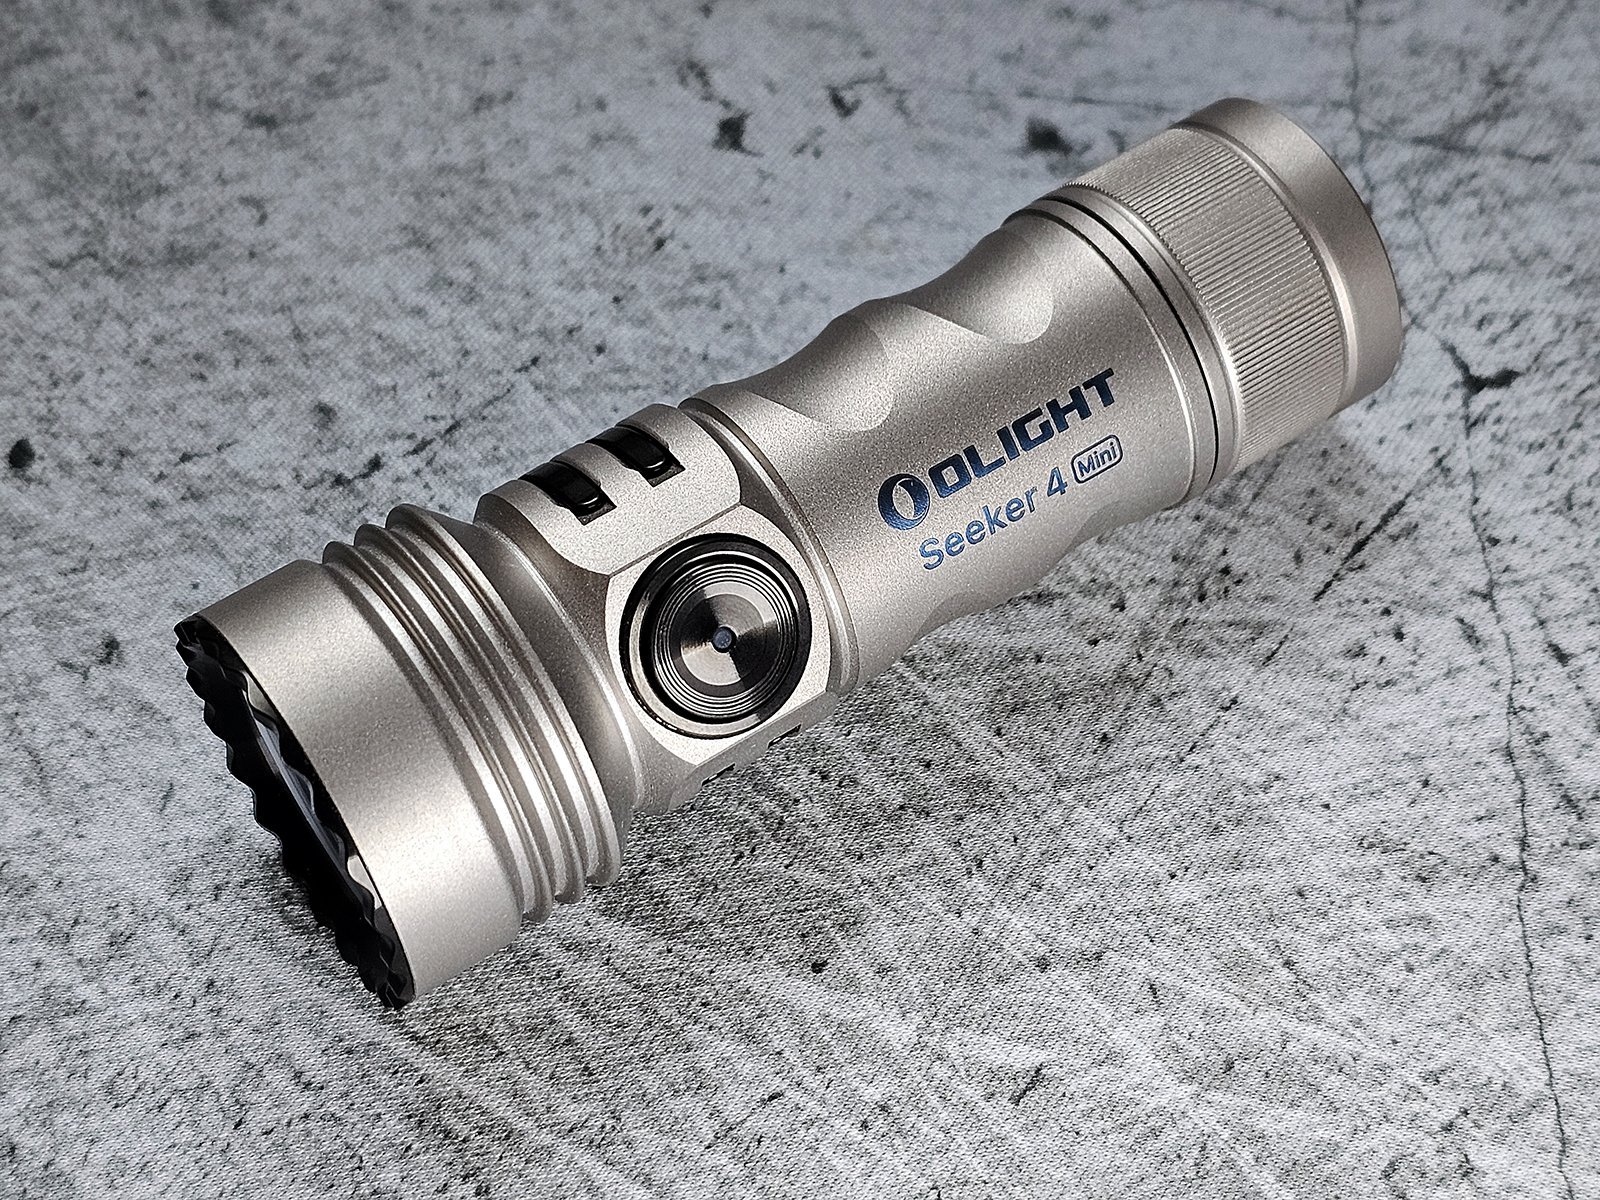
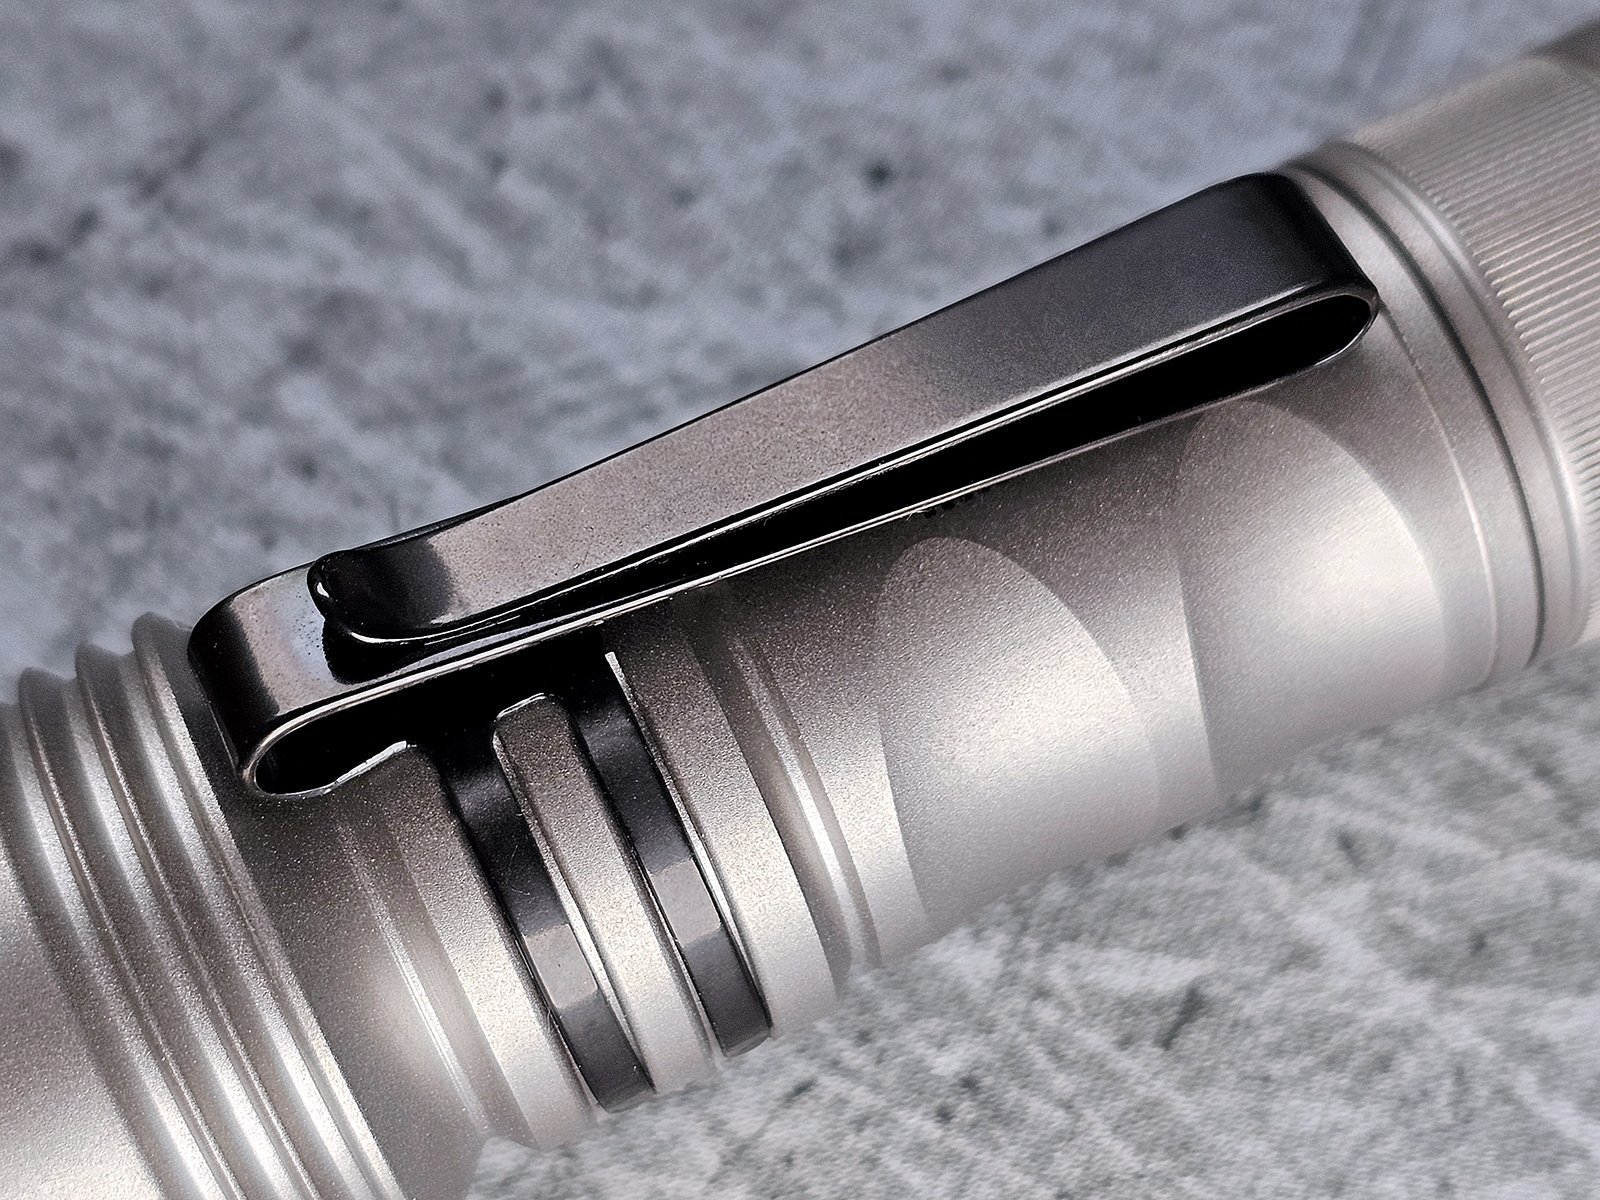
The button is made of metal and features an indicator LED in the middle. on the other side of the button there is a preinstalled, bidirectional clip, which is not deep carry. It is functional but not the best looking clip.
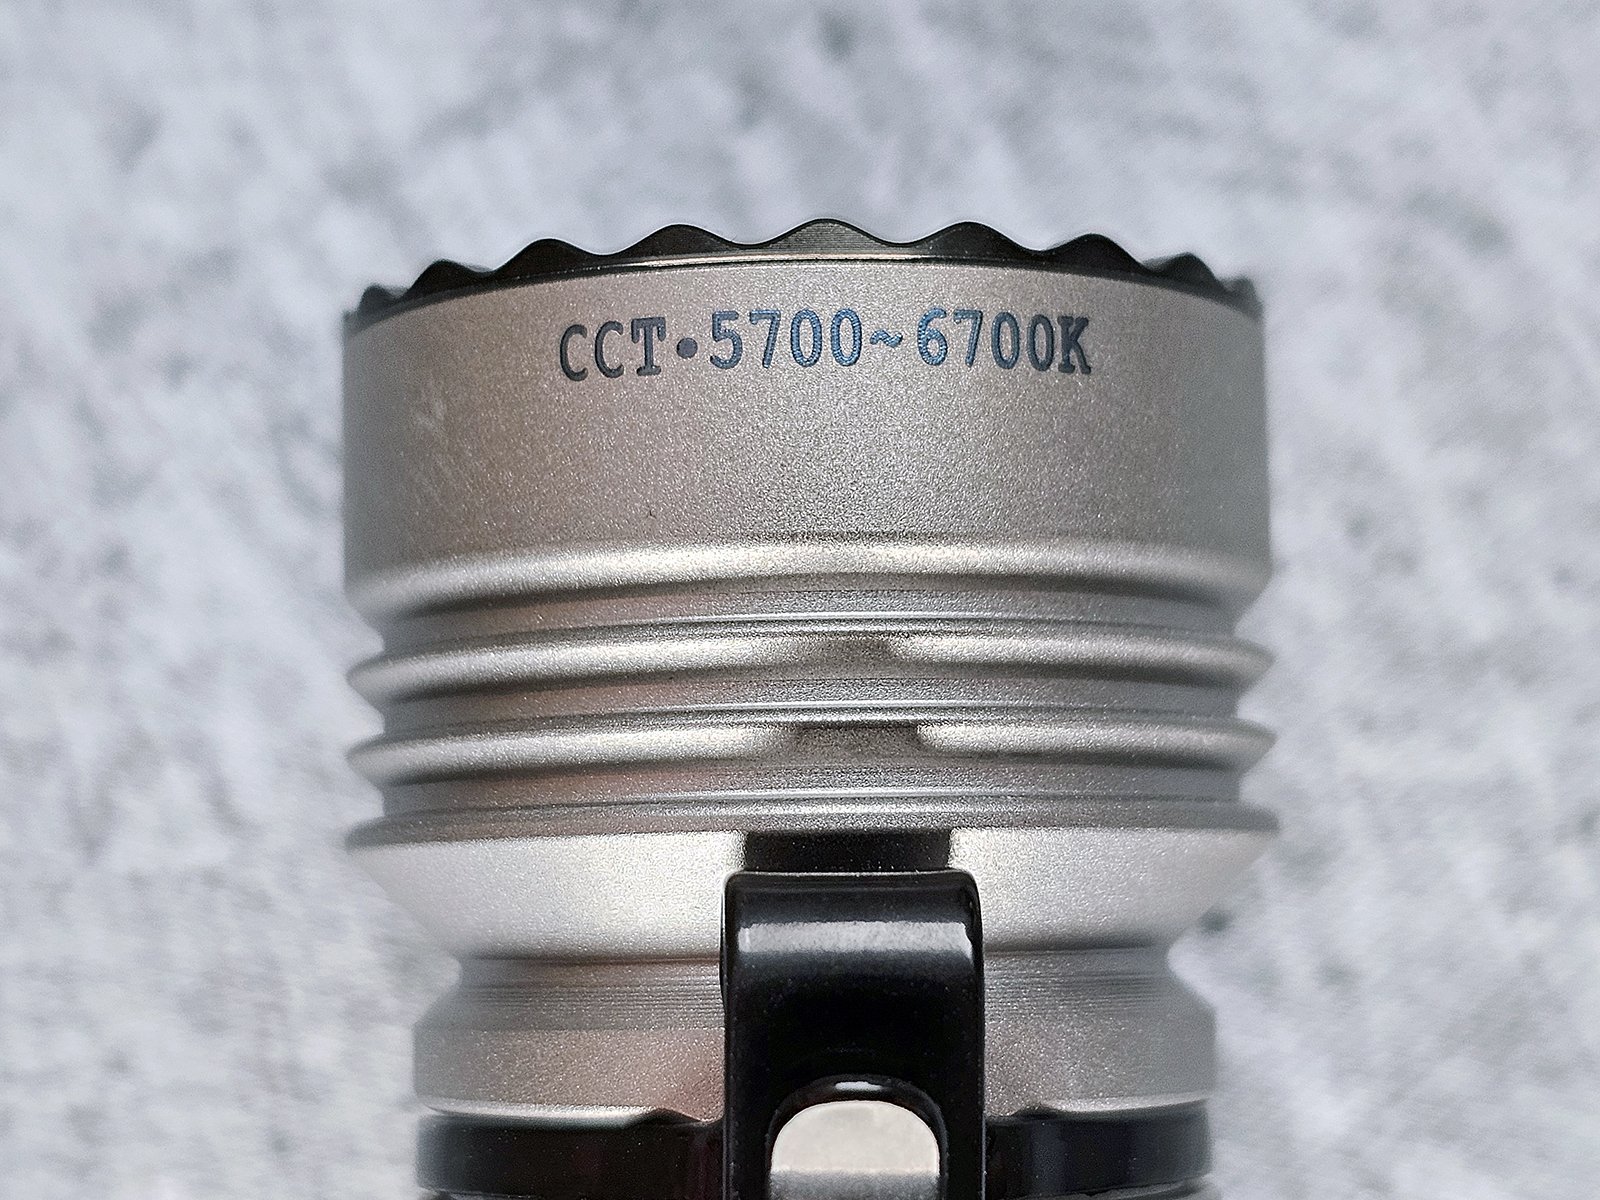
The black crenelated bezel is not aggressive and will allow light to spill if the torch is placed head down on a table, which is helpful. The CCT is indicated to be between 5700K and 6700K.
The tail cap is simple and has some texturing to facilitate removal and installation.
UV light is blocked by TIR optics, which forced Olight to use a reflector and lens on this torch. This is a much more reliable and robust configuration, as TIR optics are plastic and can scratch or even melt if used while contaminated. The reflector needs to be physically larger than a TIR optic to focus light effectively, which led to a larger diameter head, frankly on the higher edge of pocketable, but it is a price I am willing to pay to have a reflector instead of a TIR.
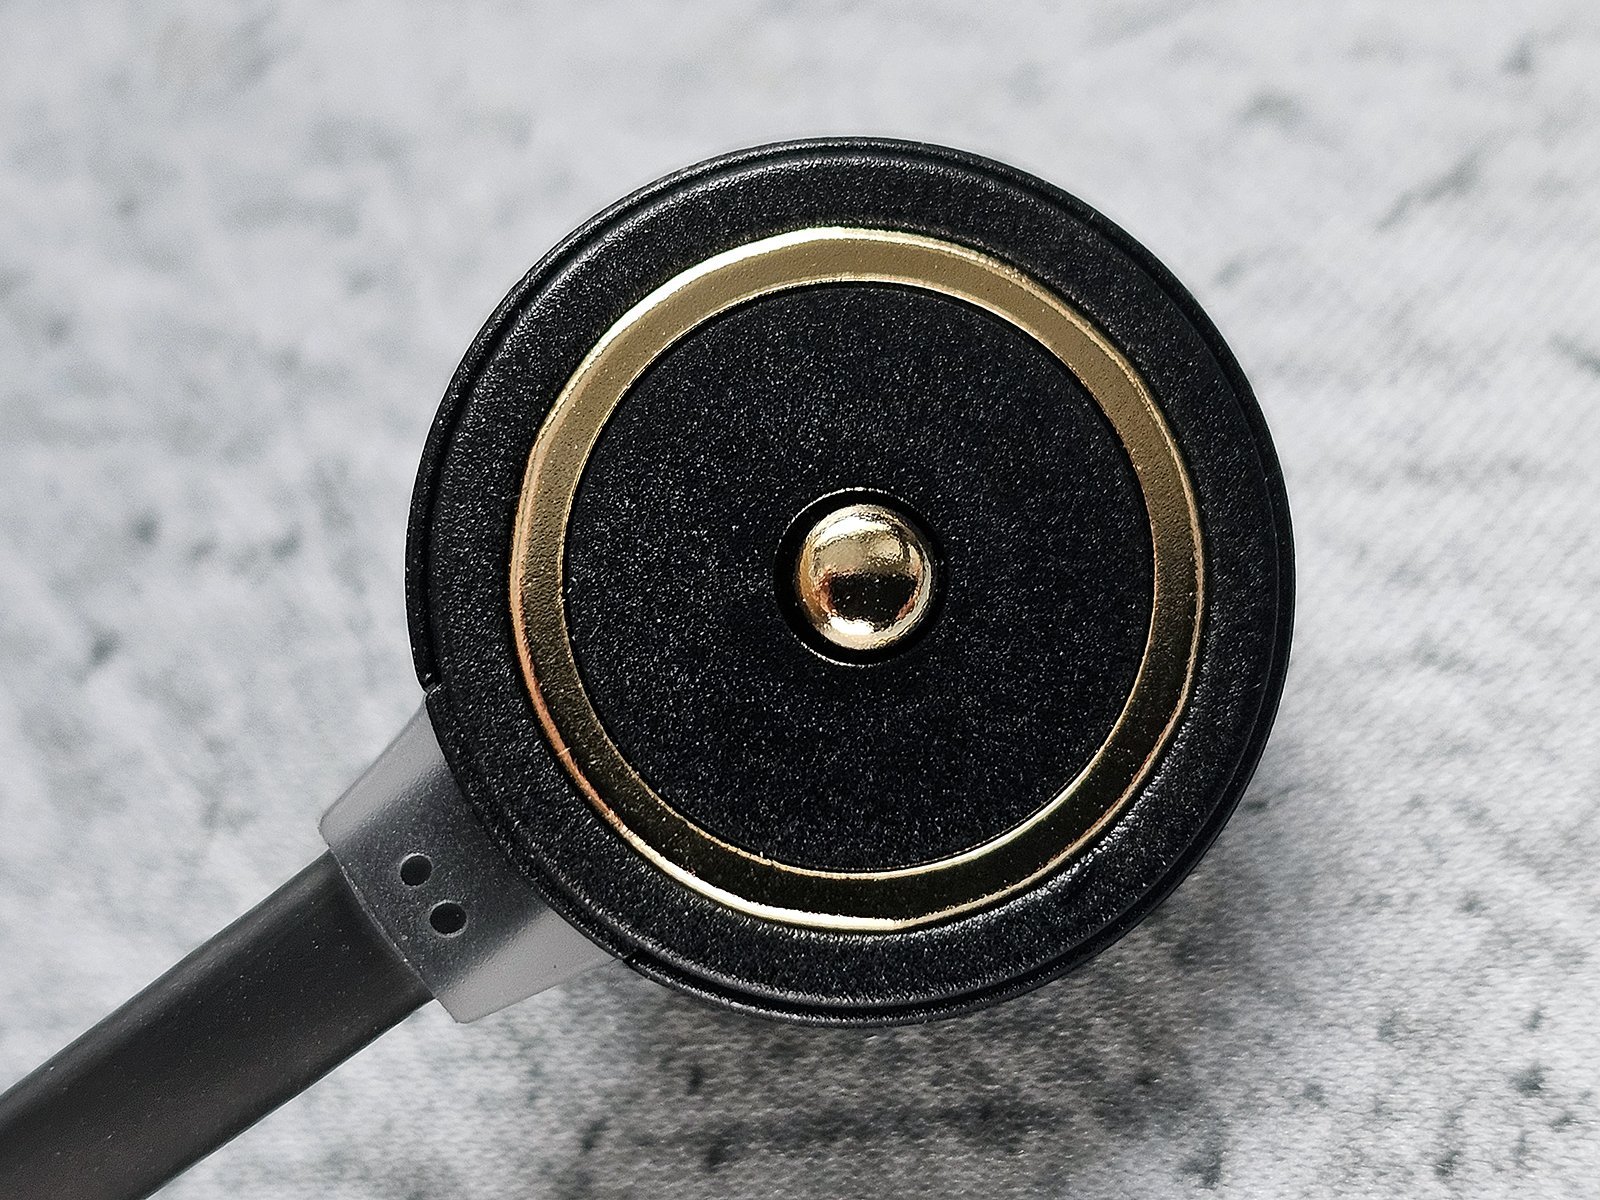
The tail end is the standard Olight design that allows the magnetic attaching of the charger.

Unscrewing the tail cap reveals the battery, with both of its ends covered by the insulating film.
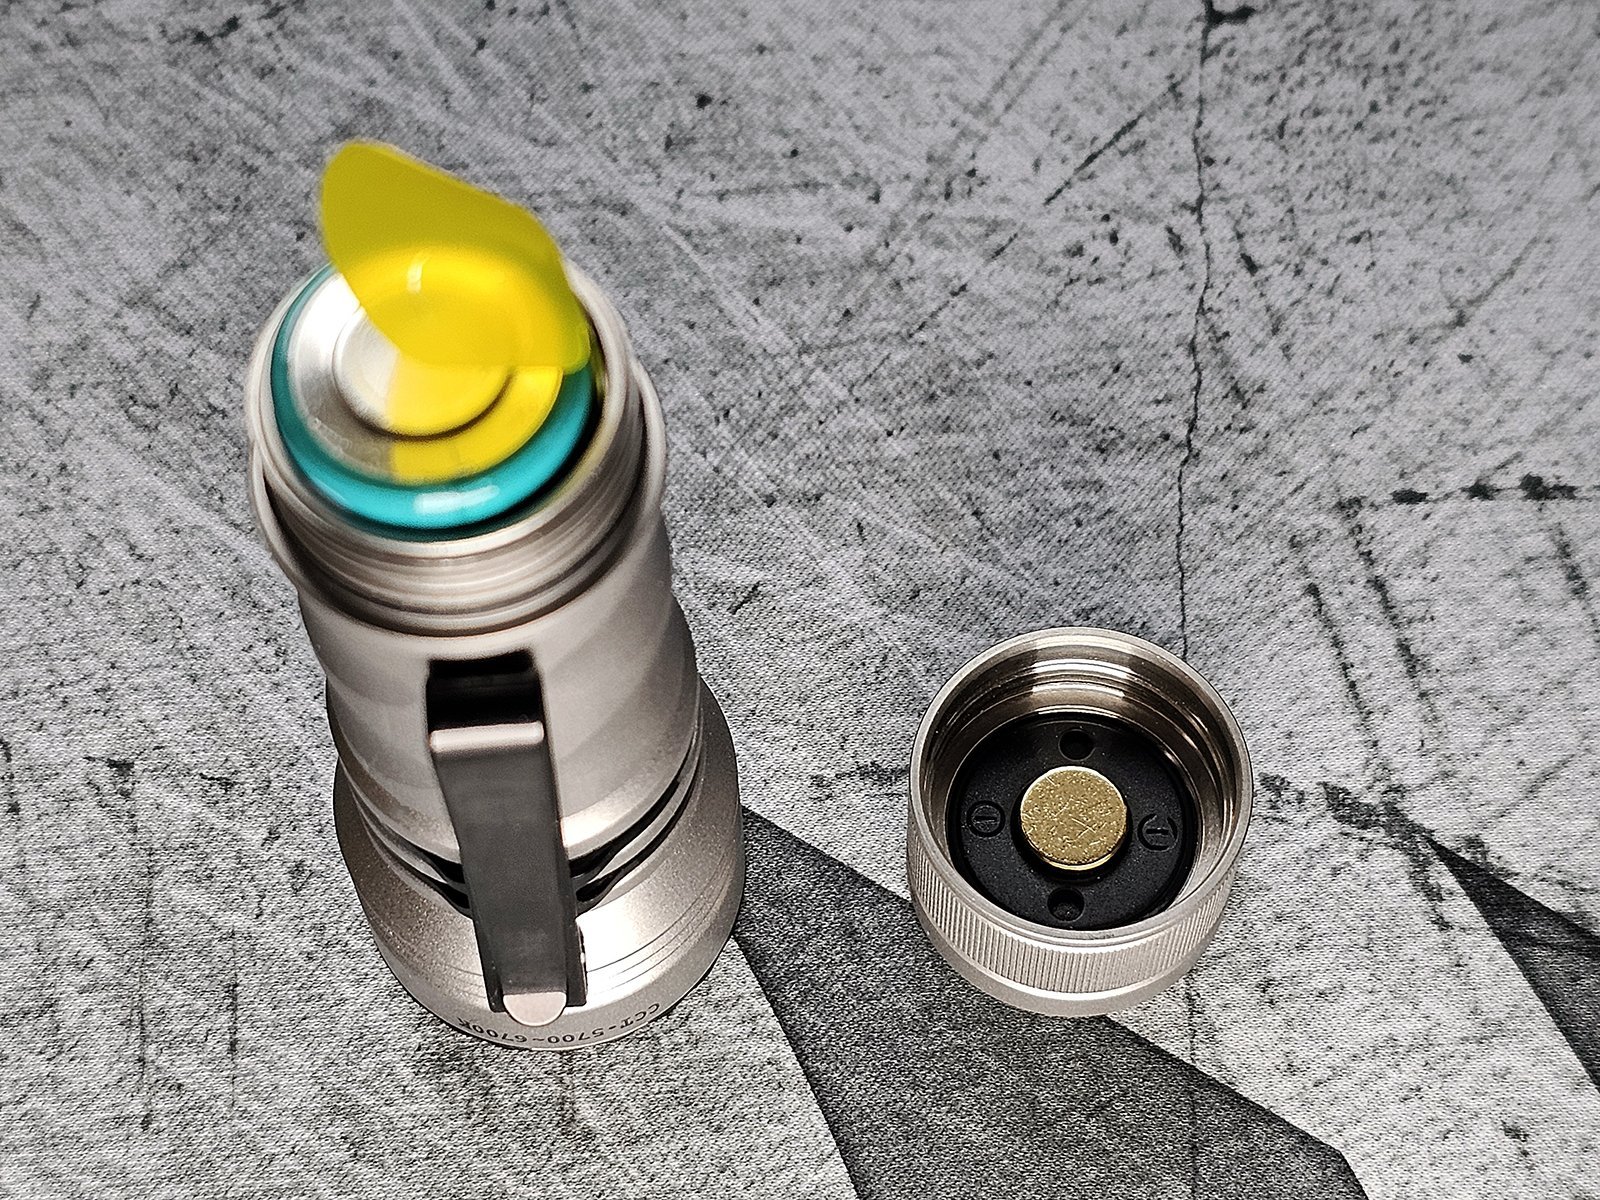
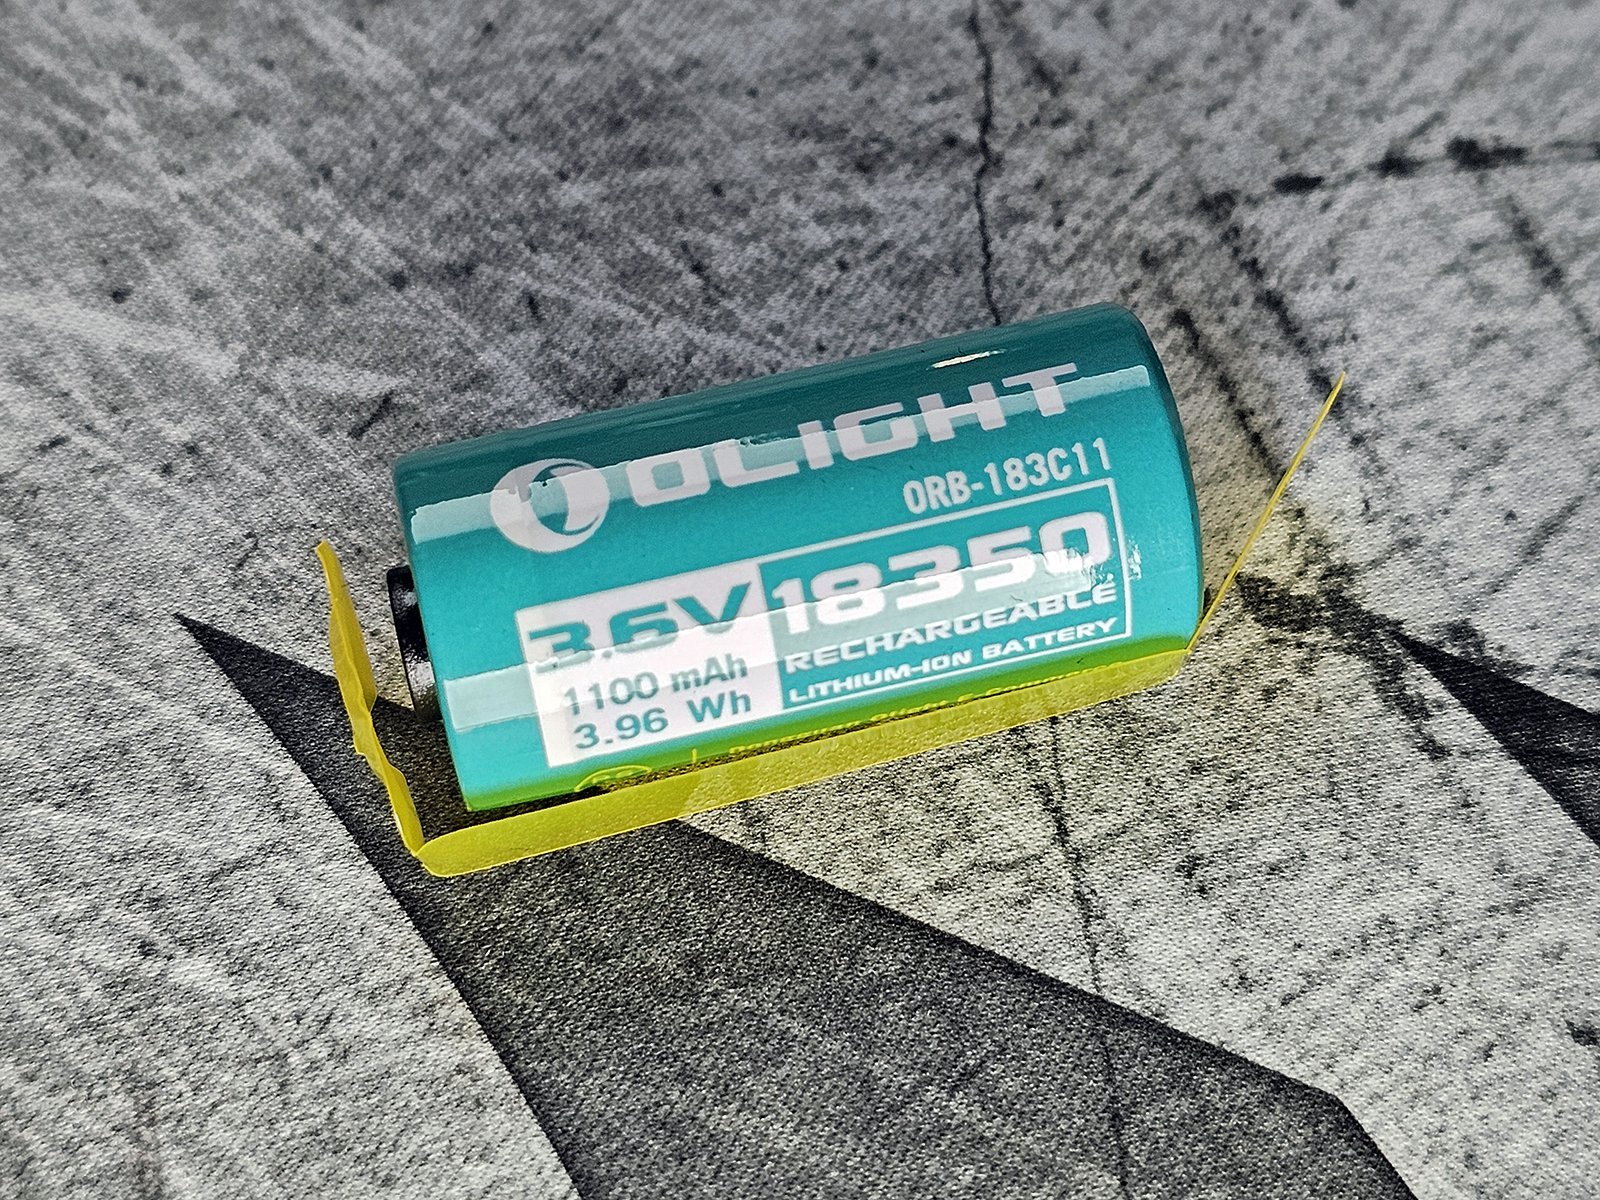
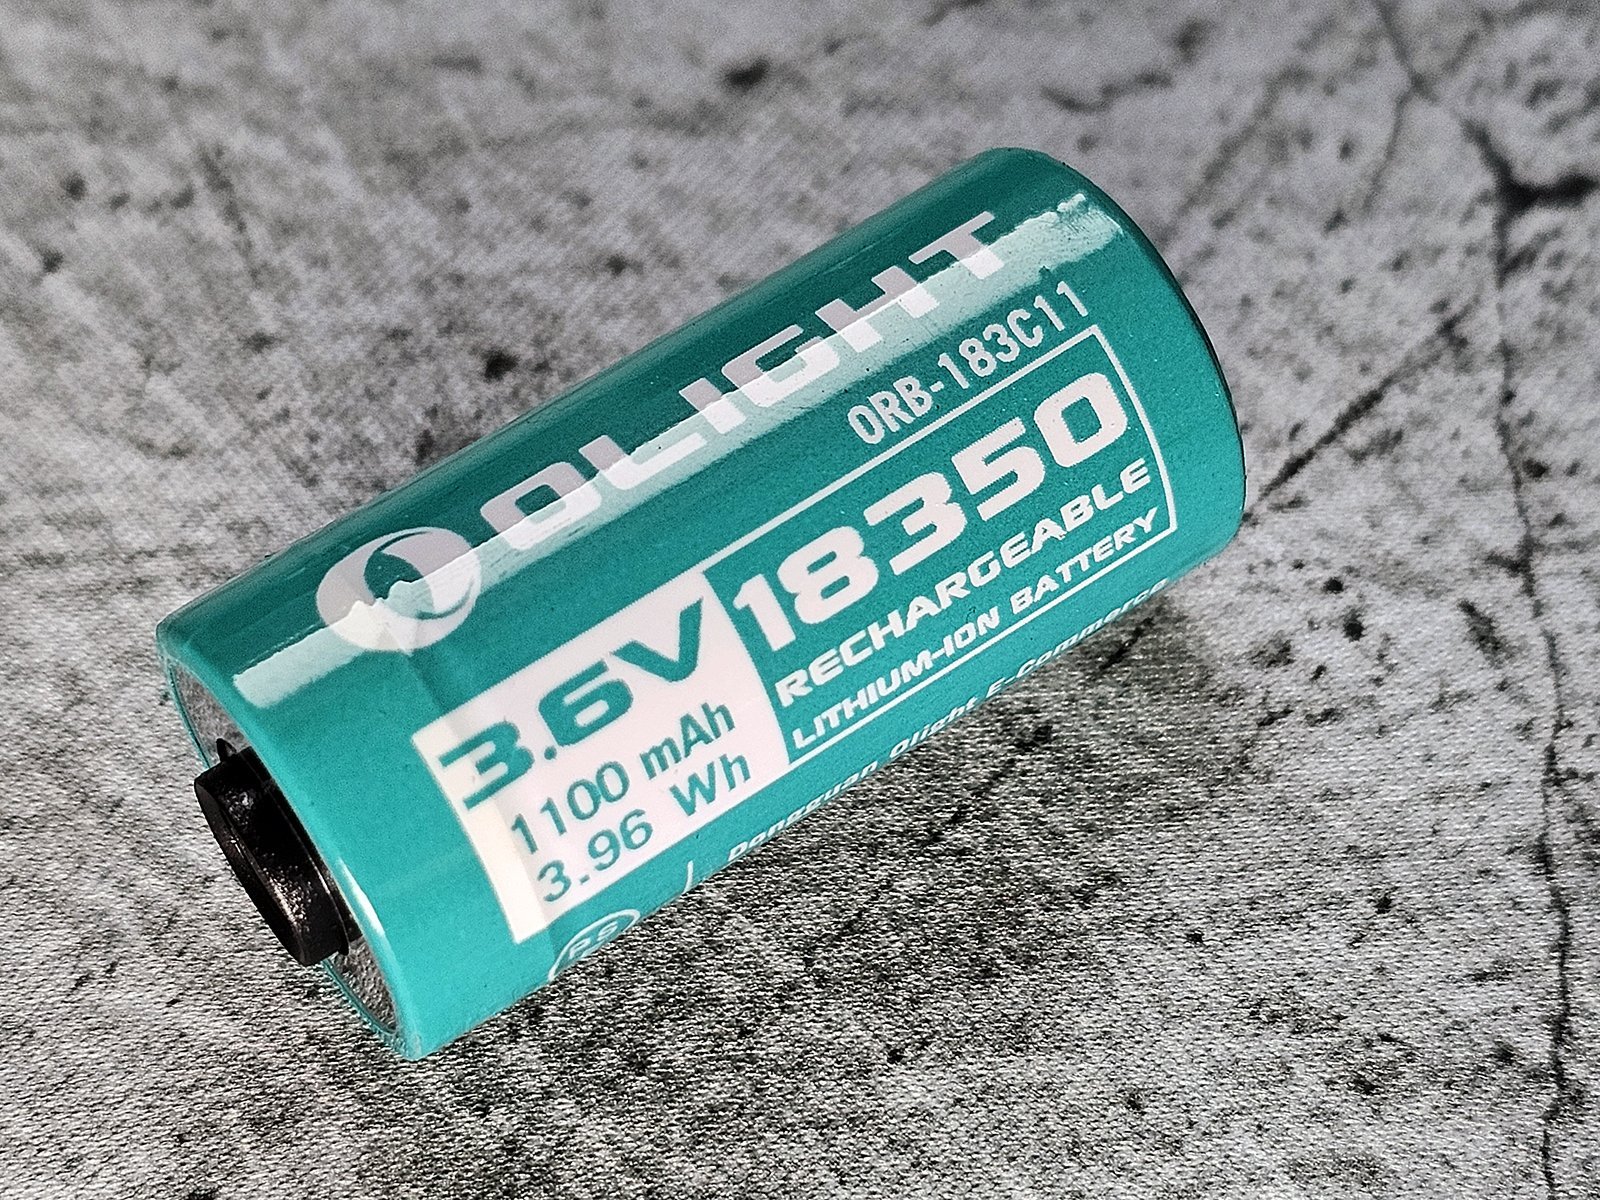
The battery is an Olight branded 18350 Li-Ion with a rated capacity of 1100mAh or 3.96Wh and it is proprietary.
The negative pole is standard, but the positive pole is surrounded by a black plastic insulator and another negative pole around that. This offers both the positive and negative poles on the same side of the battery.

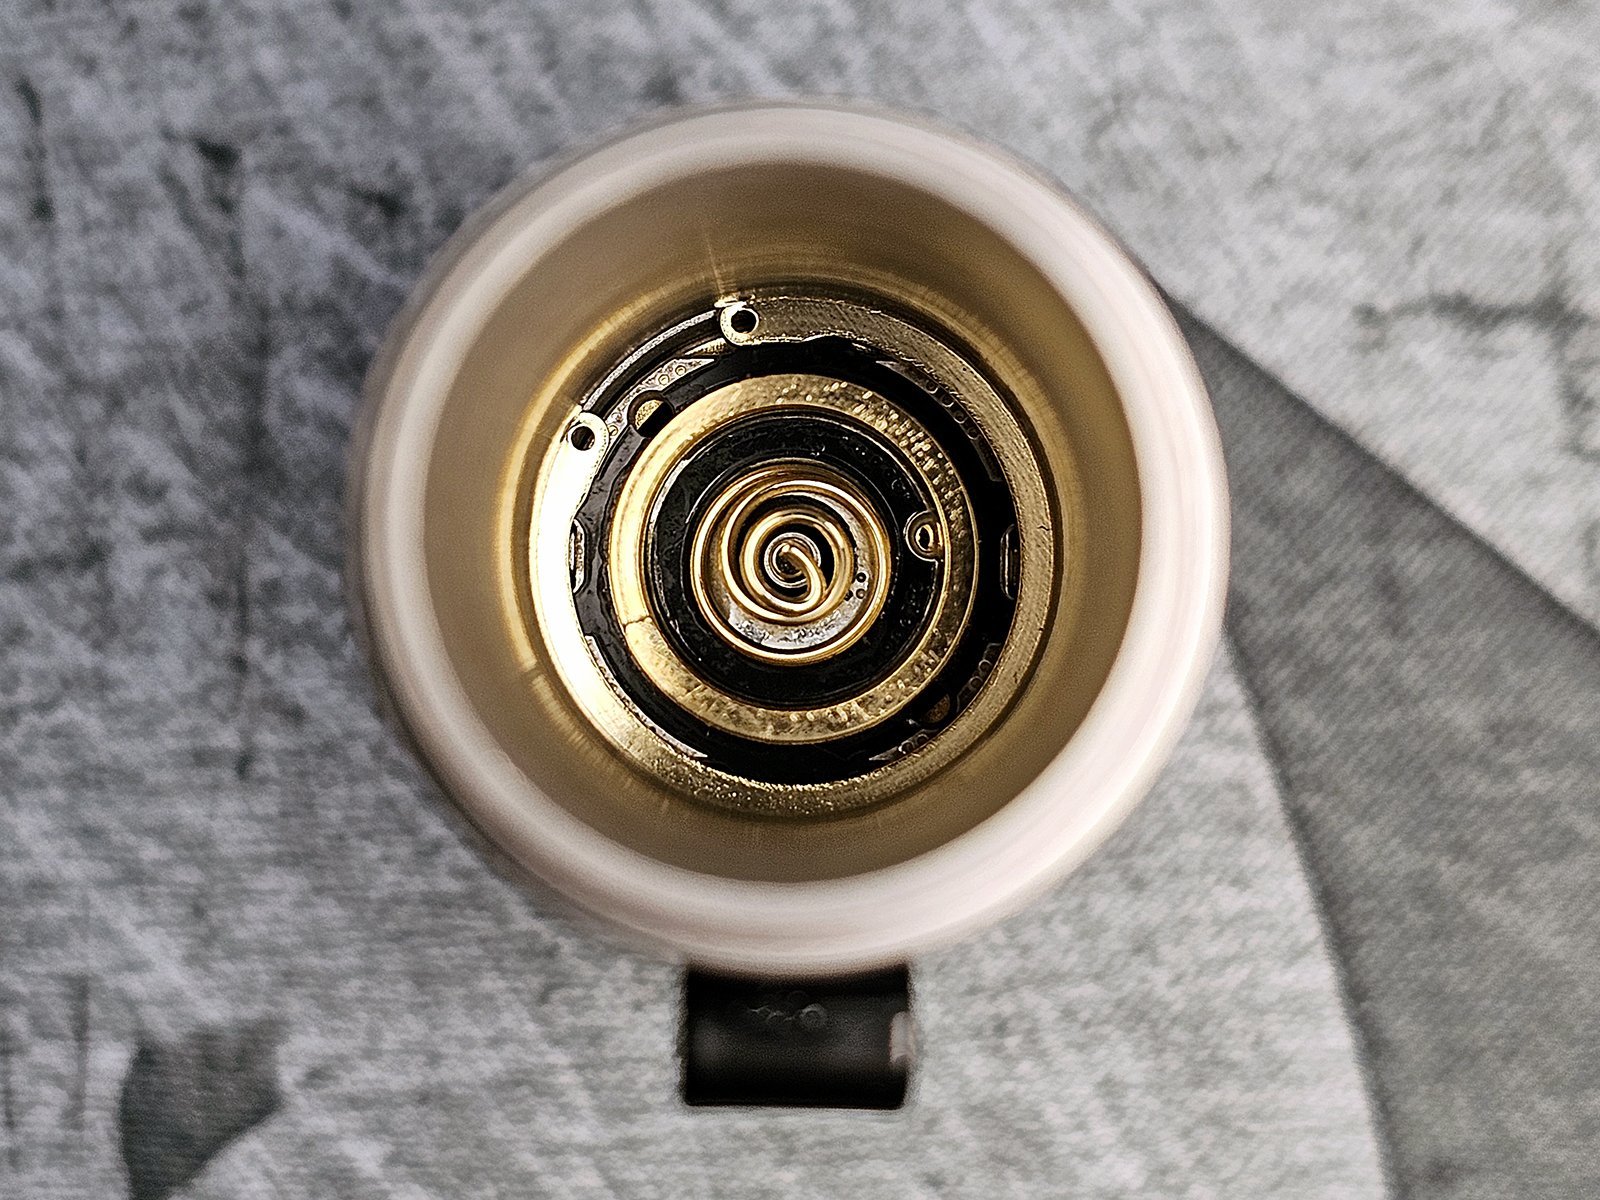
Inside the battery tube, we can see where both positive and negative poles make a connection on the back of the driver, the positive with a spring and the negative with a circle surrounding the spring.
There is also a holding ring keeping the driver in place, which seems to imply that the driver may be removable, although I did not test that.
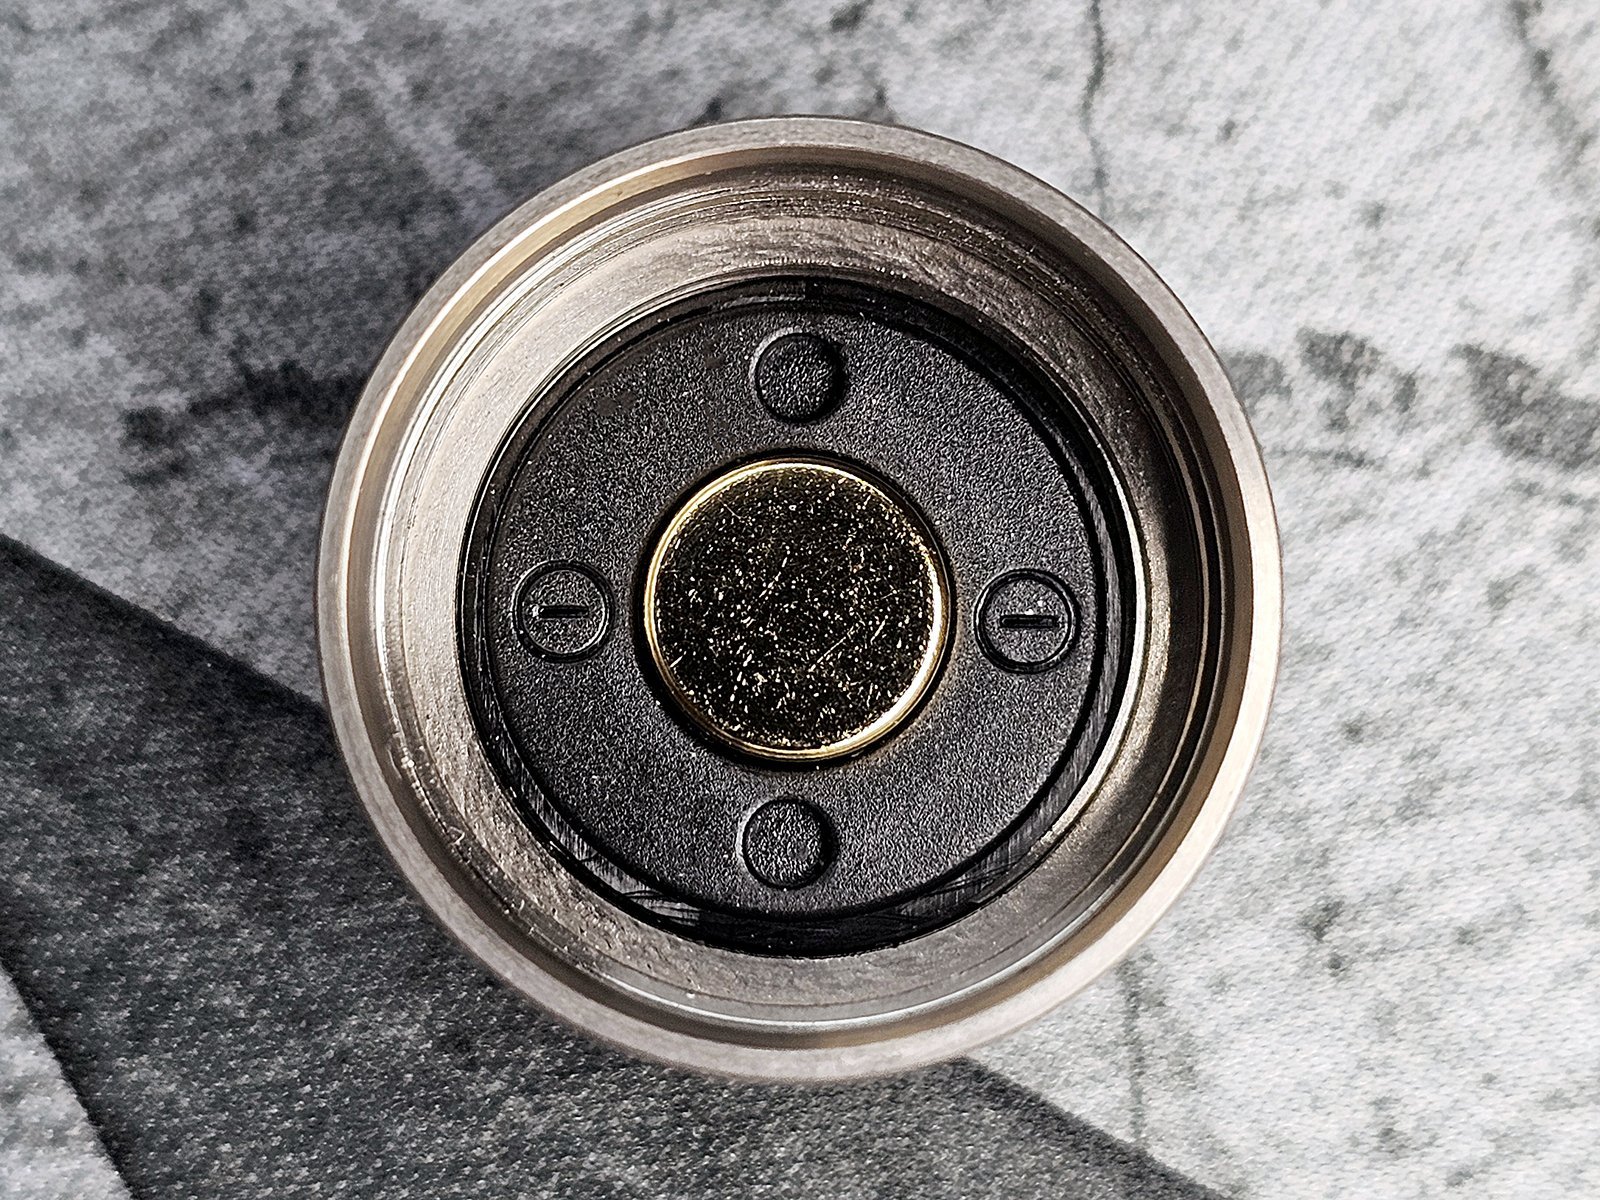
The inside of the tail cap has a spring loaded contact for the negative pole in the middle and an insulator around it. There is an internal tube that carries the positive contact of the charging cable to the driver side.
This complex design facilitates the magnetic charging but also removes the option for the torch to work with any other except the proprietary batteries, locking the user into an ecosystem. Granted, the battery does come included with the torch, but any replacements or extras will have to be purchased from Olight, at a premium price.
There are 2 sides to this argument. There are many that despise the proprietary battery and also having to carry a proprietary cable around to charge the torch, when we all carry USB C cables for our other devices anyway. There are also those who believe it is worth using the proprietary battery and carrying the extra cable for the convenience of the magnetically attached charging. I stand with the first crowd on this, but you can decide for yourselves.
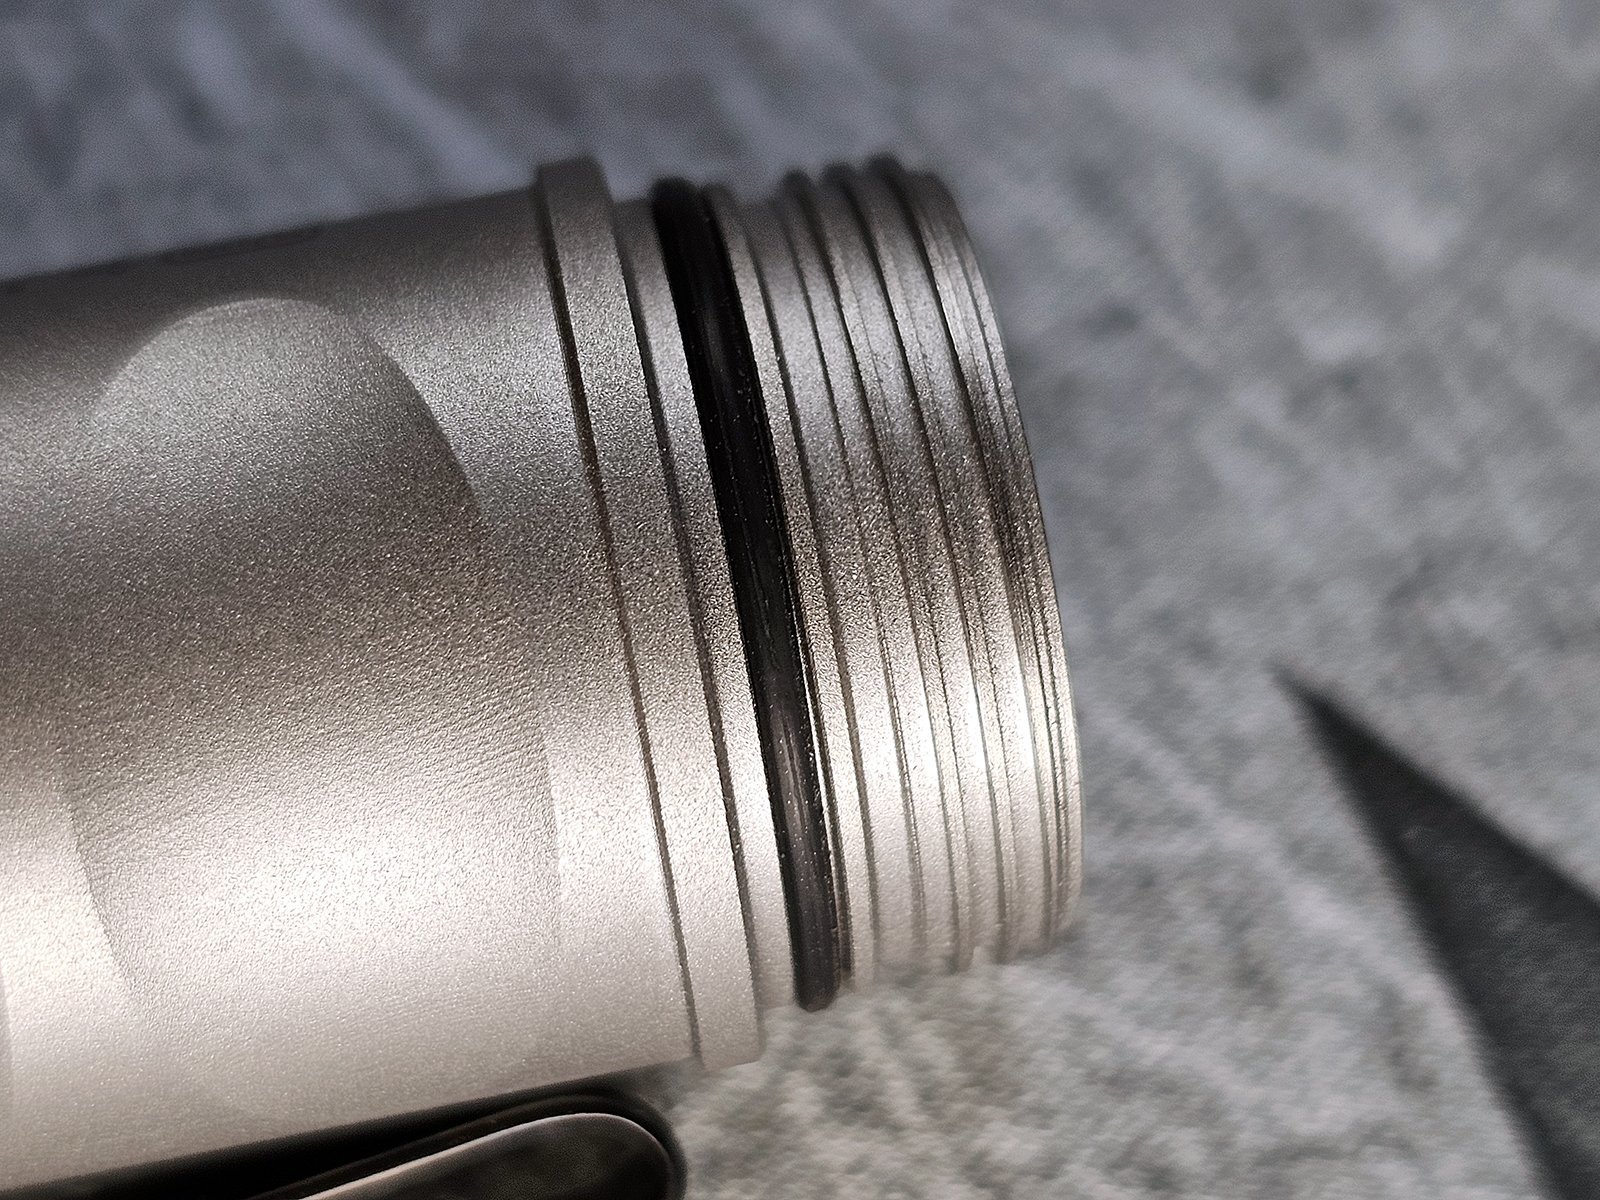
The threads are square cut and well made although quite scratchy, as is the norm with production level Titanium torches. There was no lubrication on the O-ring or threads.
Specifications
The specifications of the Olight Seeker 4 Mini Ti, as found on the manufacturer's website, can be seen in the table below.

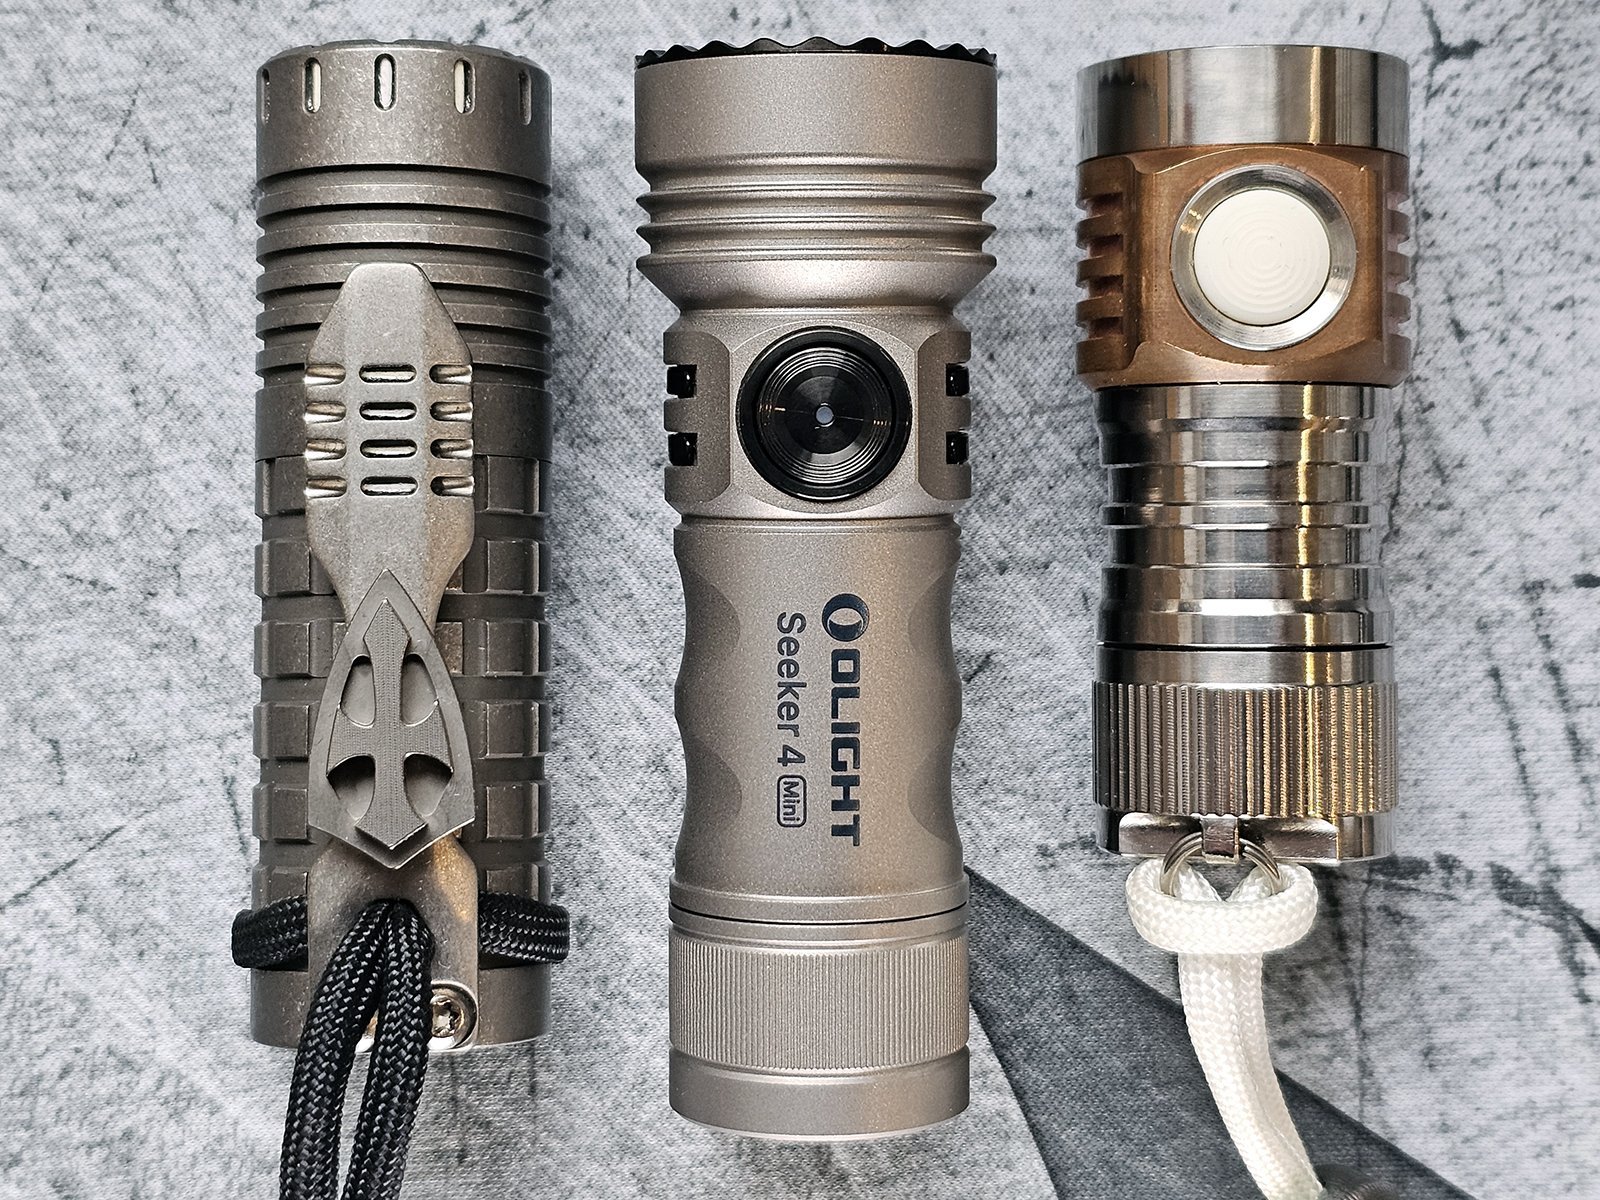
Size Comparison
Size wise, the Olight Seeker 4 Mini Ti is larger than most 13650 torches, mainly due to the reflector instead of a TIR. Here it is between the Reylight Dawn and the Hank Wang Emisar D4V2 Ti.
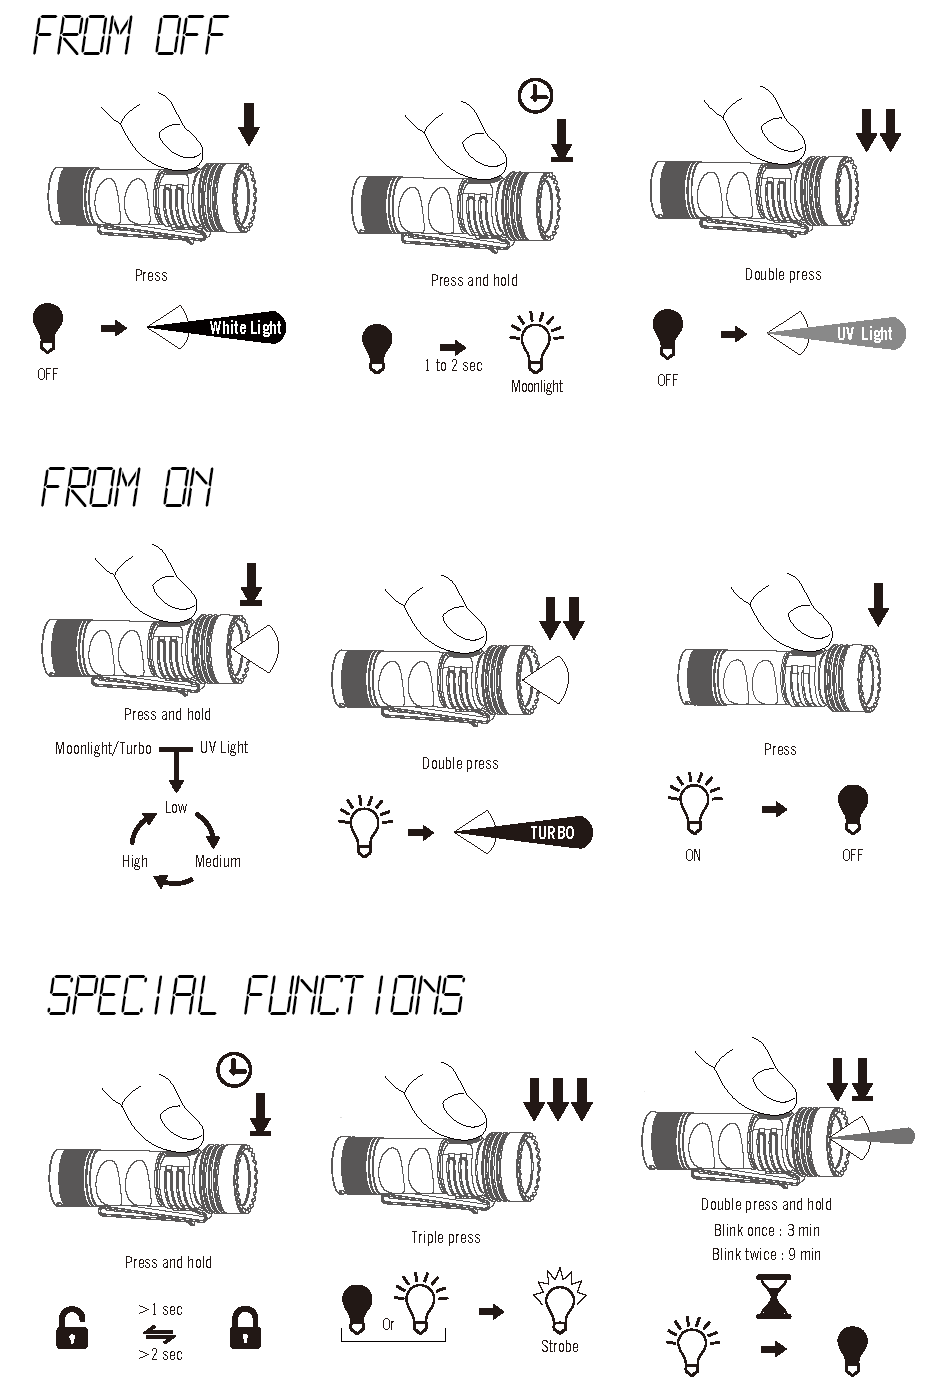
Indicator LED and User Interface
The button of the Olight Seeker 4 Mini Ti features and indicator LED in the middle, which shows the battery level.

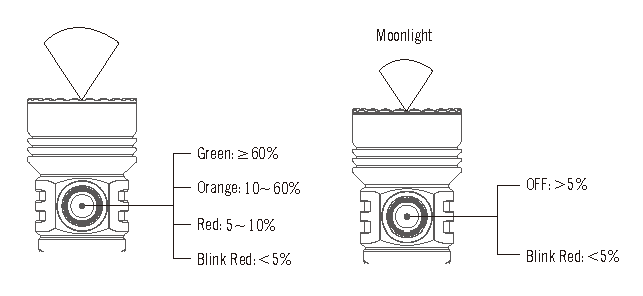
The operation of the Olight Seeker 4 Mini Ti follows the standard Olight operation, with some modifications for the control of the UV light.
Modding
I would not have purchased the Olight Seeker 4 Mini Ti if it was not modable, as I prefer my torches to have nice quality rather than high output light.
Unscrewing the bezel of the Olight Seeker 4 Mini Ti is pretty straight forward and no tools are needed. Under the bezel, there is a white O-Ring which hugs the edge of the lens and under the lens there is a triple reflector.

Under the reflector, we find the MCPCB.
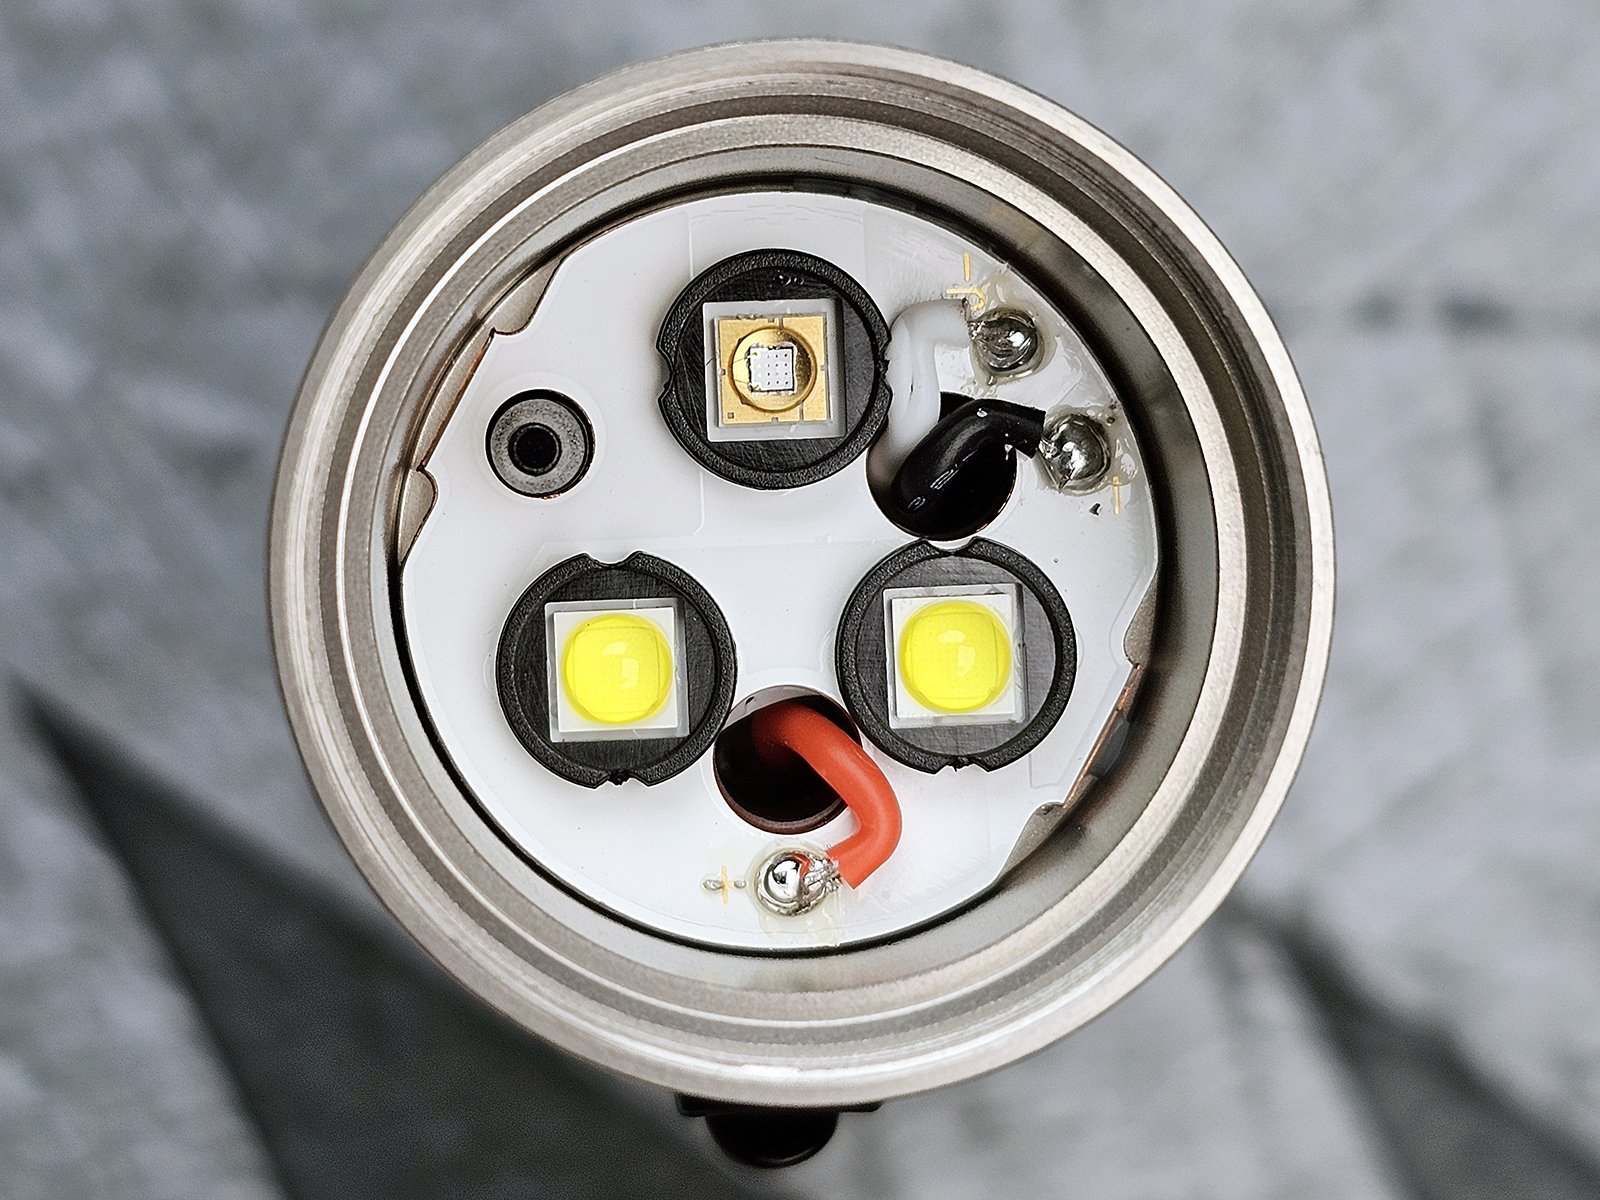
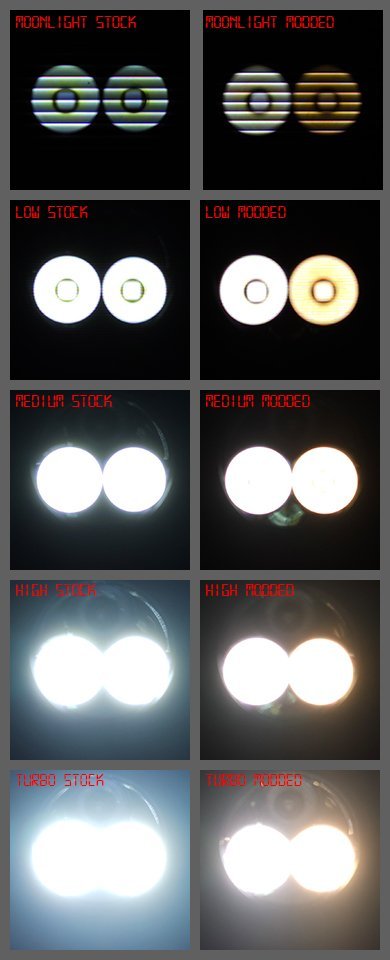
With a little modding magic, we go from the stock configuration in the first photo, to the eye candy in the second photo. I opted to replace the original emitters, which seem like Osram P9 to me (even though Olight does not state the exact emitter in the specifications), to a mix of Nichia 519a emitters.

Specifically, I used 1 Nichia 519a sm573 (5700K) and 1 Nichia 519a sm353 (3500K). The result will have a CCT somewhere between the 2 and a Duv value lower than both. This is the point using 2 emitters with different CCTs: Because the BBL line is curved, the Duv of the mixed emitters is lower than both of the 2 emitters.

Modes
I do not own a multi thousand dollar worth integrating sphere, just a logging Lumen meter and a home made integrating tube. The array is calibrated with 3 professionally measured lights and gives me consistent results, but there is definitely room for error and deviations are to be expected.
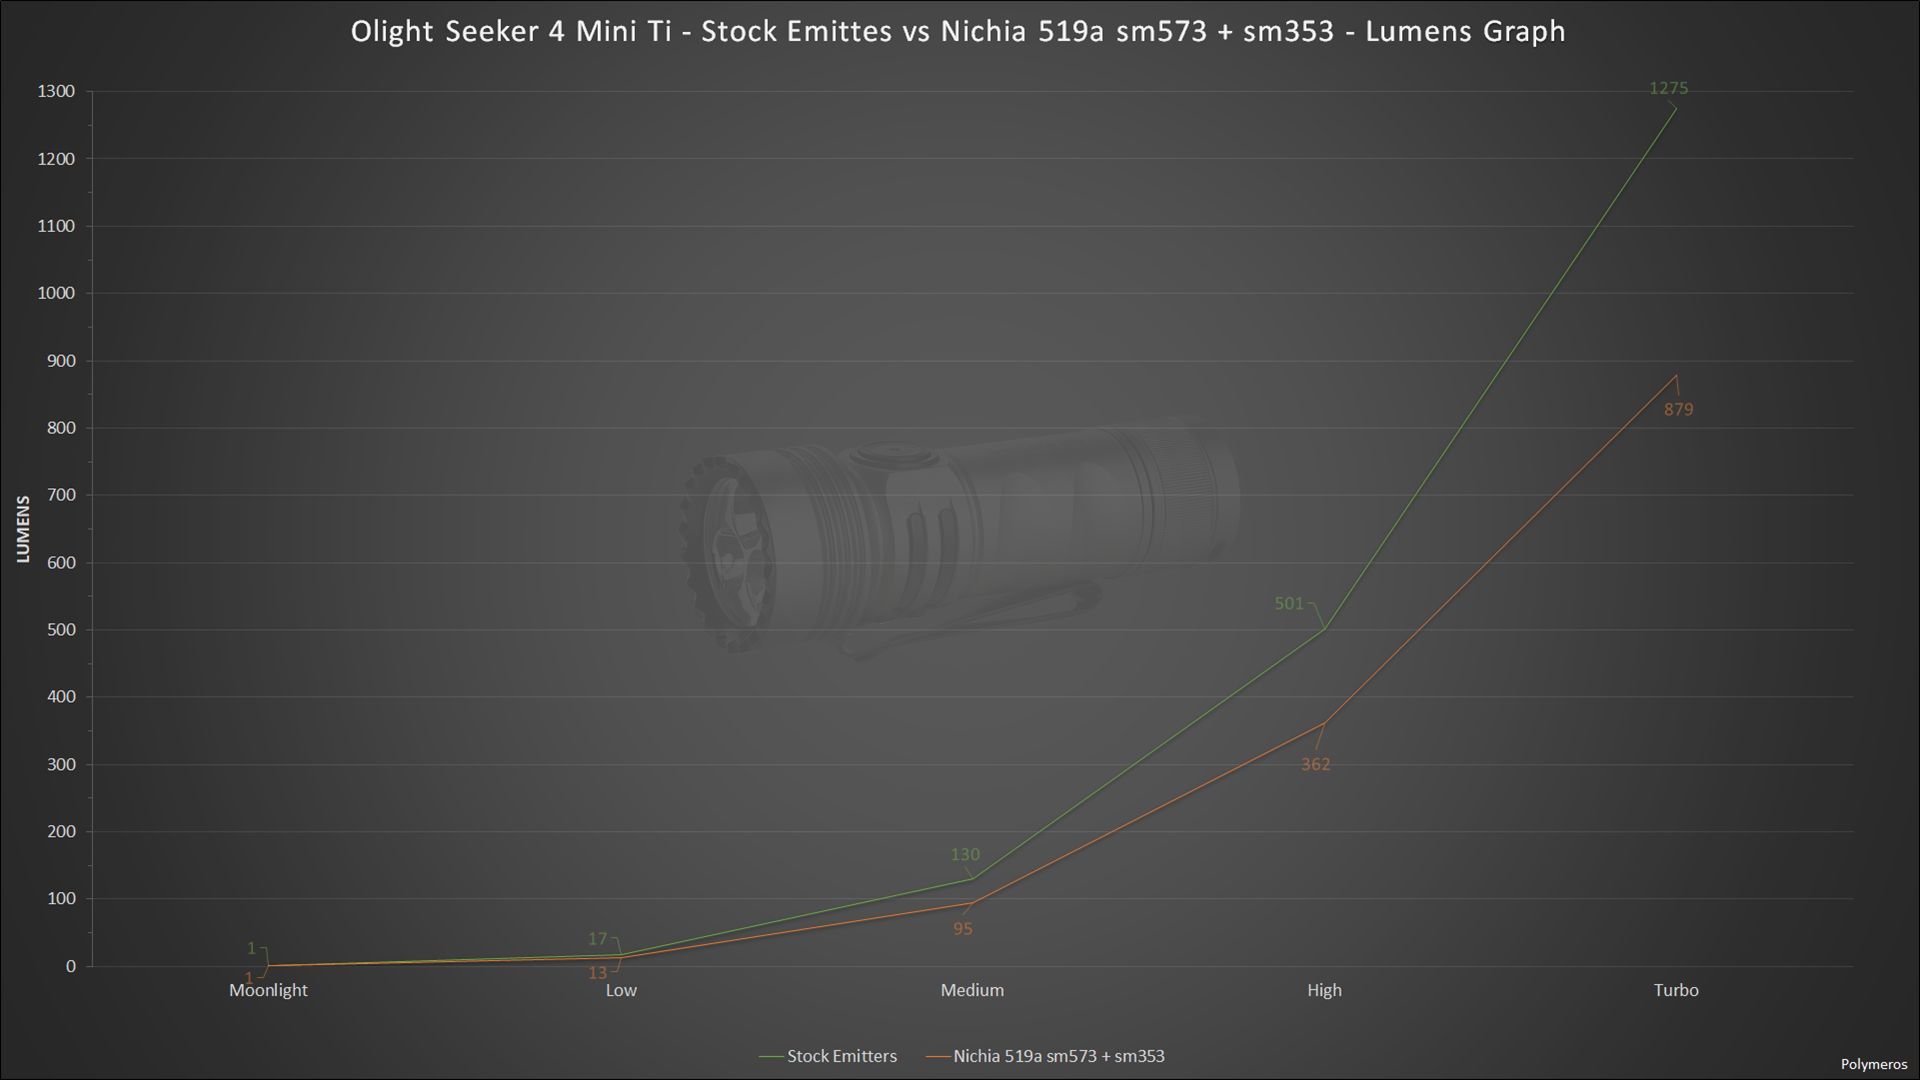
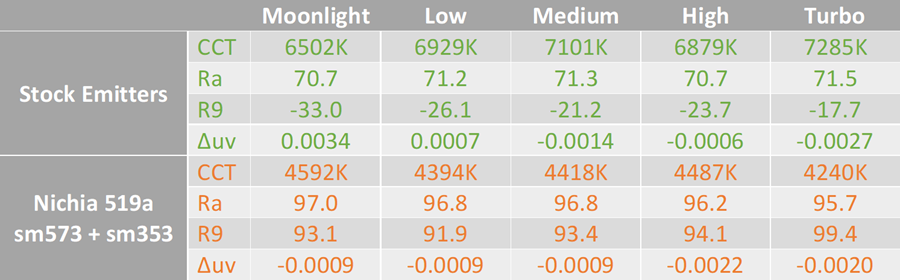
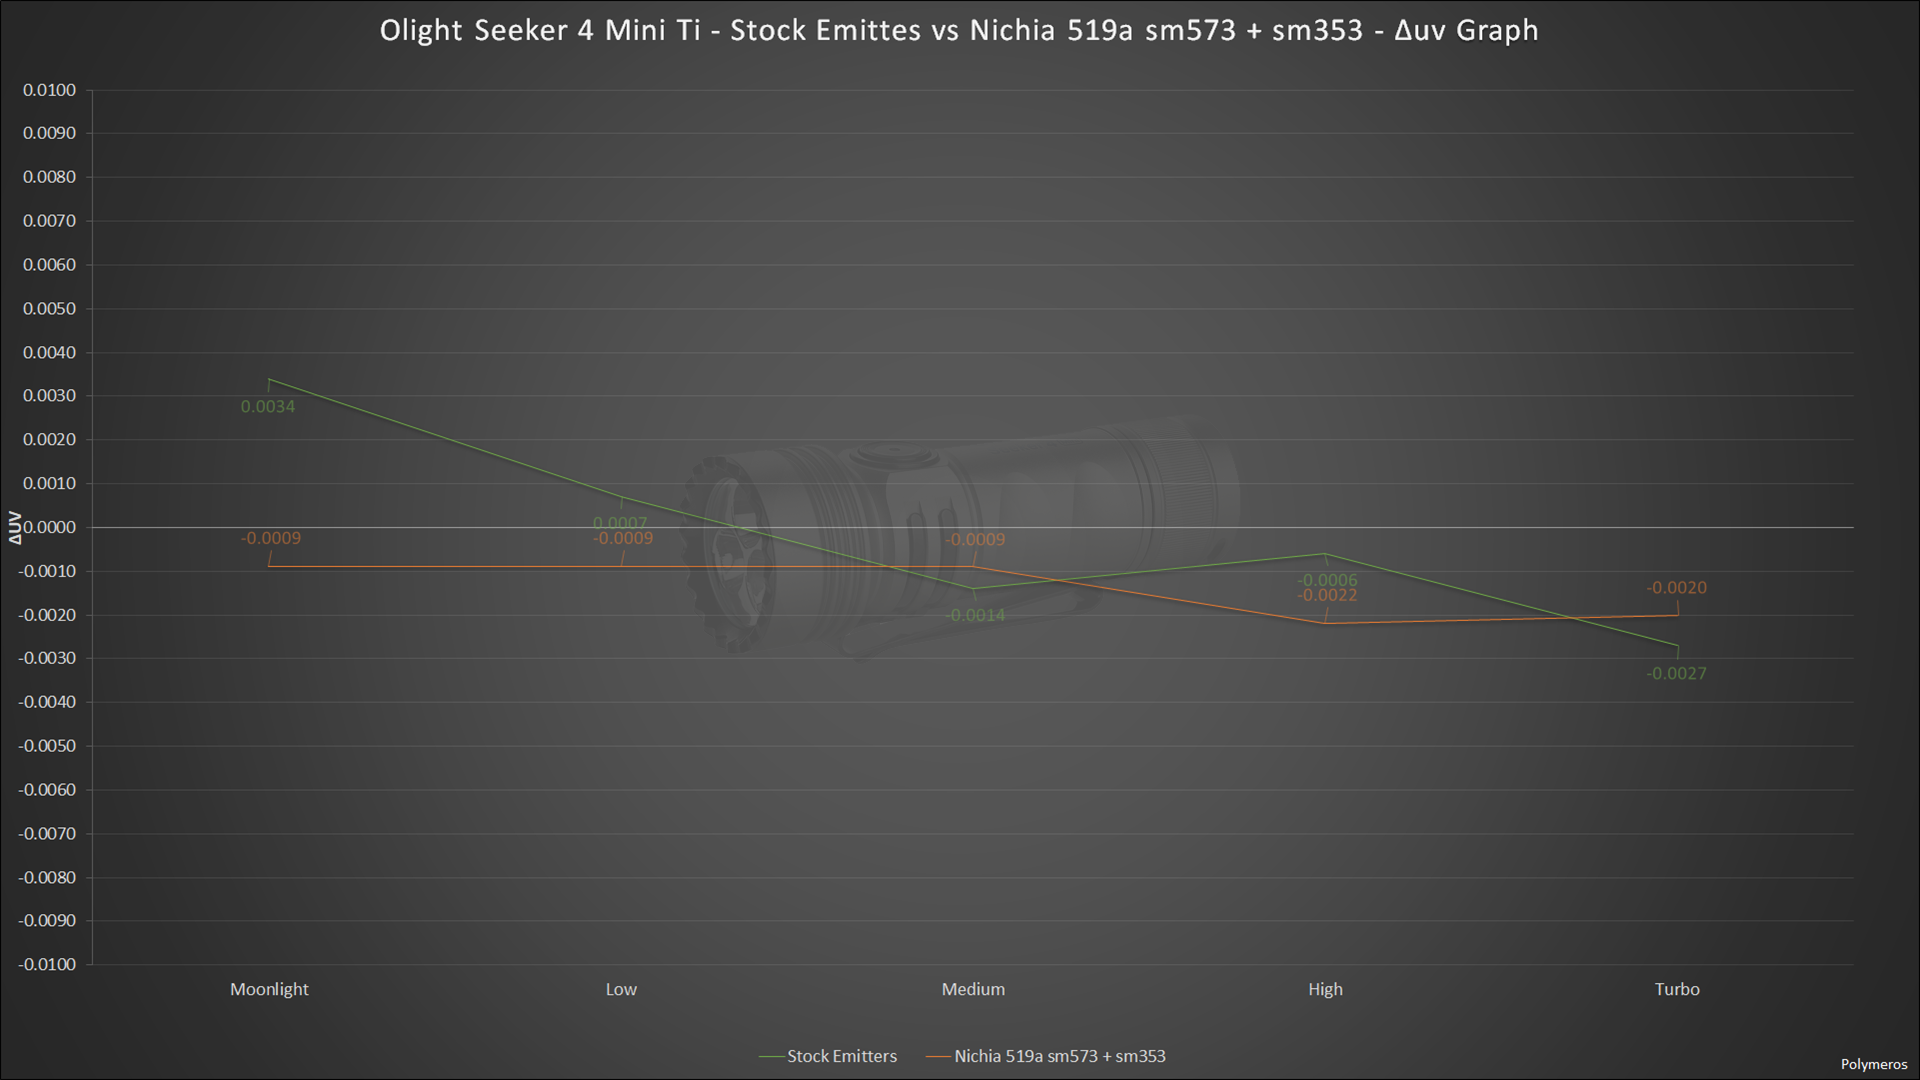
My measurements, before (green) and after (orange) the modification are shown in the following table, compared to the stock specs (black).

The following graph shows the lumen output on all modes, before and after the mod.
The next graph shows the throw on all modes, before and after the mod.
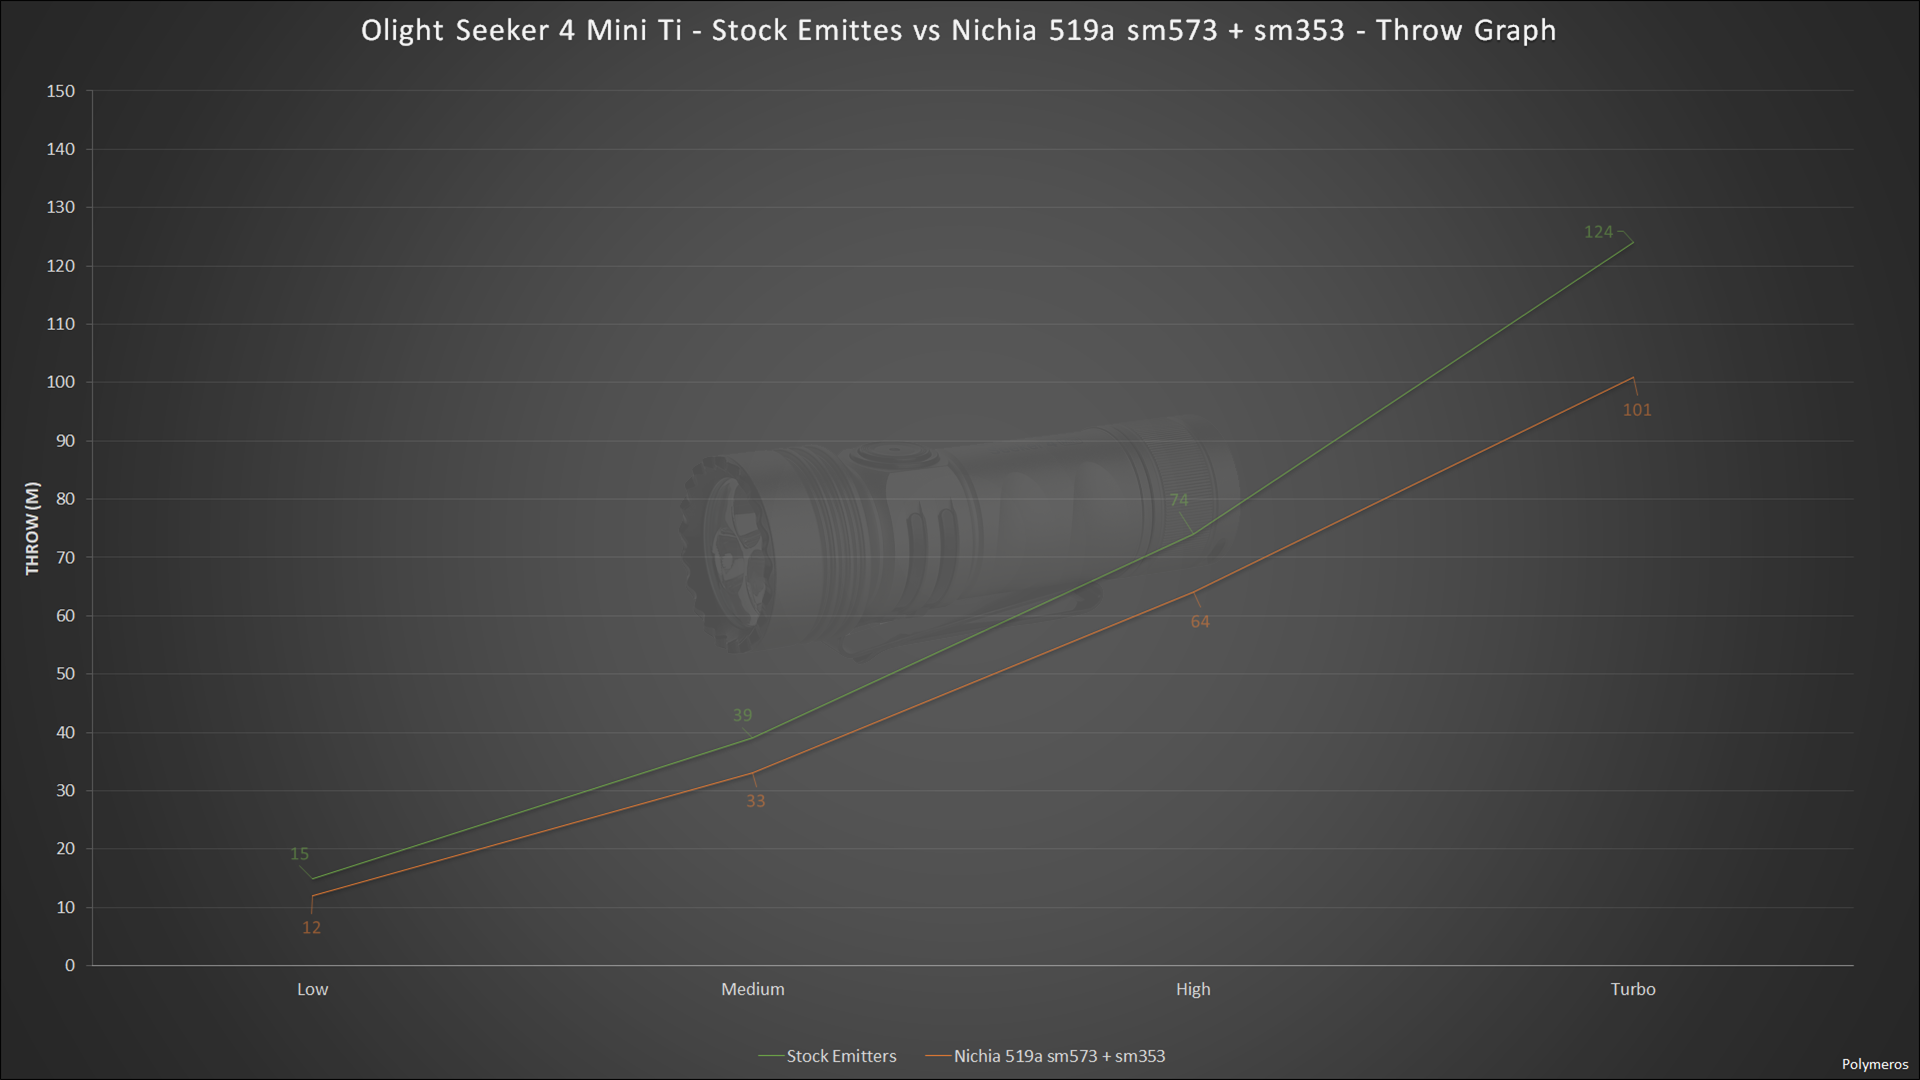
It is as clear as it was expected that exchanging the Osram P9 emitters to Nichia 519a led to a loss in output. Then why do it? I'm glad you asked. That will become clear in the Photometry section.
Photometry
I'm happy to report that to the lasting dismay of my wallet, I now own a Sekonic C-800 spectrometer, so the measurements below should be quite accurate.
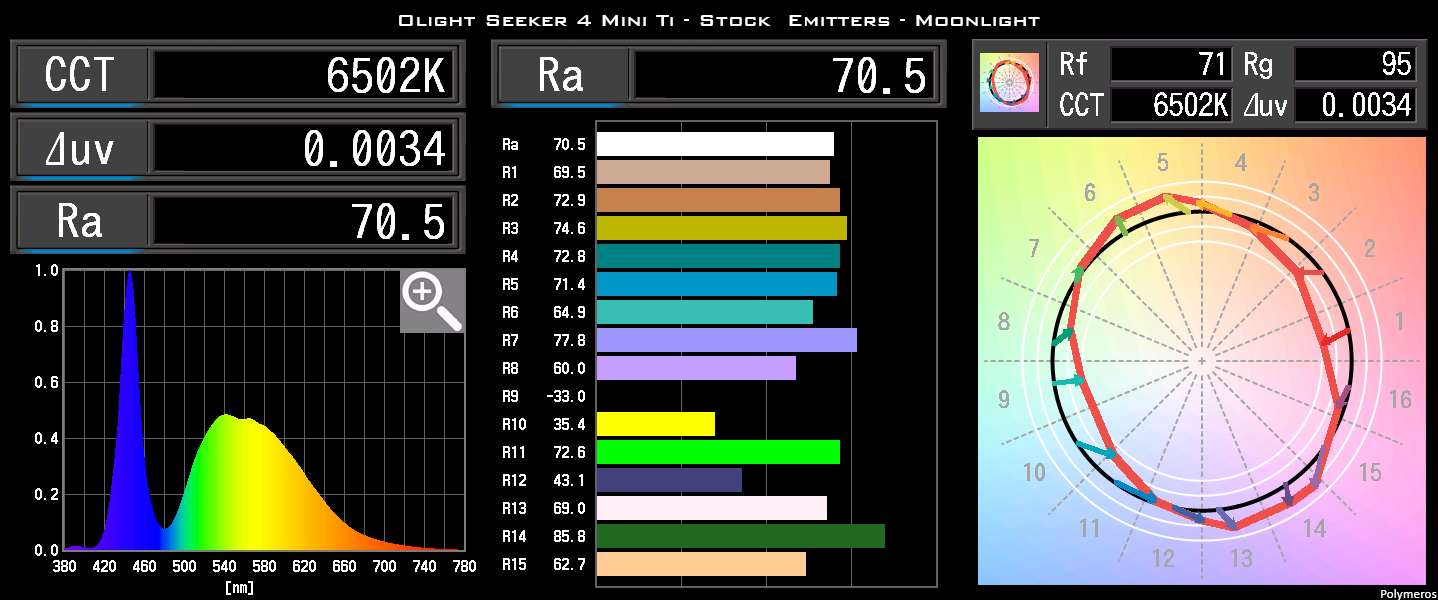
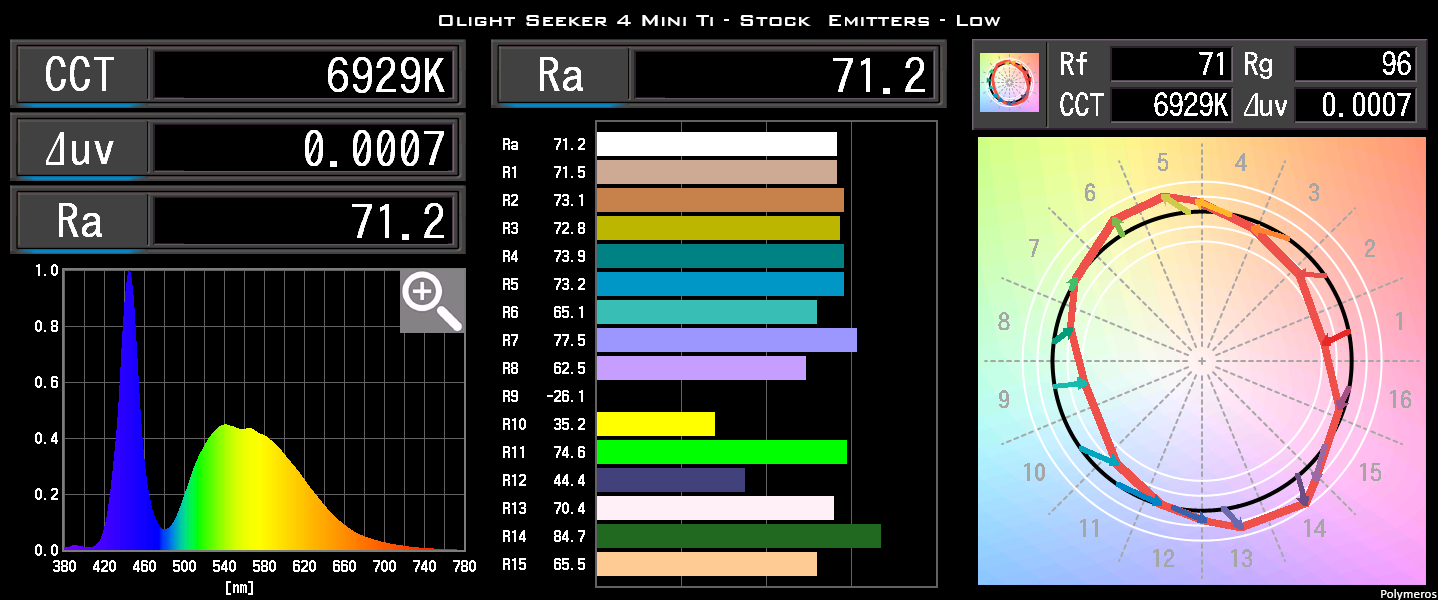
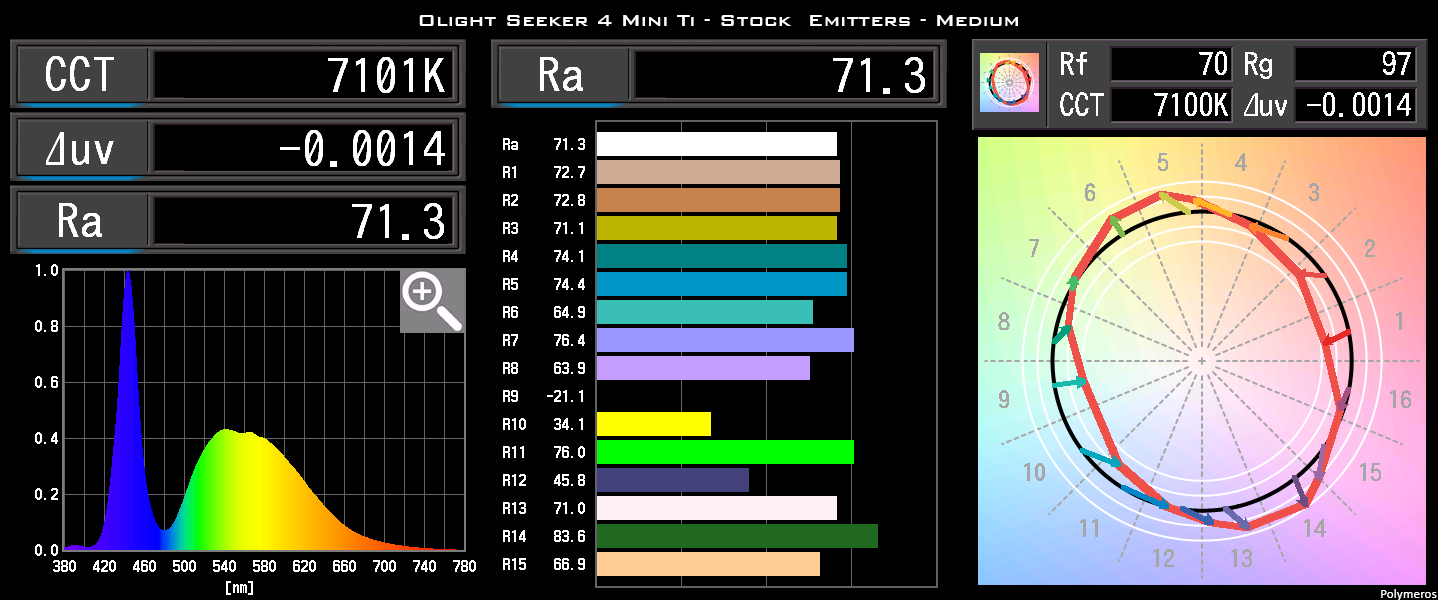
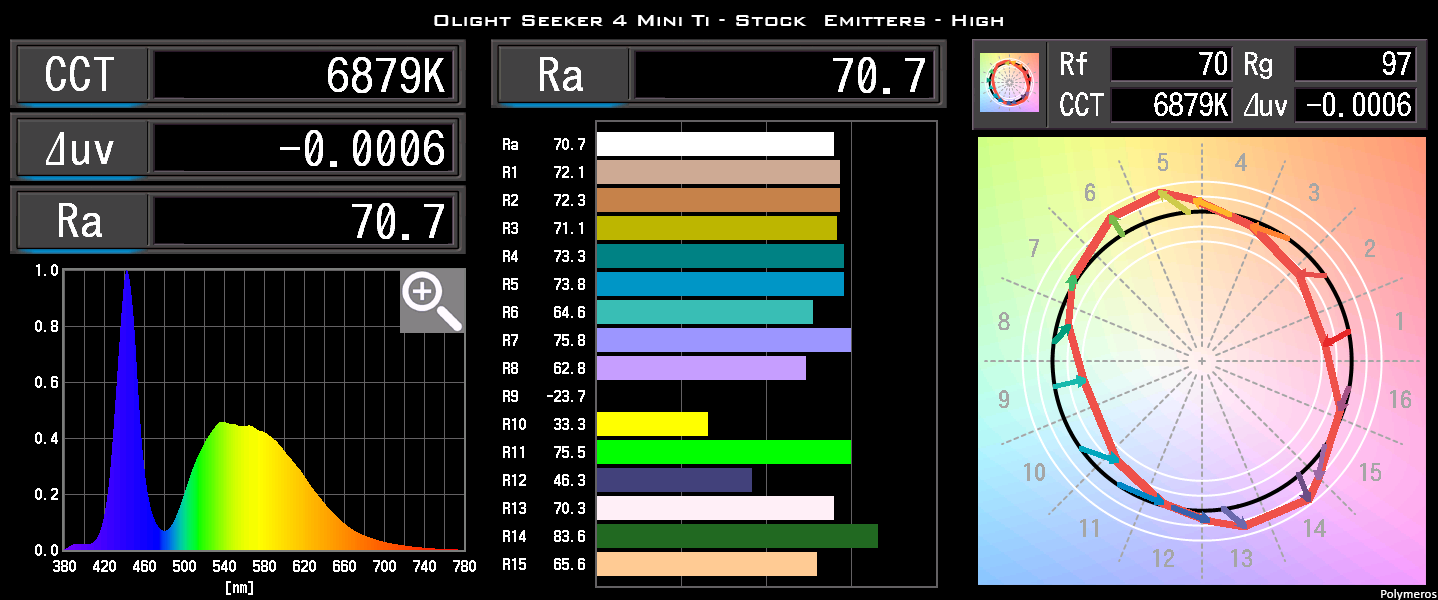
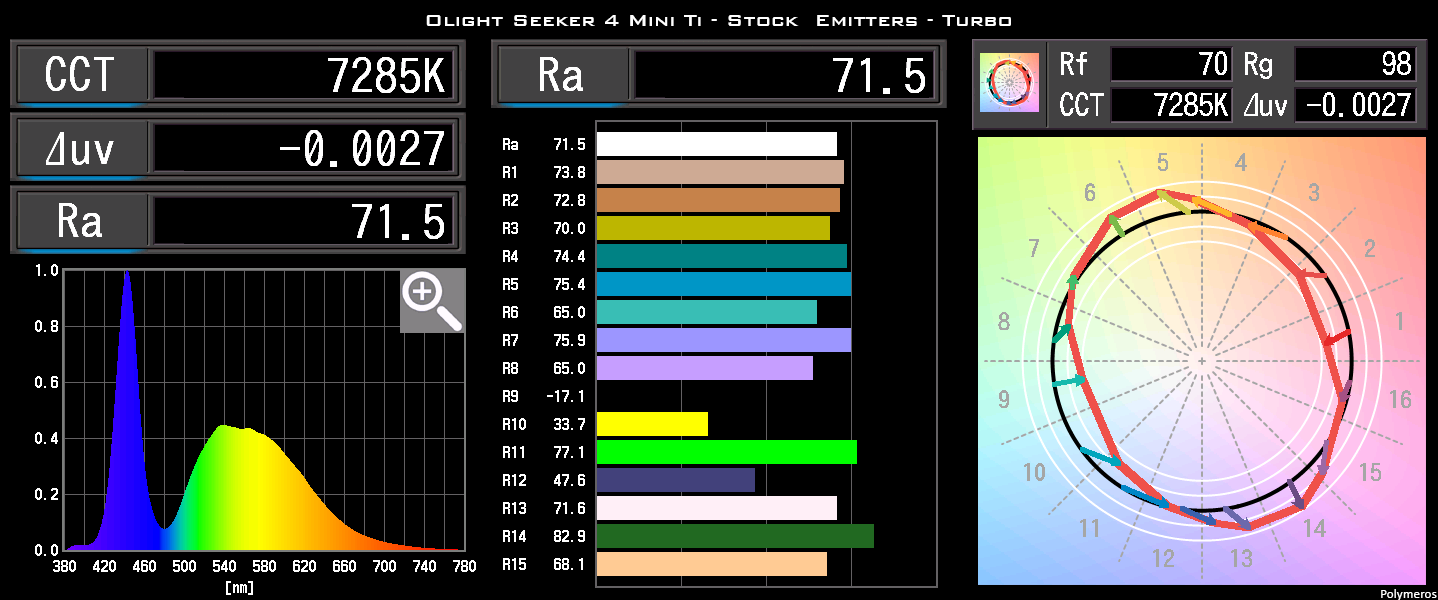
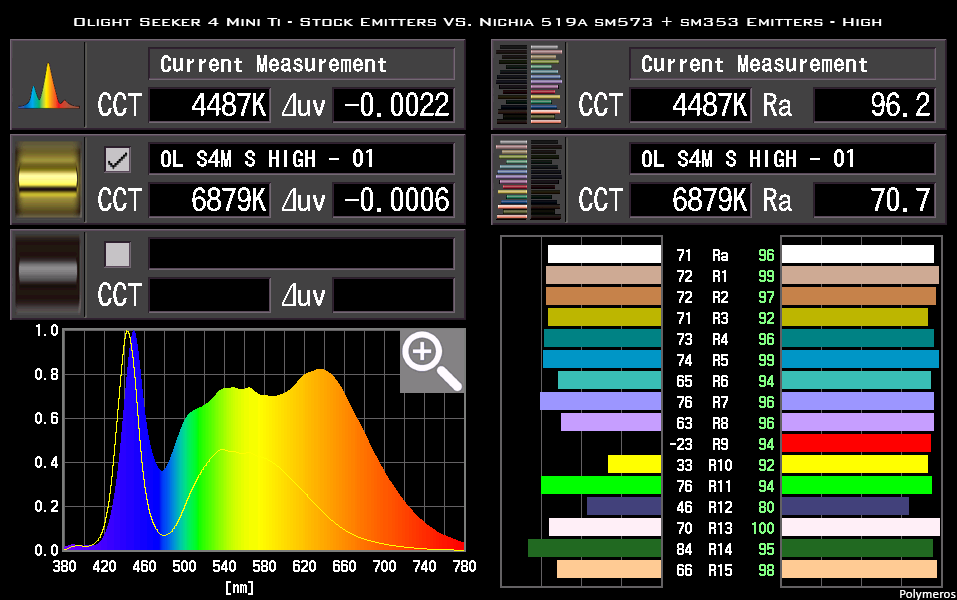
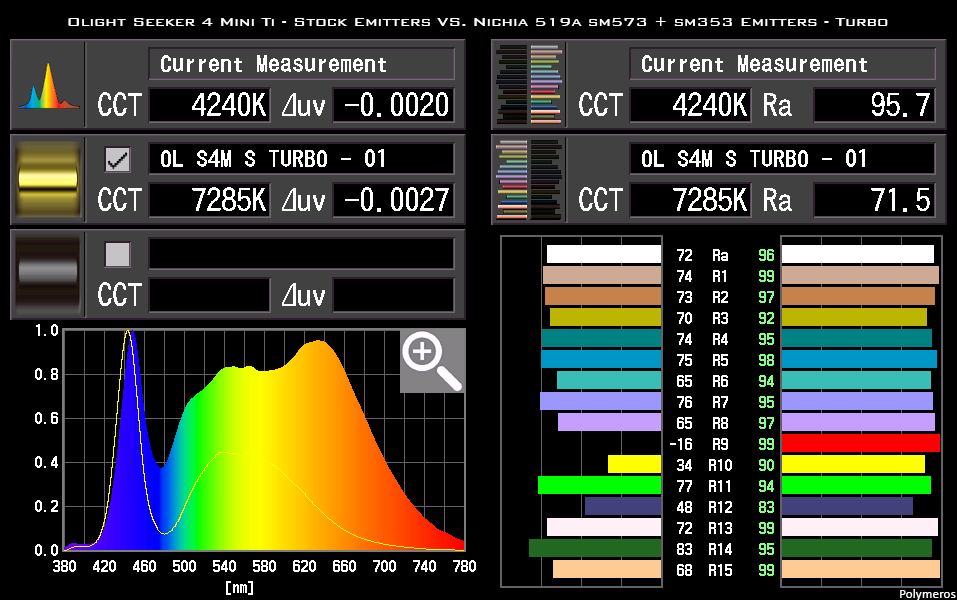
The CCT of the original emitters is very cool. And by cool, I don't mean nice, but rather the opposite, as it starts at 6500K on moonlight and climbs to a bluish 7300K on Turbo, significantly exceeding the CCT values stated in the specifications.
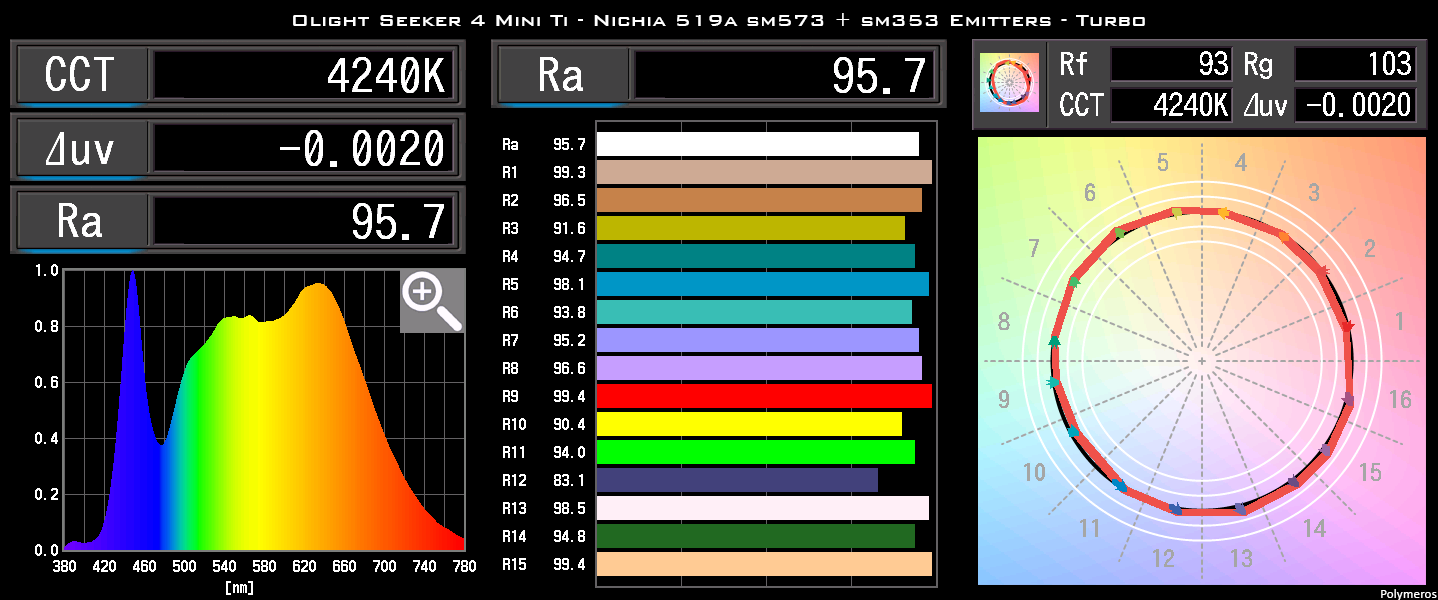
By contrast, the modded version has a CCT between 4200K and 4600K which is excellent for all around use, both in day time and at night. Quite a big upgrade in my opinion.
The Duv is another area of improvement. The stock emitters had a greenish tint on Moonlight mode which became neutral on higher modes and even below BBL on Turbo, even though we can't call it rosy as negative Duvs at 7300K are purple-blue. The modded torch on the other hand offers consistently neutral to slightly rosy Duv!
As for CRI, the difference is clearly massive, with especially the R9 jumping from negative values to consistently over 90!
Here are some graphs to illustrate all of the above.


For the more tech savvy readers, I'm including the measurements from the Sekonic C-800.
The Spectrogram and CRI clearly show the poor colour rendition of the stock emitters and the TM-30 graph is extremely revealing!
As opposed to the stock emitters, the Nichia 519a sm573 and sm353 mix is pure eye candy! Look at those TM-30 graphs!
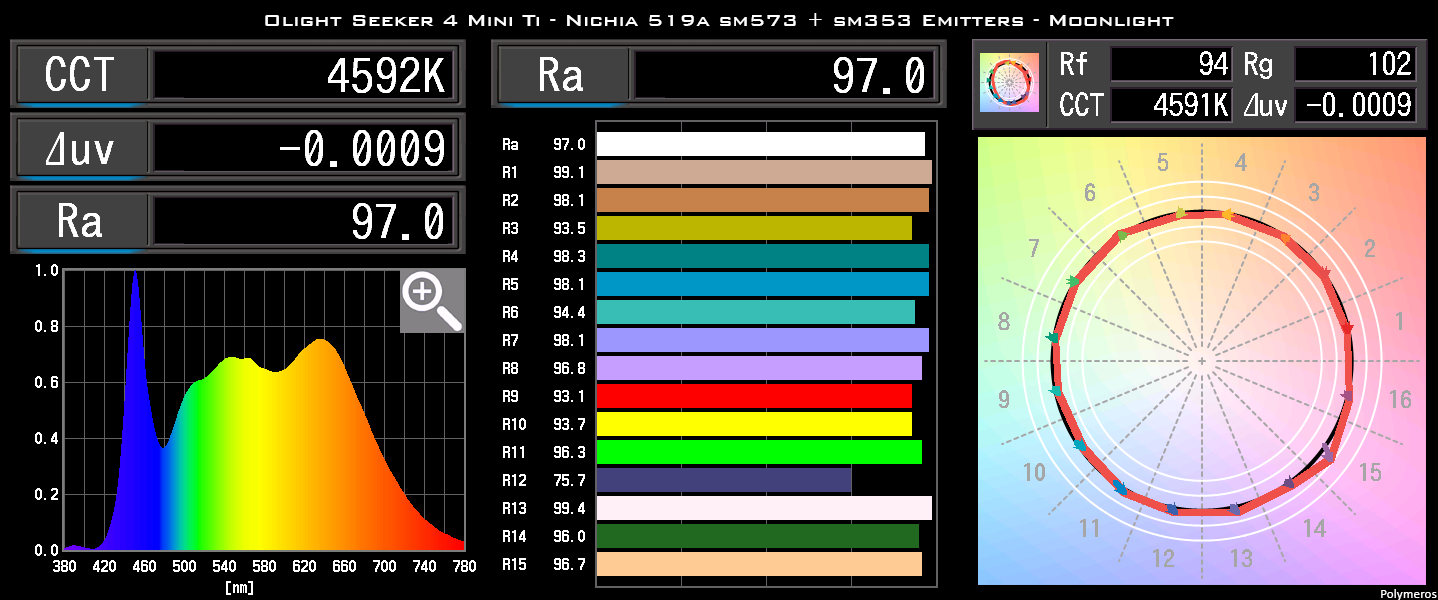


Here are the spectrogram and CRI comparisons between stock and modded. The spectrogram overlays are revealing.


So, do you think it was worth losing 31% of the maximum output to upgrade the light quality, as shown above? I certainly do but I would be interested to read your opinion in the comments below.
Beam Profile
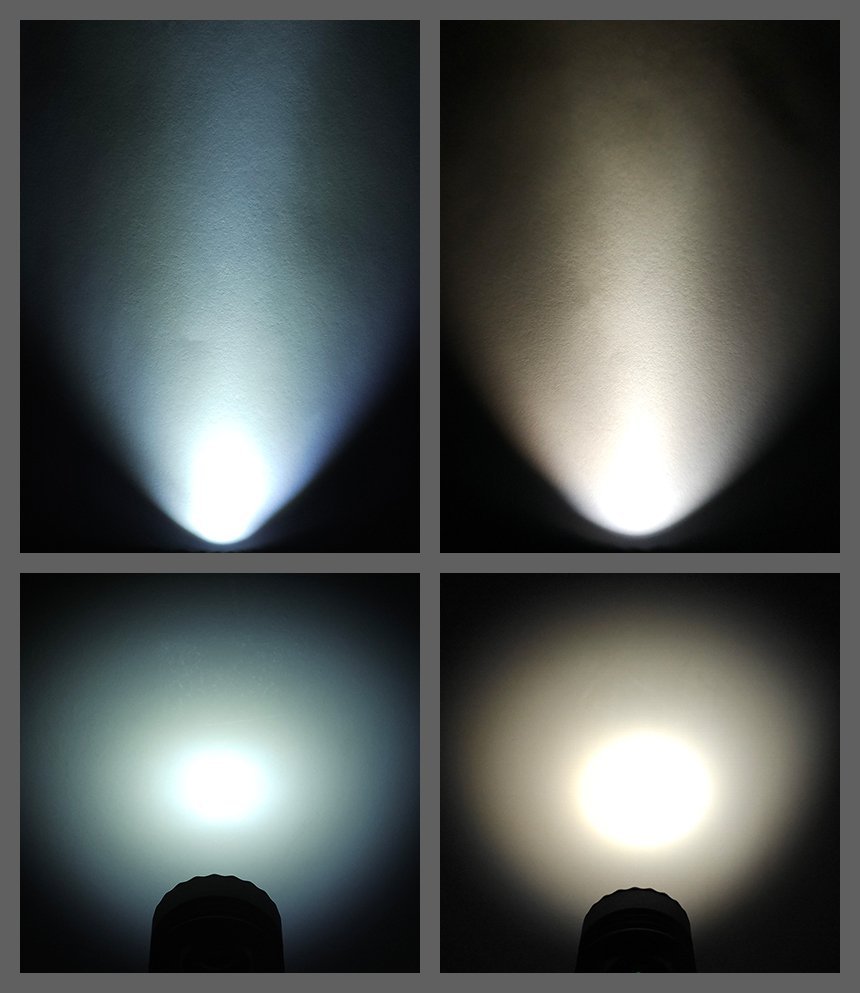
The beam profile of the Olight Seeker 4 Mini Ti is a nice mix of throw and spill, excellent for EDC. The beam of the modded version is slightly wider, with a bigger, less intense hot spot. All of the beam photos were taken with the white balance locked to 5500K.
Driver
I do not have a driver board to analyse so I have to guesstimate from the torch's behaviour. The driver seems to be a fully regulated buck - boost driver, as it maintained constant output without following the gradual drop of the battery voltage but also depleted the battery to below 3V.
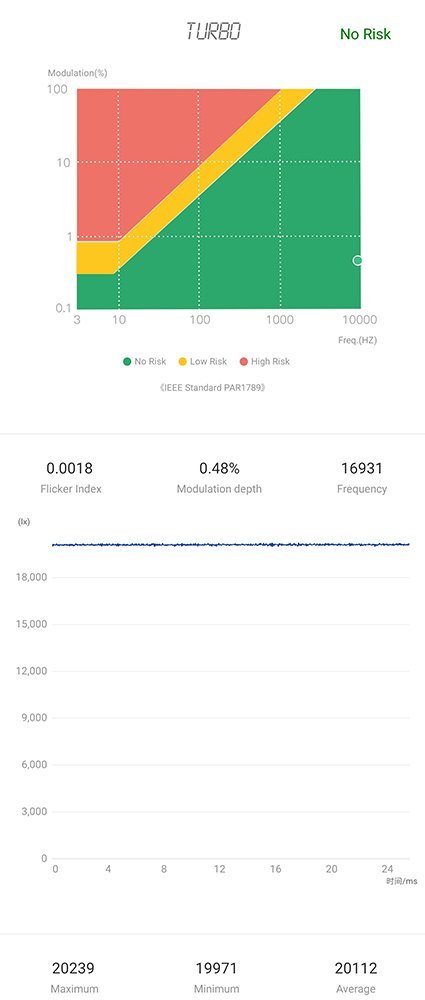
The driver of the Olight Seeker 4 Mini Ti uses PWM to regulate the output and it does so at a very high modulation depth. It also uses a high enough frequency to make it safe on all modes, except Moonlight.
Getting a regulated, constant output driver to deliver a very low output is extremely challenging and most brands opt to either use linear drivers to achieve a very low output or not offer a very low output with their regulated drivers. Olight opted to combine a regulated driver with a 1 Lumen Moonlight mode, which resulted in a PWM frequency of 2.2KHz being used. This is tiring to the eyes and is considered a low risk.
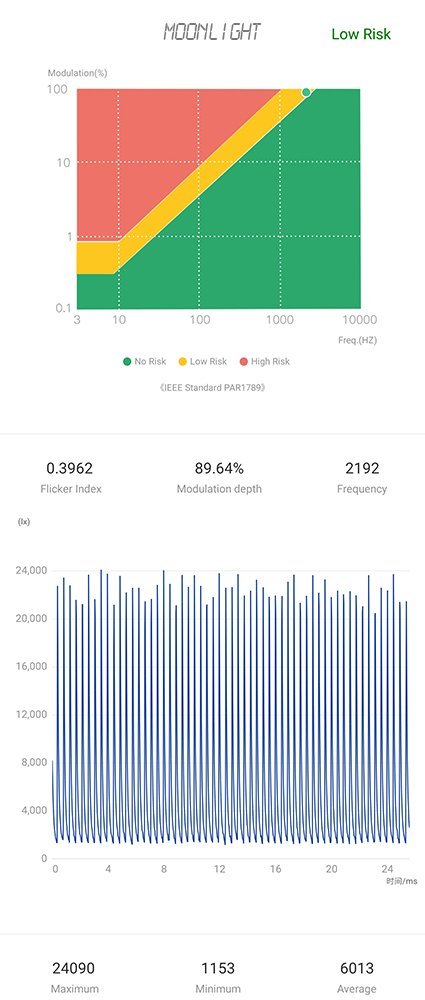


Here is what my camera saw, at a shutter speed of 1/12000 sec.
Battery and Charging
The battery of the Olight Seeker 4 Mini Ti is an Olight branded, proprietary, 18350 Li-Ion battery which is rated at 1100mAh or 3.96Wh.


I measured the battery at a capacity of 1041mAh and an internal resistance of 62mΩ.
The charging of the Olight Seeker 4 Mini Ti is quite simple. Just get the magnetic charging cable anywhere near the tail end of the torch and it will snap into place and begin charging.


The indicator LED on the charging cable will be red while charging and turn green when the battery is fully charged.
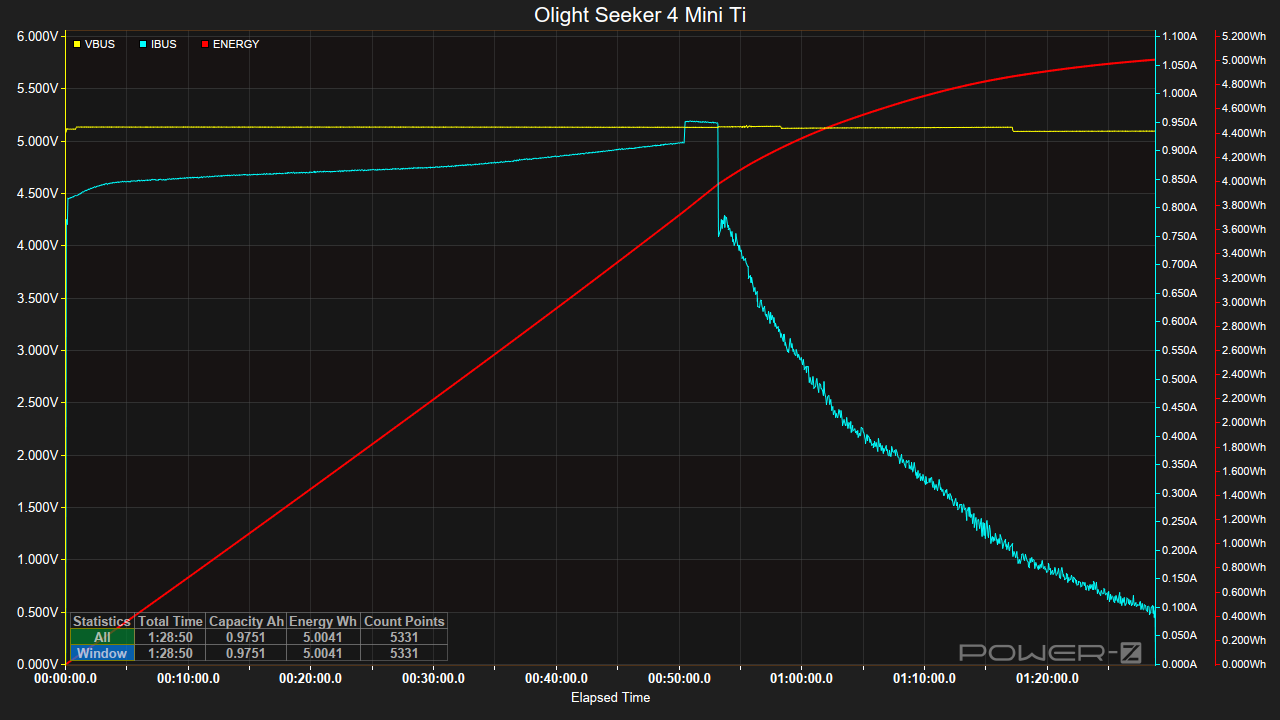
The following chart shows the charging of the battery inside the Olight Seeker 4 Mini Ti, after it had been depleted to the point where the torch turned itself off. At that point, I let the battery rest and then measured it at 2.85V. The charging used a maximum current of 0.951849A and was completed at a total charging time of 1 hour, 28 minutes and 50 seconds. This charging process used a total of 5.0041Wh. The voltage of the battery at the end of charging was 4.19V.
Runtime Charts
Let's go over some runtime charts for both the stock and the modded Olight Seeker 4 Mini Ti.
The first chart shows the full runtime with the stock emitters, on Turbo. All the details are noted on the chart.

Here are the first 10 minutes of the above chart, in greater detail.

This is with the modded emitters, also on Turbo.

Here are the first 10 minutes of the above chart, in greater detail.

This is the stock configuration full runtime chart, on High.

Here are the first 10 minutes of the above chart, in greater detail.

This is the modded emitters full runtime chart, on High.

Here are the first 10 minutes of the above chart, in greater detail.

I combined the above charts, to provide an easy visual comparison of the data. The numerical values are omitted, to keep the charts clear.


Conclusion
The Olight Seeker 4 Mini Ti is an EDC torch, featuring both white light and UV output. It features a triple reflector and lens configuration, which allows the use of a UV emitter and is higher quality and more robust than a TIR optic, but also makes the head necessarily bigger.
The torch comes with 2 stock emitters that seem to be Osram P9, which can output a maximum of 1275 Lumens for 3.5 minutes. this is an impressive sustained output for a torch this size and considering it also offers UV output, but the CCT and CRI of the emitters leave a lot to be desired.
Thankfully, the Olight Seeker 4 Mini Ti is extremely mod friendly, allowing the advanced user to substitute any 3V 3535 footprint emitter of their choice. I opted for a mix of Nichia 519b sm573 and sm353 and the results, albeit at the cost of 31% output reduction, were visually stunning!

The cost of the Olight Seeker 4 Mini Ti varies by country and by the time you get it, as Olight has frequent sales. If you want to buy it, definitely wait for when it is on sale as Olight prices make much more sense at those times. All in all, it is a reasonably priced torch, for what it offers.
Let's list the Pros and Cons of the Olight Seeker 4 Mini Ti:

Pros
+ Over 1200 Lumens for 3.5 minutes on Turbo.
+ UV.
+ Excellent fit and finish.
+ Titanium.
+ Reflector and lens instead of TIR.
+ Simple and intuitive user interface.
+ Regulated driver.
+ 1 Lumen Moonlight mode.
+ Battery level indicator.
+ Strong magnet in the tail cap.
+ Springs on both ends of the battery.
+ Easy to mod.
+ Very easy magnetically attached charging.
+ IP68.

Cons
- Only 2.2KHz PWM modulation on Moonlight mode, which is not easy on the eyes.
- Large head.
- Proprietary battery.
The sample for this review is part of my personal collection and purchased with my own means

Polymeros Achaniotis 11/03/2024
-
 6
6
 Ακολουθήστε το TheLab στο
Viber για να λαμβάνετε πρώτοι όλες τις τεχνολογικές μας ειδήσεις καθώς και τις τελευταίες μας κριτικές προϊόντων.
Ακολουθήστε το TheLab στο
Viber για να λαμβάνετε πρώτοι όλες τις τεχνολογικές μας ειδήσεις καθώς και τις τελευταίες μας κριτικές προϊόντων.
 TheLab Weekly Digest
Άρθρα, reviews και ό,τι κινήθηκε στο forum. Κάθε Κυριακή.

.thumb.jpg.14a3df6f5853e0ce92219404fd5d940d.jpg)


Recommended Comments
There are no comments to display.
Create an account or sign in to comment
You need to be a member in order to leave a comment
Create an account
Sign up for a new account in our community. It's easy!
Register a new accountSign in
Already have an account? Sign in here.
Sign In Now