


Introduction
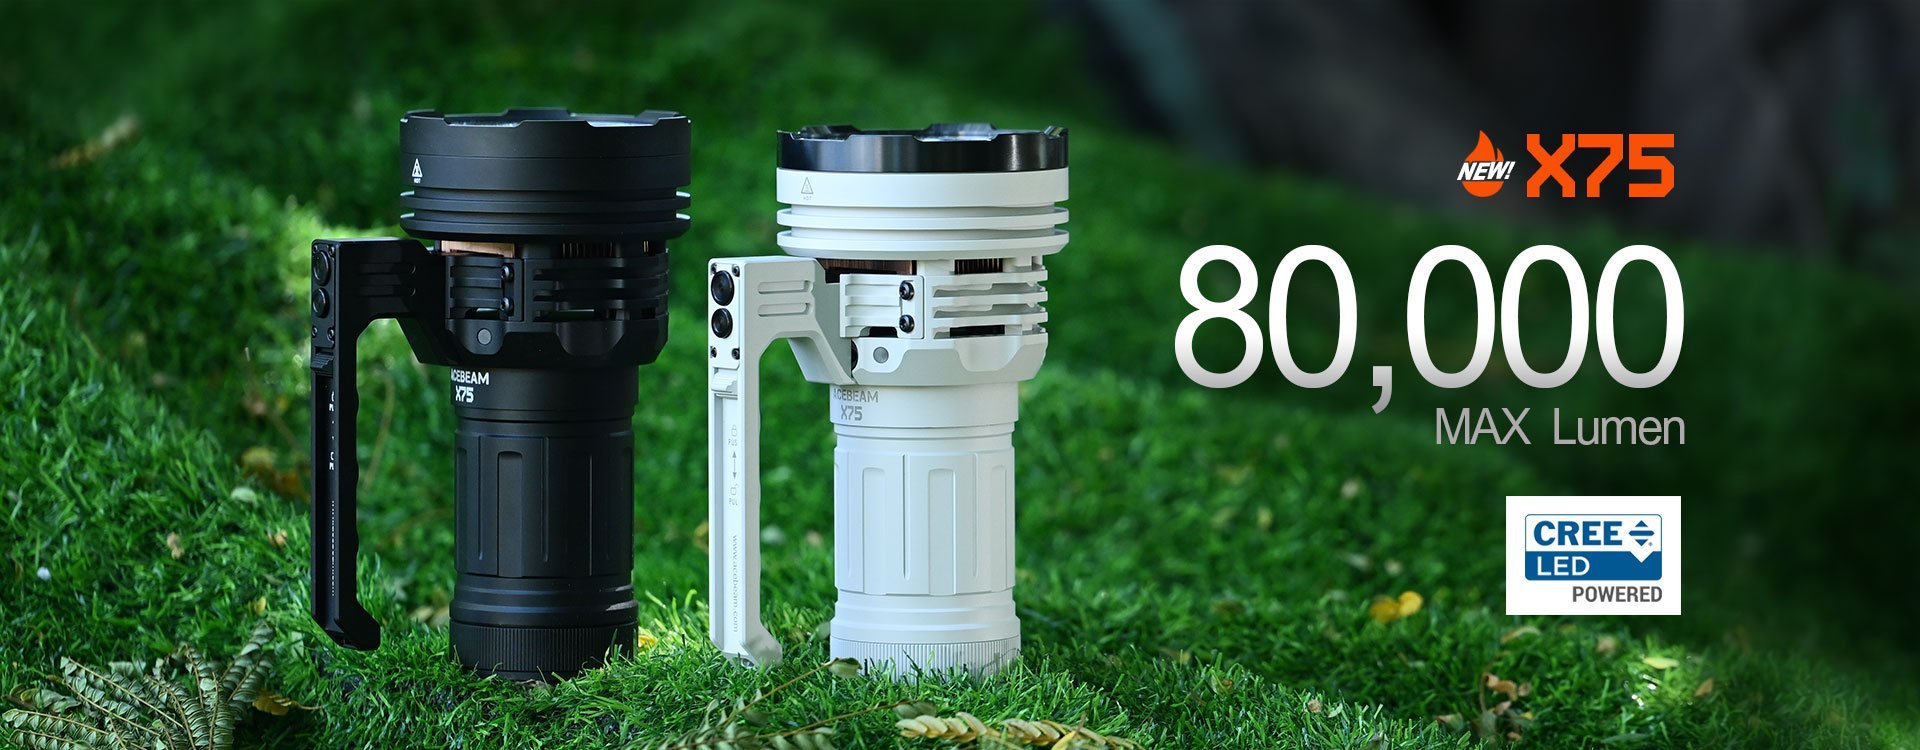
No matter how you approach it, the marketing claims of the Acebeam X75 are fascinating. Not only do they promise a maximum brightness of 80.000 lumens, which makes it the 2nd most powerful production torch in the world, but also the highest sustainable output, which is indubitably much more useful and important. Couple that with the top level design, build quality and electronics of Acebeam, add the 100W USB C charging and 100W Power Bank capabilities and you have a truly amazing torch.
My only issue when I was offered a review sample was which emitter option to choose from. Acebeam offers the Acebeam X75 with 3 emitter choices:
- The Cree XHP70.2 6500K, which provide the maximum output of 80.000 Lumens.
- The Cree XHP70.2 5000K, which provide a more neutral tint, at the cost of a slight decrease in brightness, reducing it to 75.000 Lumens.
- The Cree XHP70.3 HI 6500K, which provide the highest intensity of 426.409 Candela and a throw of 1306m, at the cost of a reduced brightness of 67.000 Lumens.
I was divided between the 1st and 3rd option. Should I go with for the maximum brightness or the maximum intensity?


Then it occurred to me that if I found it hard to decide, so must many others that are looking to purchase the Acebeam X75 . There was only one thing to do and that was to get both. Welcome to the Acebeam X75 XHP70.2 6500K vs XHP70.3 HI 6500K Comparative Review!
Unboxing
The Acebeam X75 comes in a white and orange box. The front of the box features a photograph of the torch and highlights some of its main features, such as the 60W (with the standard charger) or 100W (with the optional charger) Power Delivery 3.0 USB C charging. the Power Bank function, the Mechanical Lock feature and the Air Duct cooling system. The warranty period is indicated as 5 years.


The back side of the box does not offer any information on specifications, but rather the company address, a few QR coded links and the usual certification logos.

The top and bottom of the box has nothing special to show, except a nice, bright orange colour. The top is plain while the bottom has 1 or 2 bar codes.


One of the sides features the company logo while the other shows the chosen options of colour and emitters.
The Acebeam X75 comes in 2 finish options:
- Type-III Hard Anodized Oxidation, in black colour.
- Micro Arc Oxidation, which is an amazing off-white colour.
The 3 emitter options, as mentioned before, are:
- Cree XHP70.2 6500K, with a brightness of 80.000 lumens and a throw of 1150m.
- Cree XHP70.2 5000K, with a brightness of 75.000 lumens and a throw of 1082m.
- Cree XHP70.3 HI 6500K, with a brightness of 67.000 lumens and a throw of 1306m.
You can get the black finish with any of the 3 emitter options but the white is only offered with the Cree XHP70.3 HI 6500K emitters.


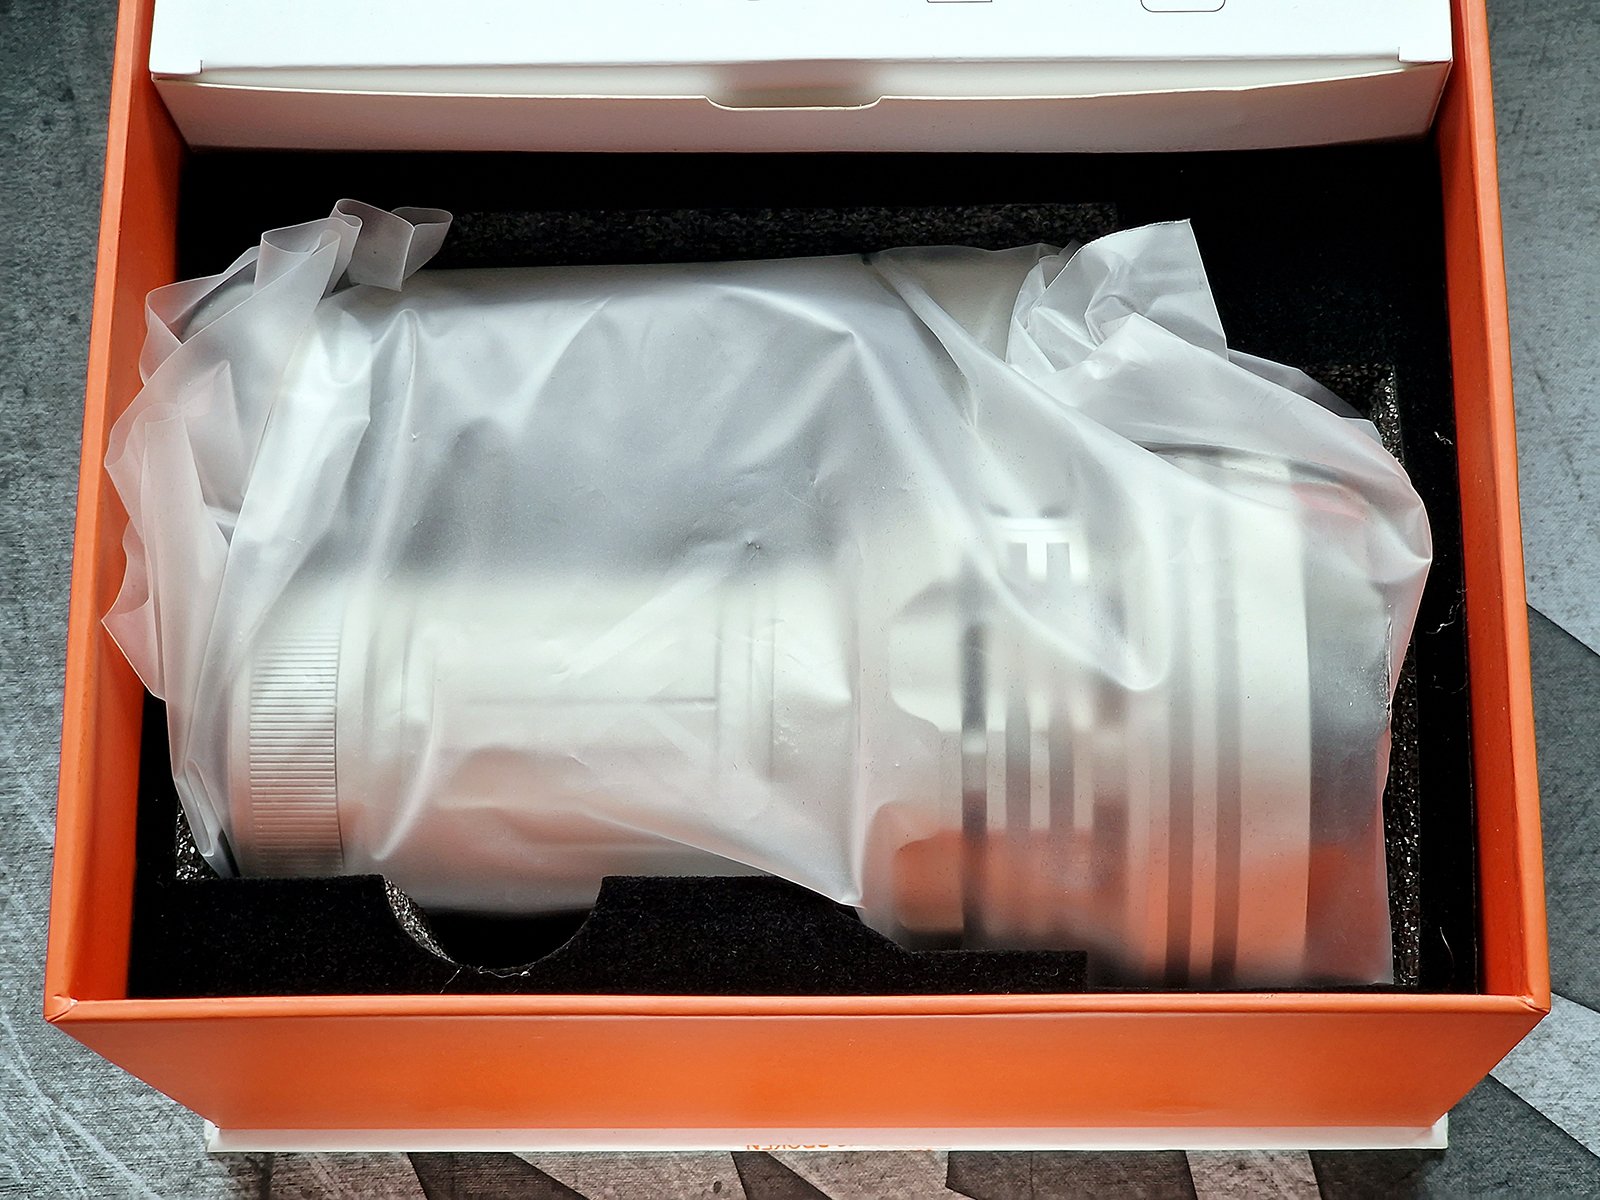
The box closure is magnetic. Upon opening it, you are greeted with a lot of packing material, protecting the torch, a yellow card and a white box. You can already glimpse that the torch on the left is black while the torch on the right is white.


The yellow card is a quick start guide, explaining how to remove the insulating film between the battery pack and the driver before the first use and including some safety and usage instructions. As for the white box...


...it contains all the accessories and documentation. The documentation consists of the manual and the warranty card, while the accessories include the charging cable, charger (in a plastic white bag), adapter (if you are outside the US - here the UK adapter is shown), 2 little bags of accessories and a silicone cover for the head of the torch.
Some of you may have noticed that the latter is only in the second photo. That is because the black torch came with the silicone cover installed, while the white torch came with it in the accessories box.


The smaller of the 2 little bags contains 2 small screws, 2 larger screws, 2 large round O-rings, one small rectangle O-ring and a torx wrench that fits both types of screws..

The larger of the 2 little white bags contains a spare fan. It is an Acebeam branded DC brushless fan, which operates at 5V and draws 0.2A (so it has a power rating of 1W). It is frameless and has an apparent special construction.


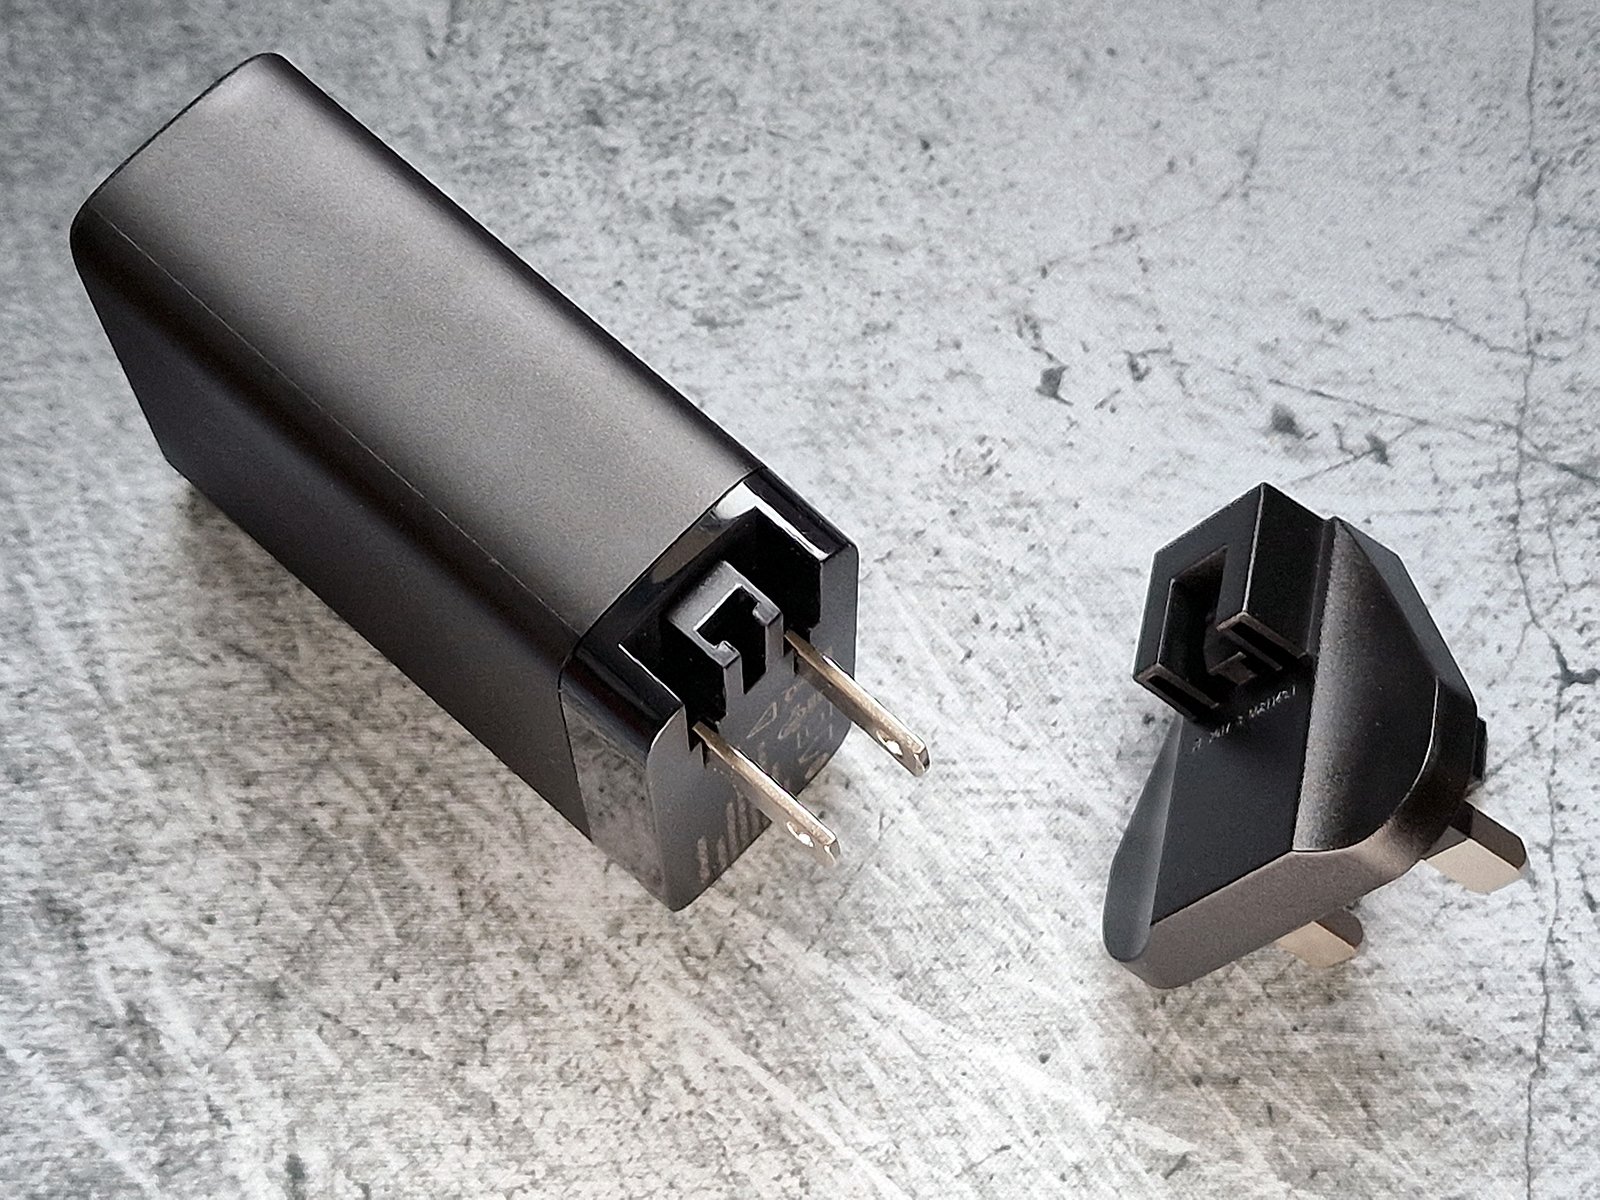
The Acebeam X75 comes with a 60W Power Deliver charger as standard, but you can get it with the optional 100W charger for an added cost of $47.90. I opted for the latter and did not regret it.

The 100W charger has 3 USB C ports and 1 USB A Port. You can see their output specs in the 2nd photo.


The foldable prongs are compatible with US power outlets. UK or EU adapters can be applied and are provided, according to the region of the buyer.

The black Acebeam X75 comes with the silicone cover installed while the white (MAO) one comes in a protective nylon bag, without the silicone cover, which as we saw is in the accessory box.

Let's take the torches out and install the silicone cover on the white one as well.
The Acebeam X75 is a large soda can style torch, with non-removable or, more precisely, necessary for operation handle as the operating buttons are on the handle itself, which is very convenient.


The silicone cover protects the front of the torch and has holes for the cooling fins that it covers. Not only does it protect the torch, but also the user from accidental burns resulting from contact with the hottest part of the torch during operation.


The silicone cover also provides information, as it changes colour when its temperature exceeds 55°C.


Let's remove the silicone covers to really show off the beautiful design of the Acebeam X75.
The crenulated bezel is made of stainless steel and is black in both finishes. So are the buttons and the screws. Everything else is made of Aluminium and is either black or off-white, depending on the chosen finish. The head is thicker than the battery tube and the deep fins provide cooling surface.

There are openings all around the head to allow for air flow, as there is a cooling fan and a copper heat sink inside the torch!

The handles feature 2 operation buttons and a Mechanical Lock switch.

There are airflow holes at the rear of the head as well. Opposite the handle, there is a UNC 1/4" socket for mounting the Acebeam X75 on a tripod.


To the left of the handle there is a pressure release valve, to relieve pressure in case something goes wrong with the battery pack and pressurised gases are released. To the right of the handle, there is an indication LED.


The tail of the torch is flat and allows it to tail stand. You can unscrew and remove the tail cap to reveal the charging port. The battery pack capacity is 61.2Wh.


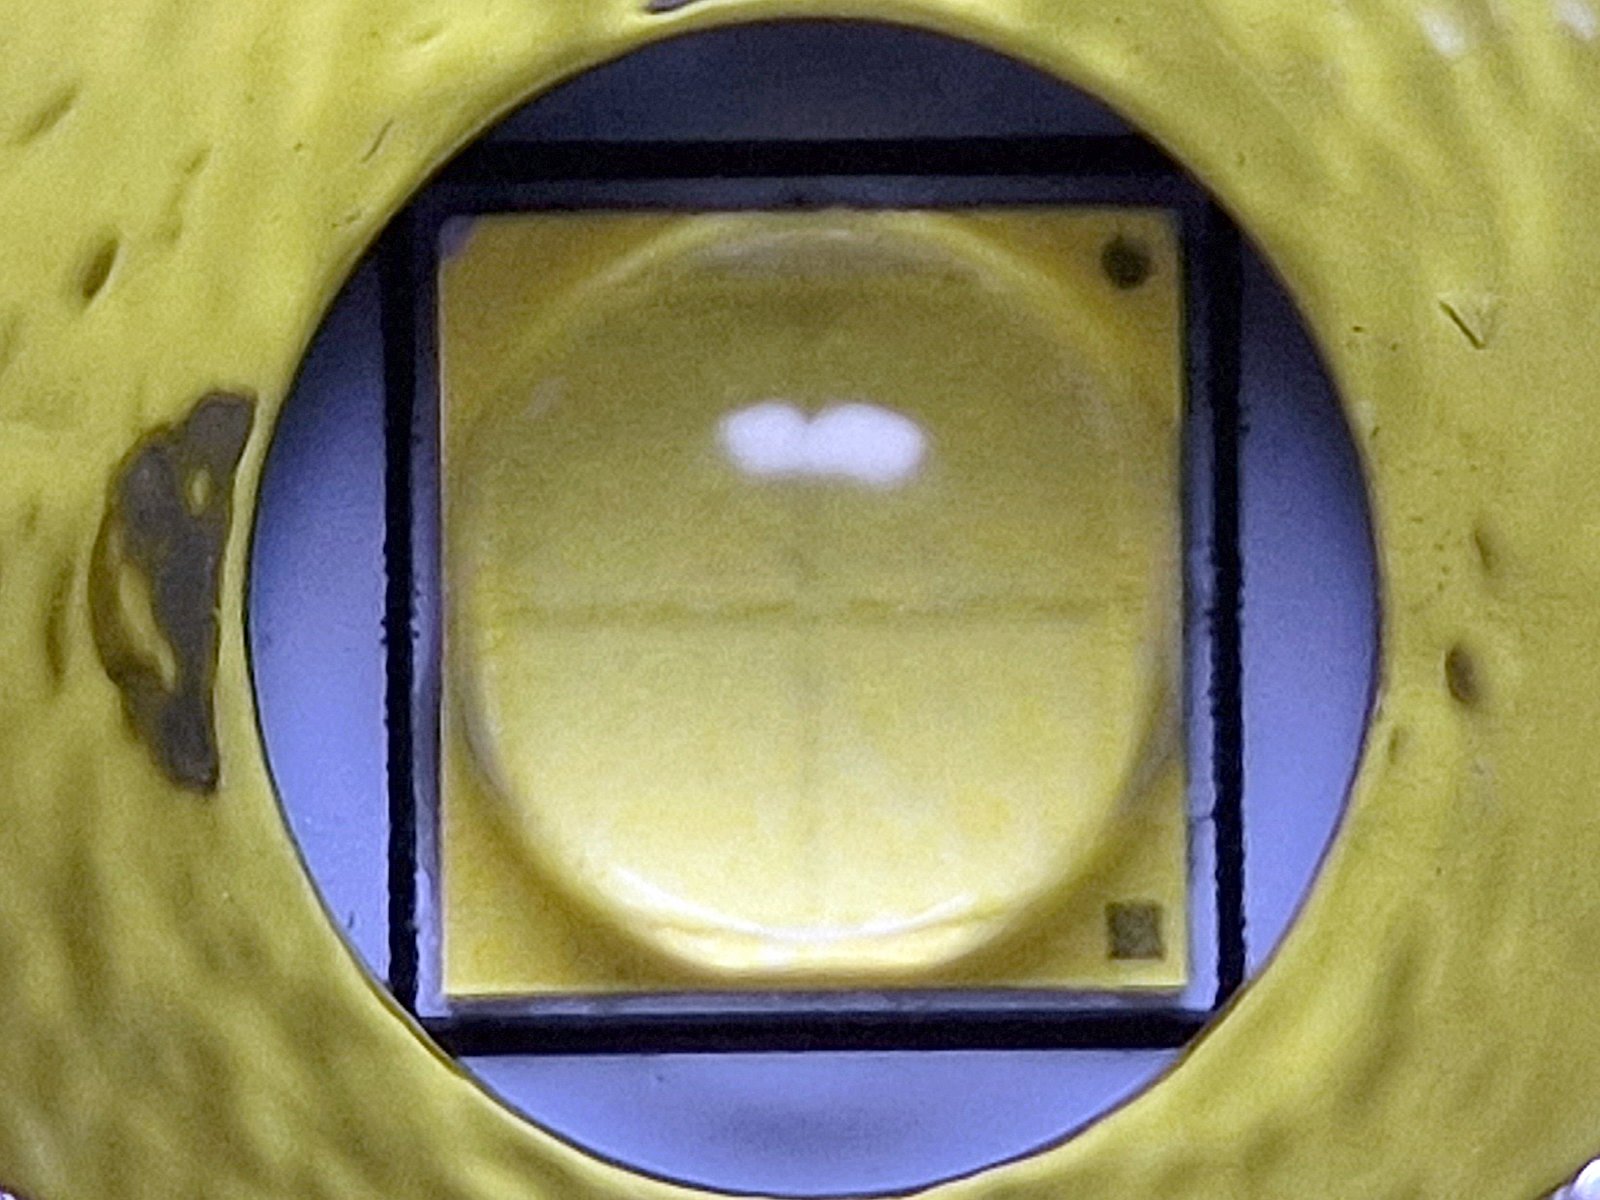
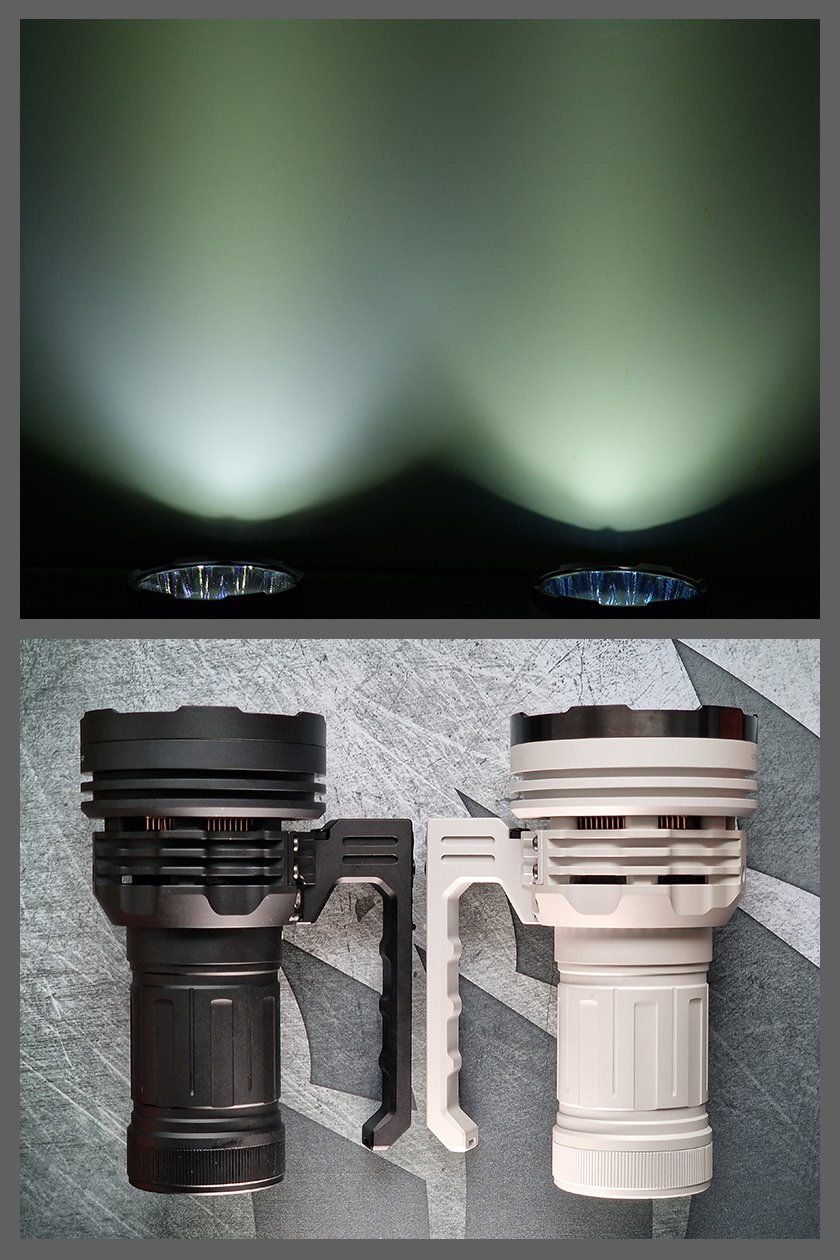
The front of the Acebeam X75 is impressive, with 12 shallow, orange peel reflectors housing the 12 emitters. Let's remove the protective film and have a closer look!


The 1st photo shows one of the Cree XHP70.2 6500K emitters that are in the black sample and the 2nd one of the Cree XHP70.3 HI 6500K emitters that are in the white sample. As you can see, both are 4 die emitters, which makes the Acebeam X75 a 48 LED die torch! The Cree XHP70.2 is a domed emitter while the Cree XHP70.3 HI is dome-less and has a smaller die area, which explains both the lower brightness and the higher intensity (and therefore throw).

To keep the heat generated by all those emitters under control, a copper heat sink can be glimpsed through the head fins. But I will elaborate on the cooling system later.


Under the tail cap there are written specifications and instructions, 2 indicator LEDs and a recessed reset switch.


The USB C port is on the side, inside the threads of the tail cap.
Although I can see the simplicity and reliability of this design, I do not like it. The tail cap feels too generic and non-luxurious when removed, especially when compared with the high end feeling of the Acebeam X75 in general. But the real issue is practical. Not only can the tail cap be damaged or lost, but also the grease in the threads got on my hands and smeared everything a few times before I got used to the notion and became mindful enough. A tail cap system such as the ones used in the Olight X7R or Olight Marauder 2 would have been nicer. An exposed, water proof USB C port, such as the ones used in high end mobile phones would have been even better.

The battery pack unscrews from the head as expected. There is an insulating film that needs to be removed before use. The driver is covered, except for a hefty, spring loaded contact point in the middle, which corresponds with the equivalently hefty positive terminal in the centre of the battery pack.


The threads are square cut, well greased and smooth.


Build Quality and Finish
The build quality of the Acebeam X75 is outstanding. The fit is perfect and both the Type-III Hard Anodization (black) and the Micro Arc Oxidation (off-white) finishes are flawless.

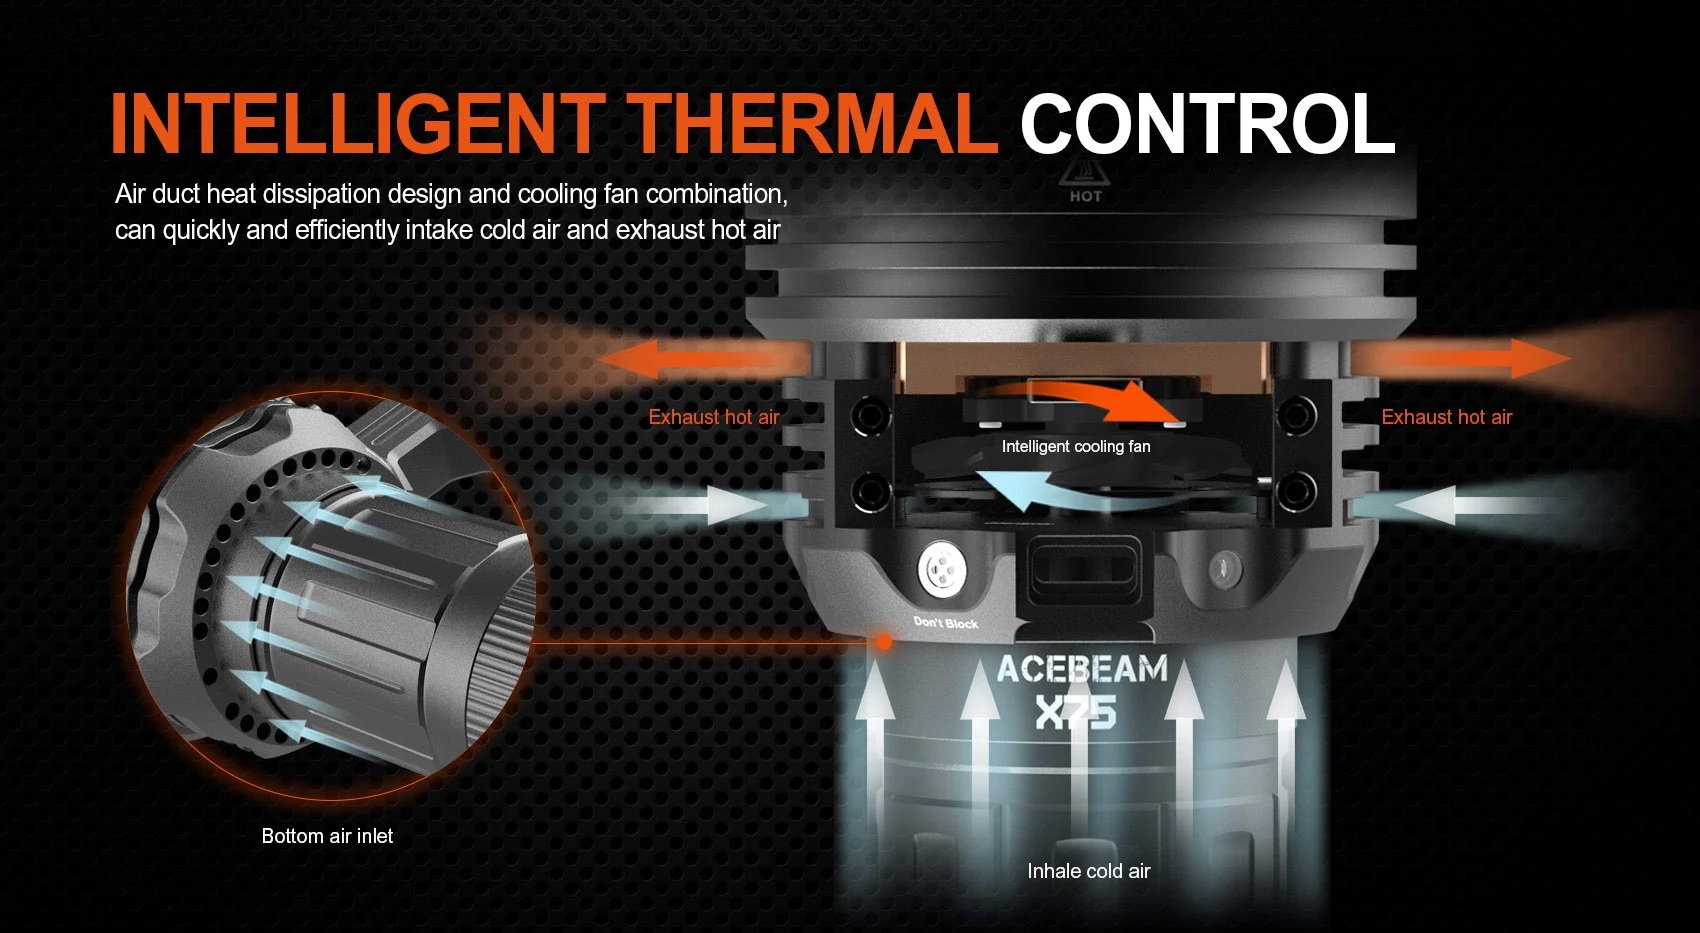
Cooling System
The cooling system of the Acebeam X75 is the best I have ever seen in any torch. Not only is it the best, but also user serviceable, which is an amazing feature.

Removing the 4 torx screws that hold the handle in place is very easy, using the provided torx key. The handle comes out, revealing the copper heat sink that cools the head of the torch.

Here we can see the copper heat sink, as well as the 5 contact points that transfer the control commands from the handle buttons to the driver of the torch and power to the fan. The heat sink can be cleaned by the user.


The contact points correspond with the 5 pogo pins on the handle. The connection is insulated by a rectangle O-ring, for which a spare is provided, as we saw earlier.


The fan can also be cleaned by the user and even replaced with the spare one provided if it fails. 2 small screws must be removed with the provided torx key to replace the fan. Spare screws are provided, as we saw, both for the smaller fan screws and the larger handle screws, so if the user drops and loses one, it is not a problem.

The Acebeam X75 features intelligent thermal control. This means that not only does the fan not work all the time, but even when it does, it adjusts its speed according to the temperature of the driver.
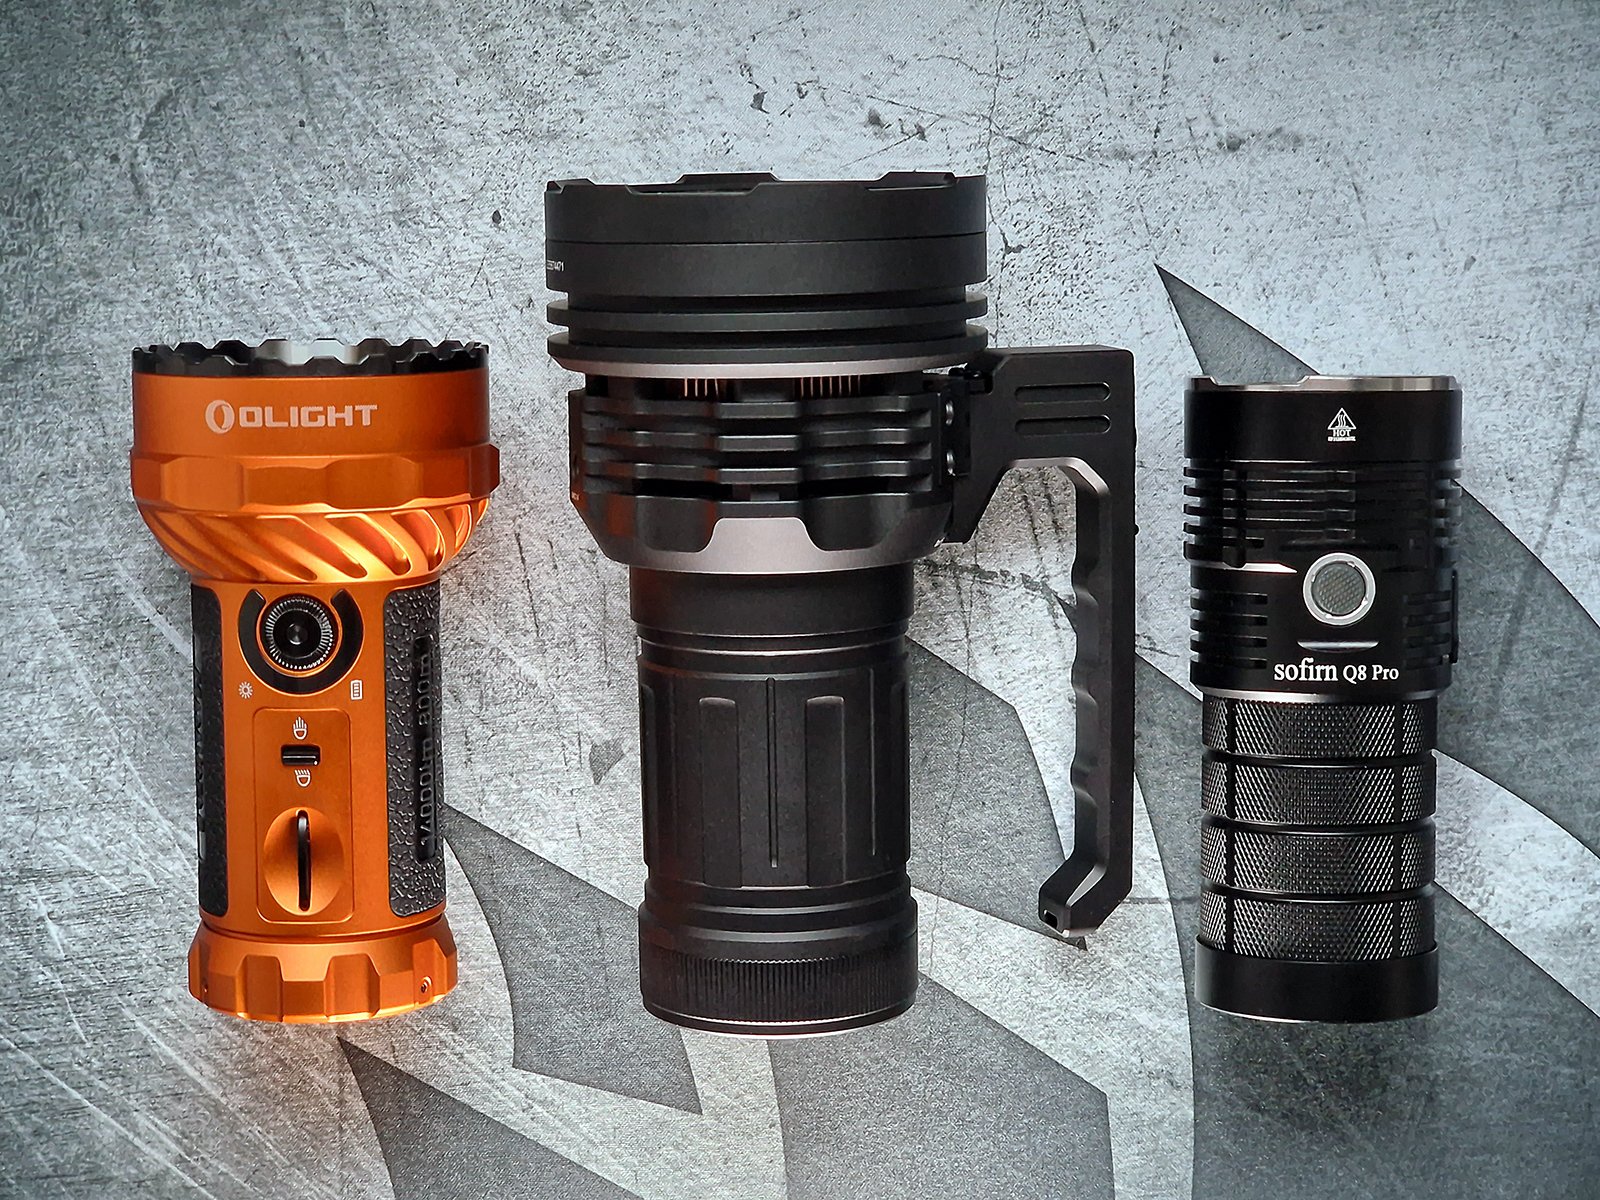
Size Comparison
The Acebeam X75 is on the large end of the spectrum for soda can type torches. There are of course much larger torches out there and taking into account its Lumen output, the Acebeam X75 is quite compact for the power it packs. That said, it is by no means a torch you can put in a large jacket pocket.
Here is the Acebeam X75 between the Olight Marauder 2 and the Sofirn Q8 Pro.
Specifications
The specifications of the Acebeam X75 with Cree XHP70.2 6500K emitters can be seen in the following table:

The specifications of the Acebeam X75 with Cree XHP70.3 HI 6500K emitters can be seen in the following table:

I really like the fact that so much information is given on output, intensity, throw and run times, on all settings. Very few companies are so transparent about the specifications of their products. It is clear from the specifications that the Cree XHP70.2 6500K emitters offer higher output...

…while the Cree XHP70.3 HI 6500K emitters offer higher intensity and throw.
Other than that, the 2 samples are exactly the same, except for the finish, of course.
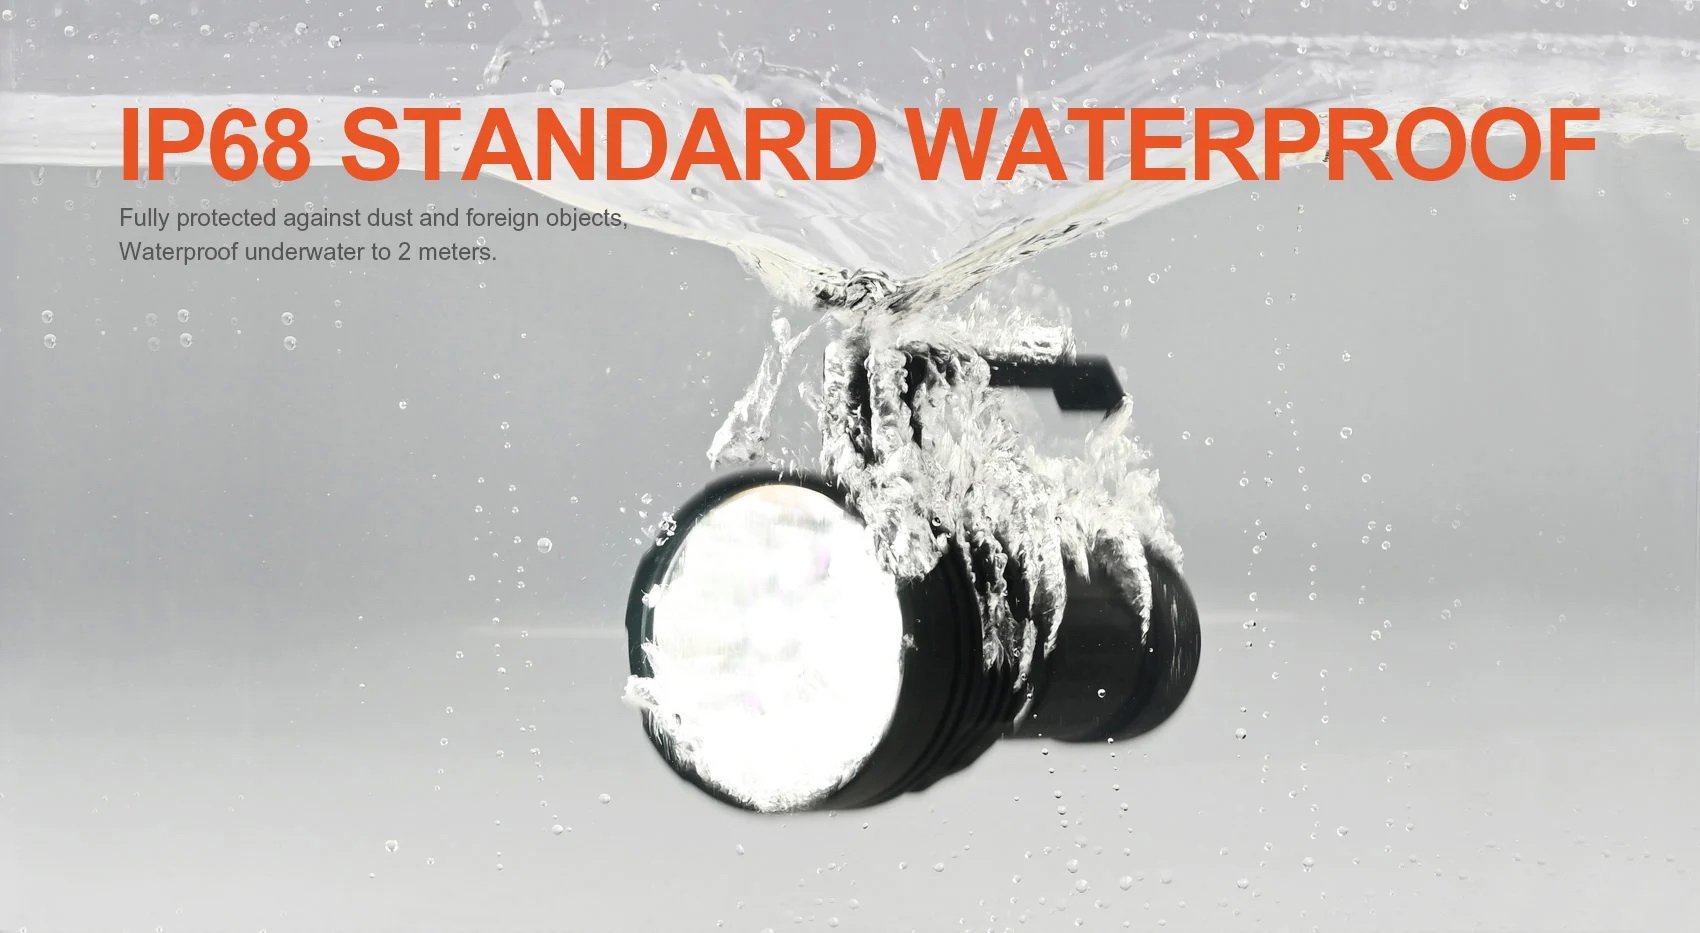
The Acebeam X75 is IP68 standard waterproof and can be submerged to 2m.
User Interface
The user interface of the Acebeam X75 is simple and intuitive. It is based on a dual switch design and a Mechanical Lock. The Mechanical Lock is disengaged on the black torch and engaged on the white one, in the following photo. When the Mechanical Lock is engaged, the switches cannot be physically pressed.
The front, bigger switch is the Auxiliary Switch and the rear, smaller switch is the Main Switch. The Main Switch is raised higher and therefore easy to differentiate by feel.

The following diagrams explain the operation of the Acebeam X75 in detail.
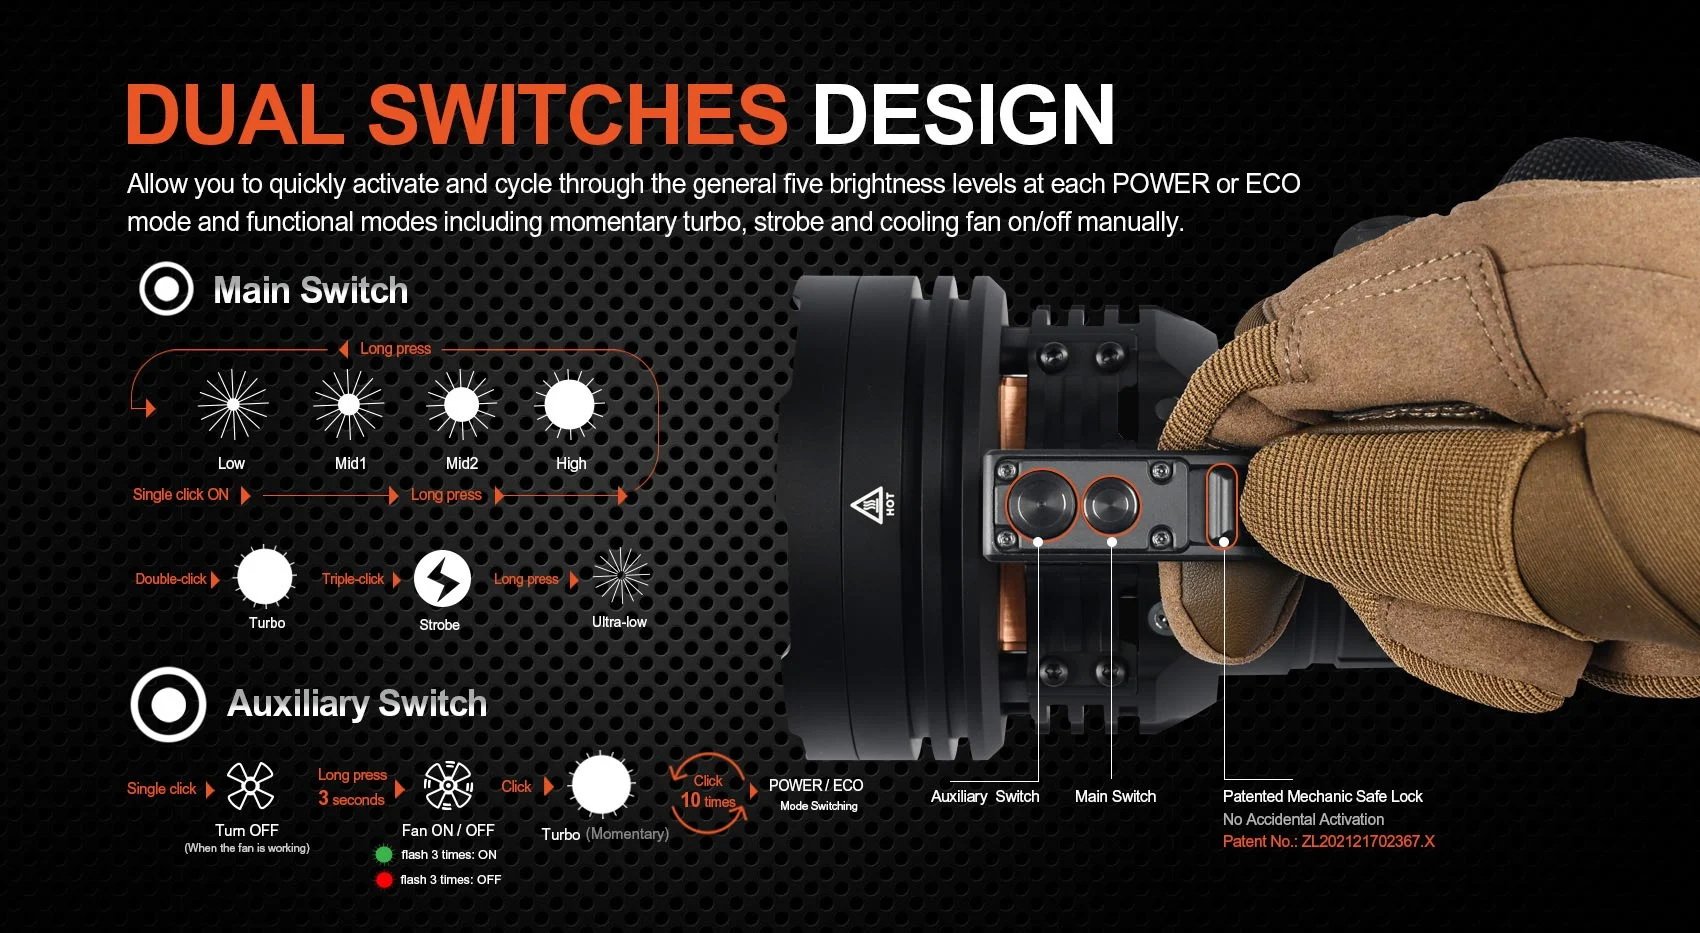

The user interface of the Acebeam X75, in my own words, is as follows:
Main Switch
-
From Off
- Click to turn on (with memory for the 4 main modes, Low, Med1, Med2 and High).
- Click and hold to turn on at Ultra-Low mode.
- Double click to turn on at Turbo
- Triple click for Strobe.
-
From On
- Click to turn off.
- Hold to cycle through the main modes (Low, Med1 ,Med2, High). You can do that even from Ultra-Low, Turbo or Strobe.
- Double click for Turbo. Double click again to return to previous mode.
- Triple click for Strobe. Click to turn off, click and hold to cycle through the main modes or double click for Turbo. From Turbo, double click to return to previous (before Strobe) mode. There is no way to go directly from Strobe to a previous, non Turbo mode.
Auxiliary Switch
-
From Off
- Press momentarily to manually stop the fan if it is running.
- Press and hold for 3 seconds to turn the Fan Mode (Windy Mode) on or off. This is indicated by 3 flashes of the indicator LED on the right of the handle. Green for on, red for off.
- Click 10 times to switch between Power and Eco mode. Power mode is indicated by the main emitters turning on for a moment and getting brighter. Eco mode is indicated by the main emitters turning on for a moment and getting dimmer. The Acebeam X75 ships in Eco mode.
-
From On
- Click and hold for momentary Turbo.


The buttons feel a bit mushy but are easy to use and of high quality. The mushy feeling is caused by the mechanics involved in having a Mechanical Lock that can block the pressing of the switches.
Modes
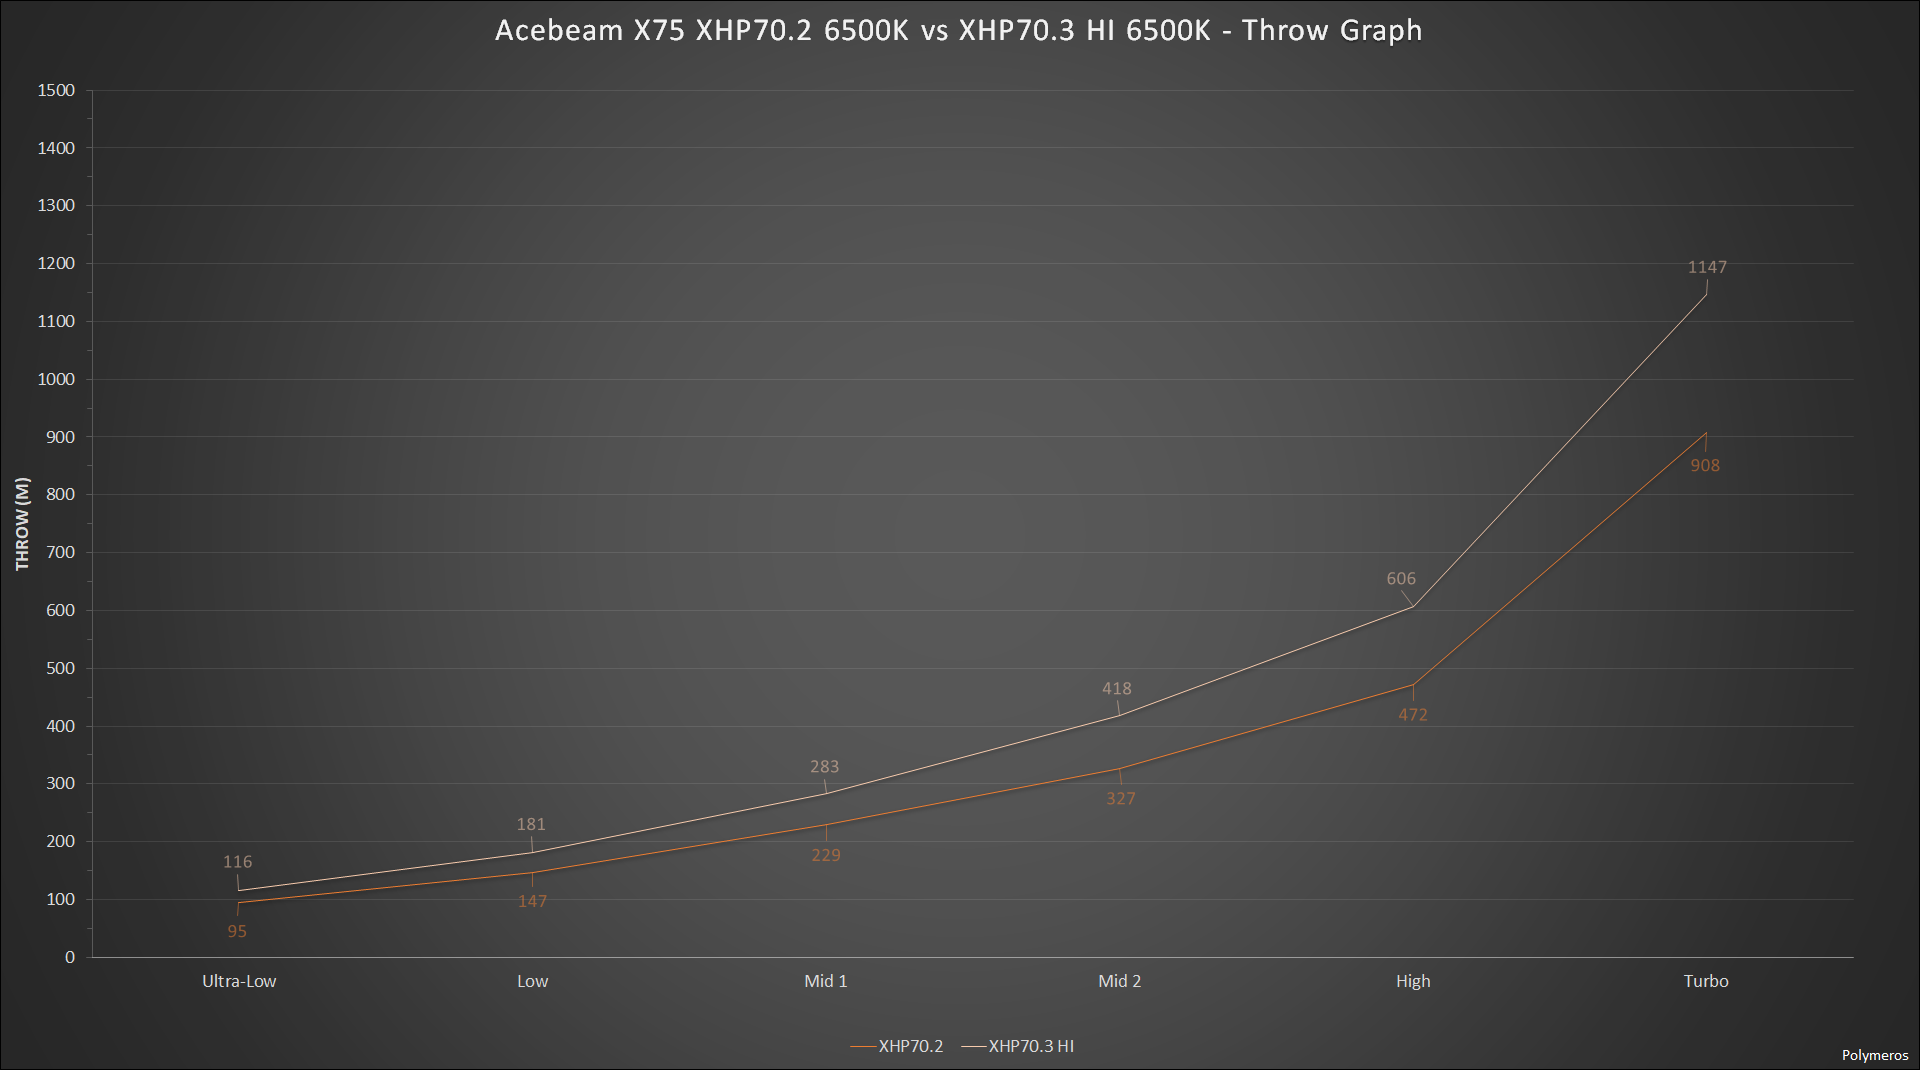
The output levels of the Acebeam X75 can be seen in the following table. The numbers provided by Acebeam are in black and my measurements are in orange.
I do not own a multi thousand dollar worth integrating sphere, just a logging Lumen meter and a home made integrating tube. The array is calibrated with 3 separate, professionally measured lights and gives me consistent results, but there is definitely room for error and deviations are to be expected.
My Lumen measurements show that the Turbo output of both emitter types do not reach the specs but are still very impressive. The Cree XHP70.2 6500K are up to or even slightly above specs in Lumen output on all modes except Turbo. The Cree XHP70.3 HI 6500K have lower Lumens output than specs on all modes. It seems like Acebeam just copied the lower mode numbers from the Cree XHP70.2 6500K specs but of course the Cree XHP70.3 HI 6500K will be a bit lower.
The Candela and Throw I measured are also lower than specs in all modes, but again impressive for these floody beams. The Cree XHP70.3 HI 6500K is the stronger emitter in this category.

The following graph shows the lumen output on all modes for both emitters. The Cree XHP70.2 is more powerful on all modes.

And this graph shows the throw on all modes for both emitters. The Cree XHP70.3 HI throws further on all modes.
So, what will you choose, Lumen output or throw? For me, both emitters have more than enough of both. It is just a matter of which feature you favour the most.
Photometry
I took some photometry readings with an Opple Light Master Pro. The results are in the following table.

The CCT of both emitter types is quite similar and start around 5500K in Ultra-Low to gradually rise to around 6200K on Turbo.

The Δuv of the 2 emitter types is different though, with the Cree XHP70.3 HI 6500K having a higher Δuv on all modes and therefore a greener tint. Both emitter types are above BBL on the lower 5 modes but as the output rises they get closer to neutral and go below BBL on Turbo.

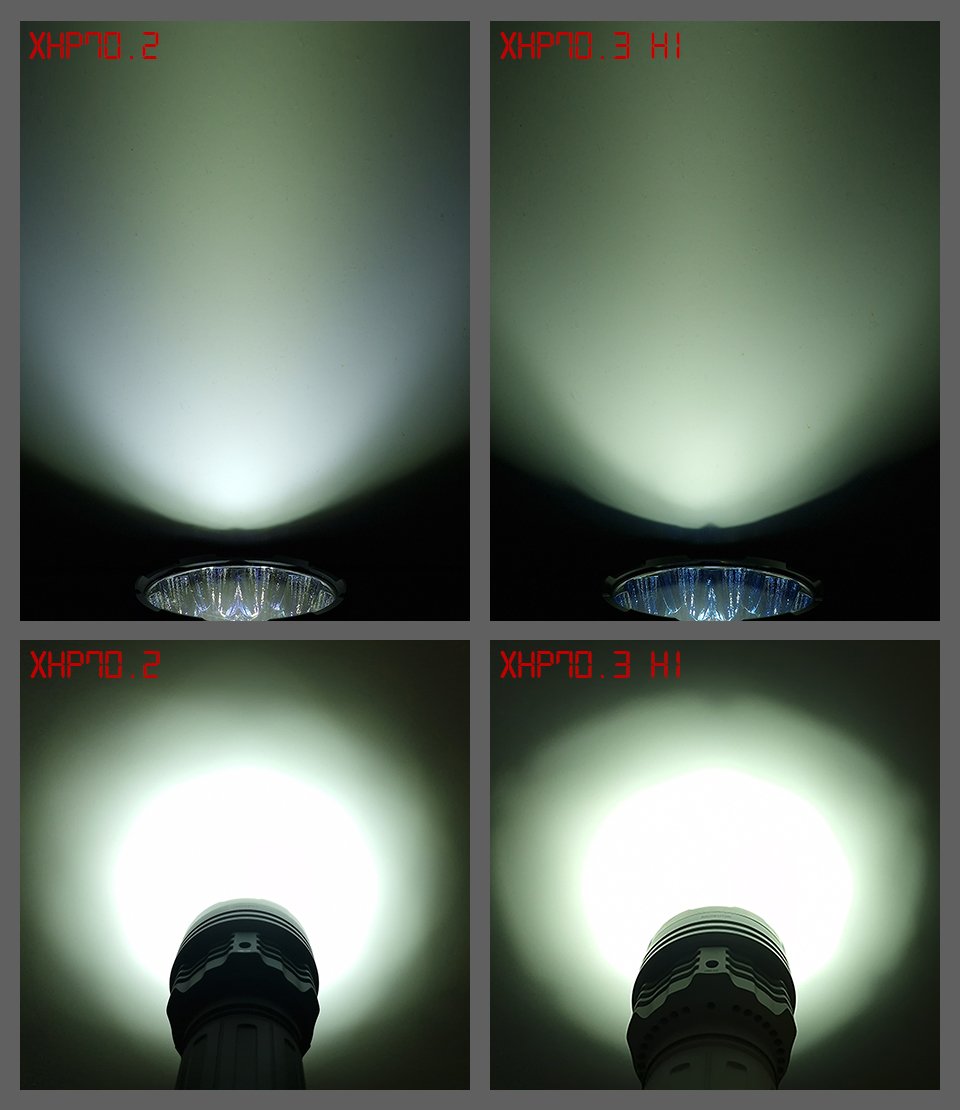
Here is a photo of the tint in Ultra-Low, where it is the greenest. The Cree XHP70.2 6500K is on the left and the Cree XHP70.3 HI 6500K on the right. The photo was taken with a manual white balance of 5500K.
Beam Profile
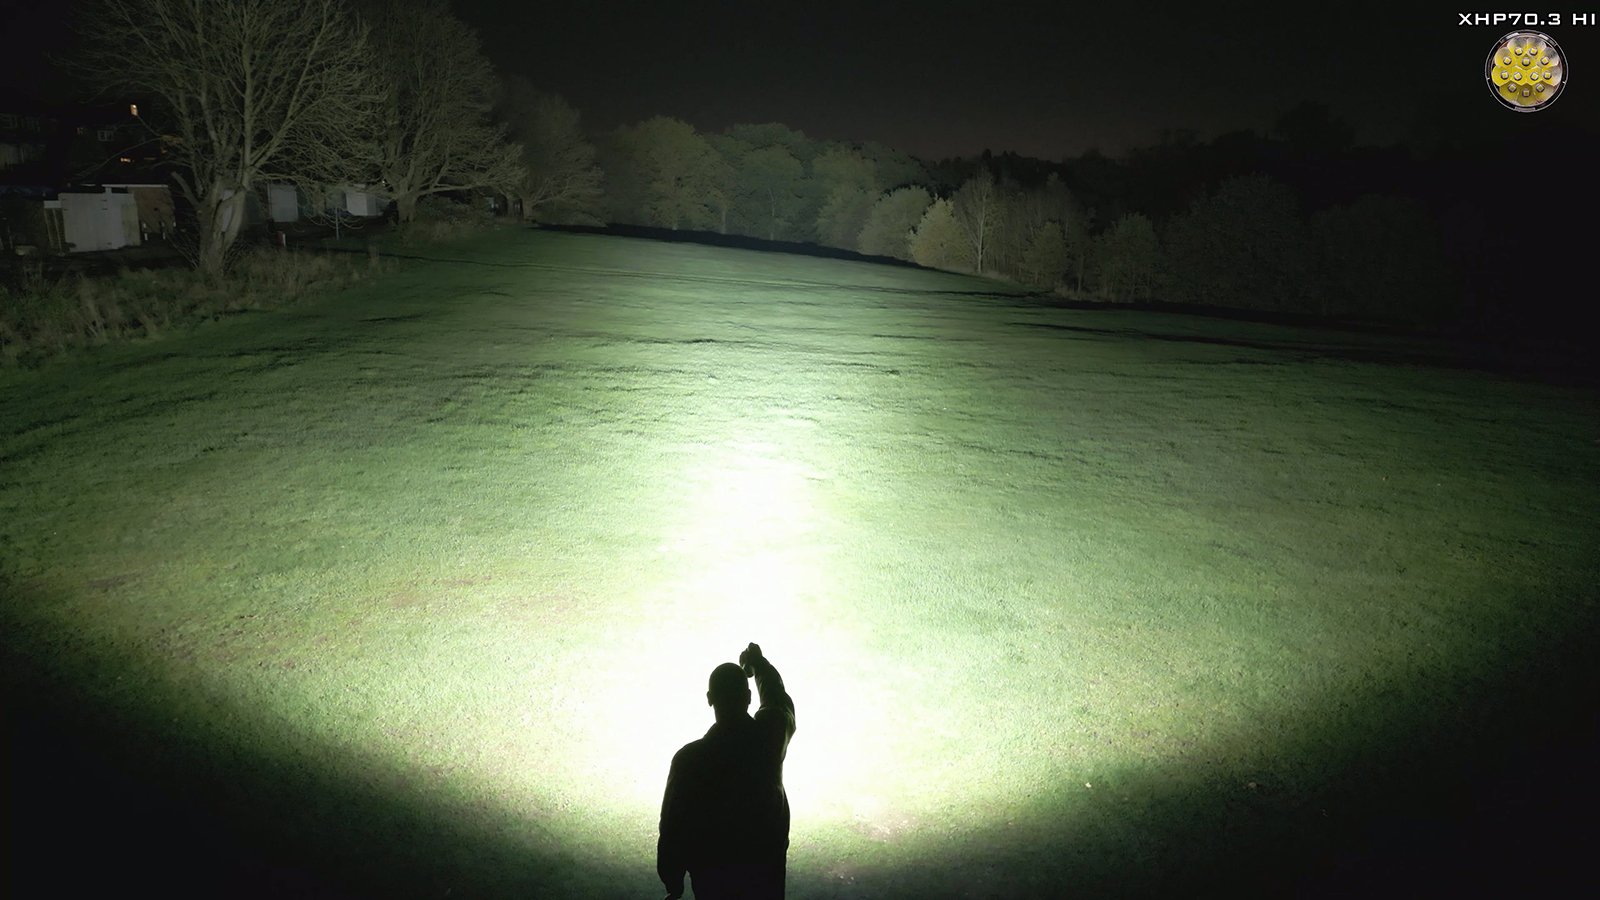
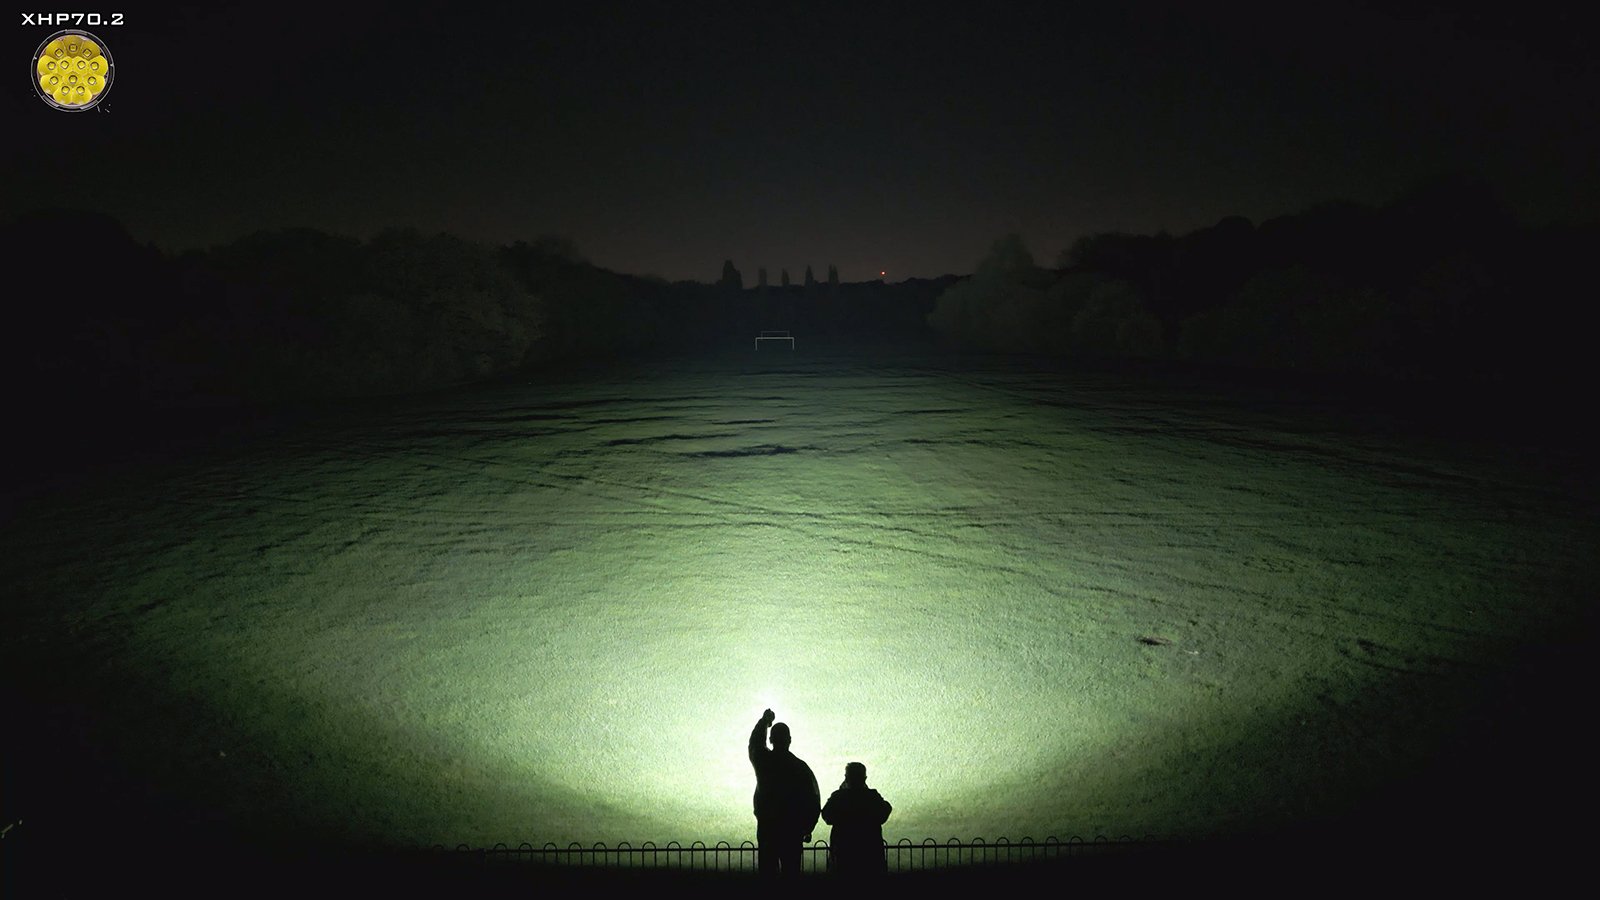
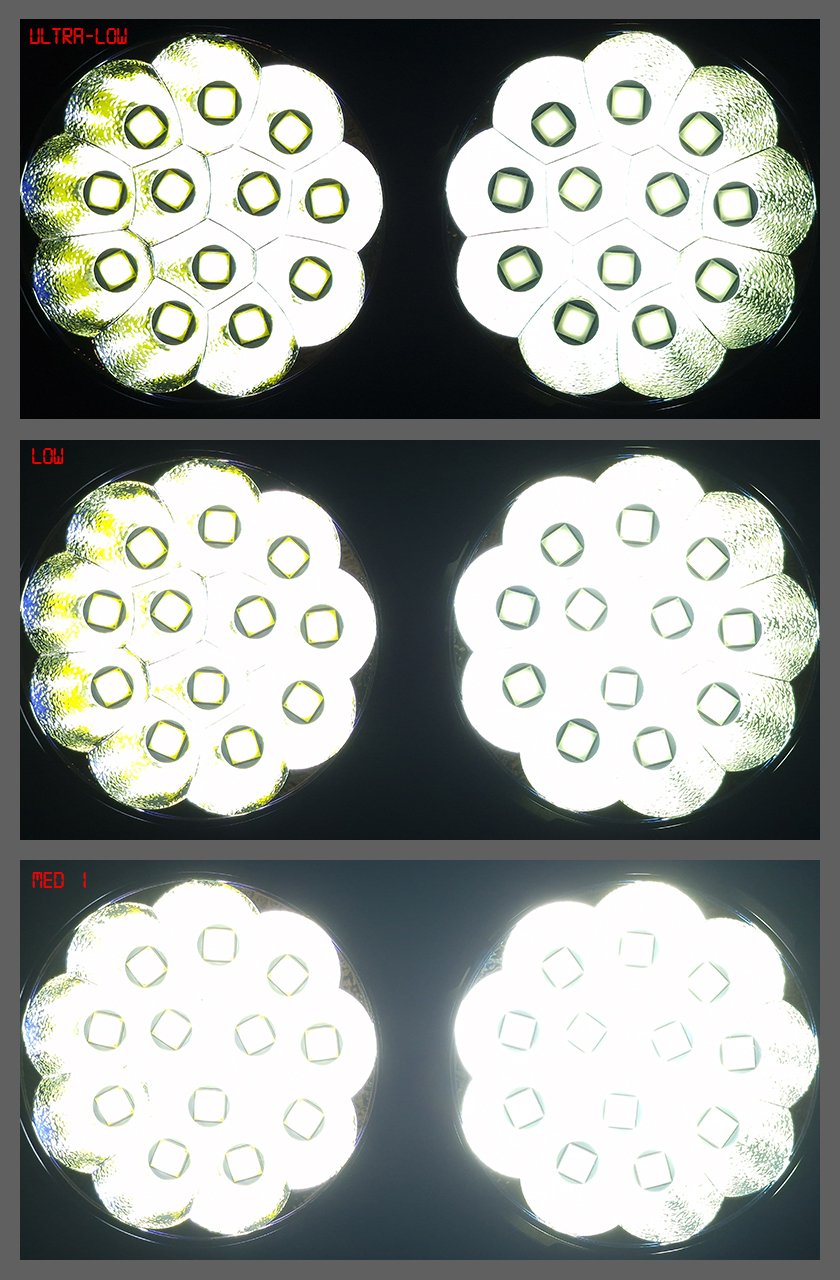
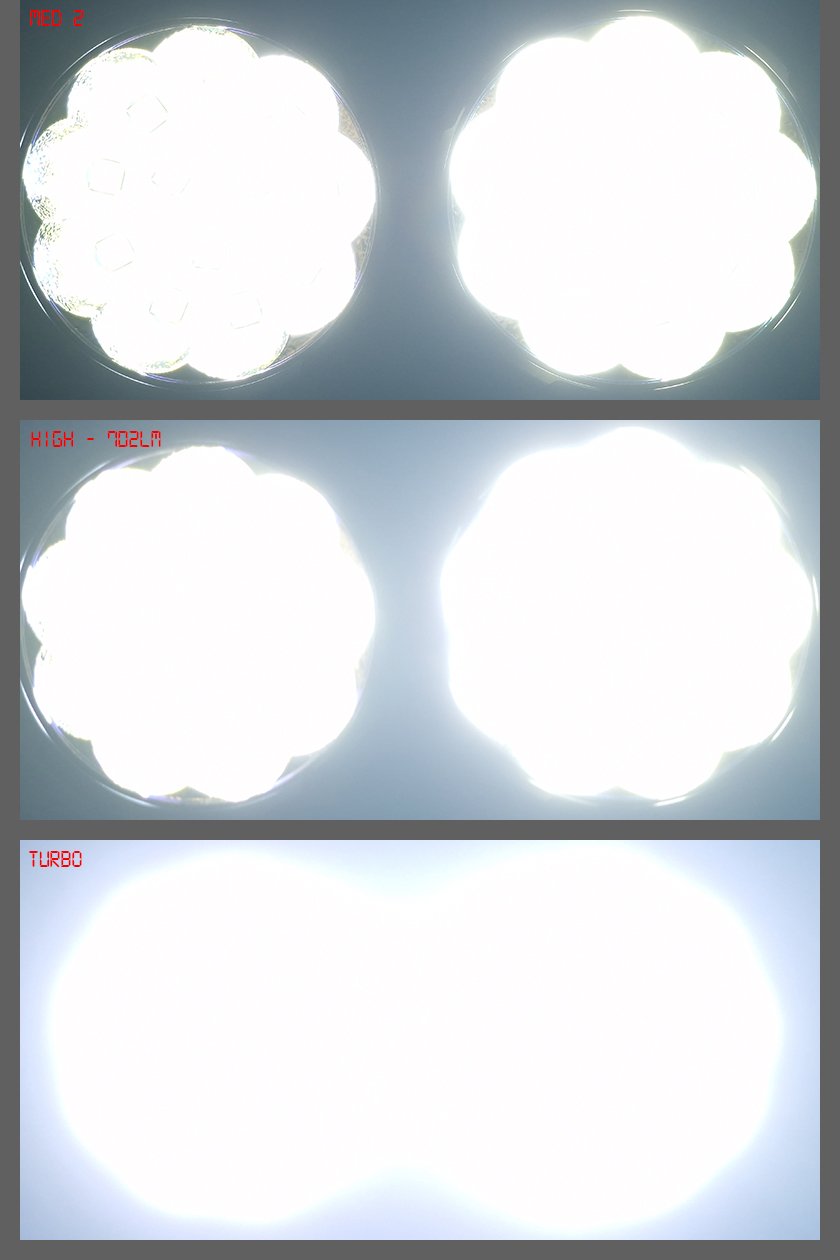
The beam pattern of both emitter types in the Acebeam X75 is very floody but there is a definite, albeit small difference in intensity and beam angle.
Video Comparison - Drone footage
For the video comparison of the Cree XHP70.2 versus the Cree XHP70.3 HI version of the Acebeam X75, I enlisted the help of the excellent photographer and videographer Daniel Beacock and his drone. We tested the two versions of the Acebeam X75 over distances of 191m and 470m.
Here are some revealing frames from the video:
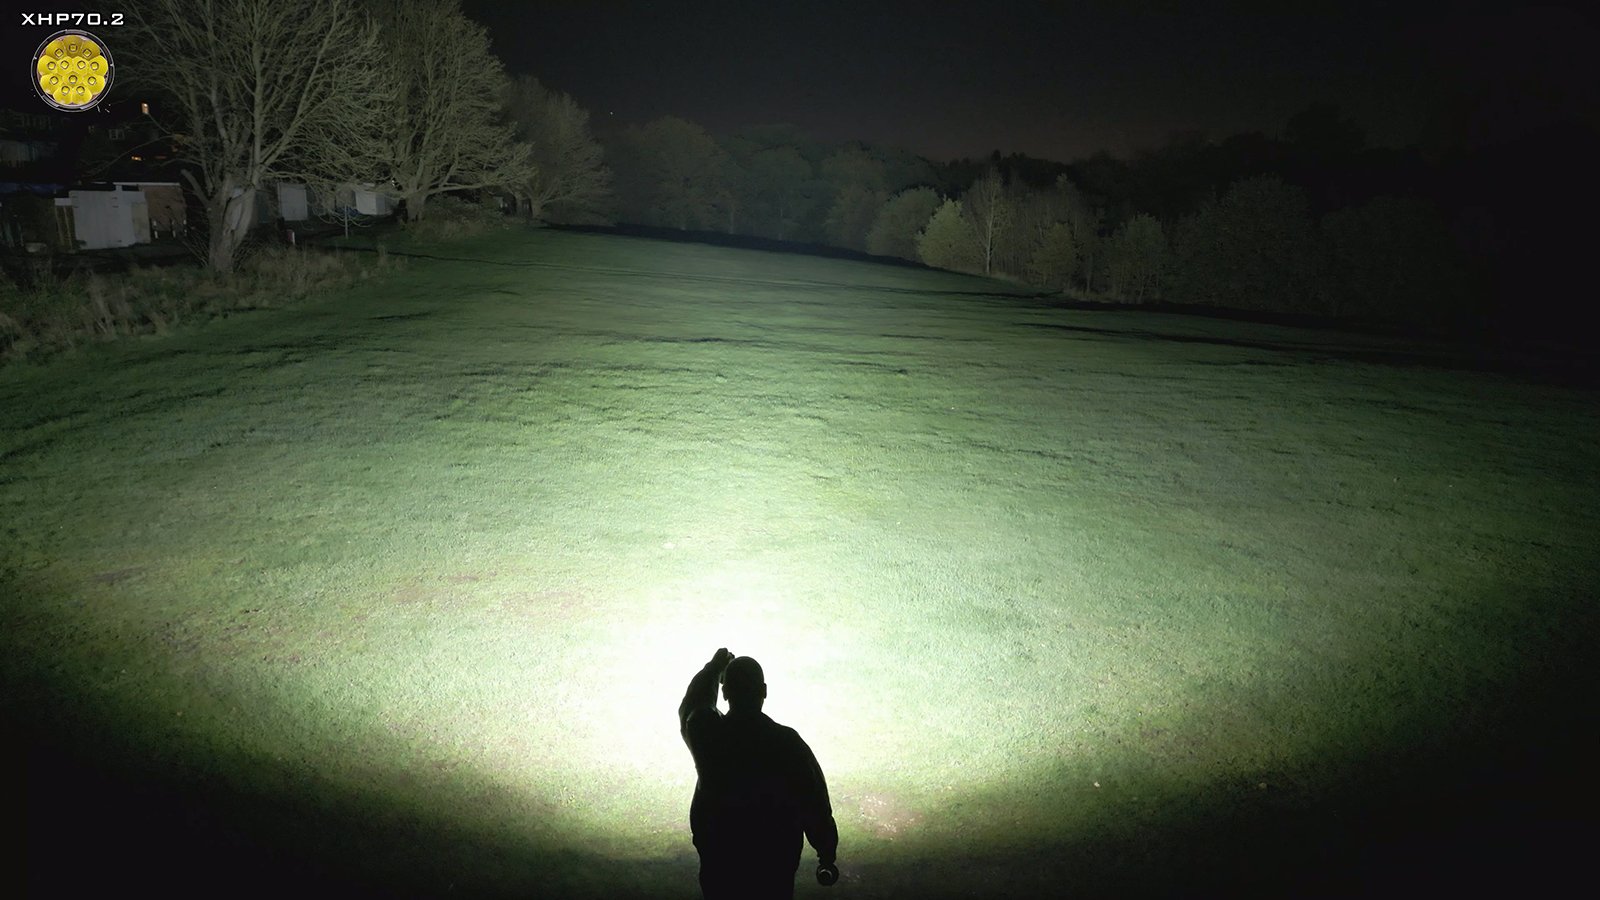

And here are the same stills, in animated GIF format.


Driver
The driver of the Acebeam X75 is a digitally regulated, constant current boost driver, which takes the 14.4V from the battery pack and delivers 24V to the emitter array. Both emitter types are 6V, so they are arranged in 3 parallel banks of 4 emitters in a row to work with the 24V that the driver provides. This arrangement should be able to maintain constant brightness regardless of the battery voltage. The driver also features smart temperature control. Large copper heatsinks and thermal pads provide the thermal path to the main copper heatsink. Very refreshing to see such a high quality driver.


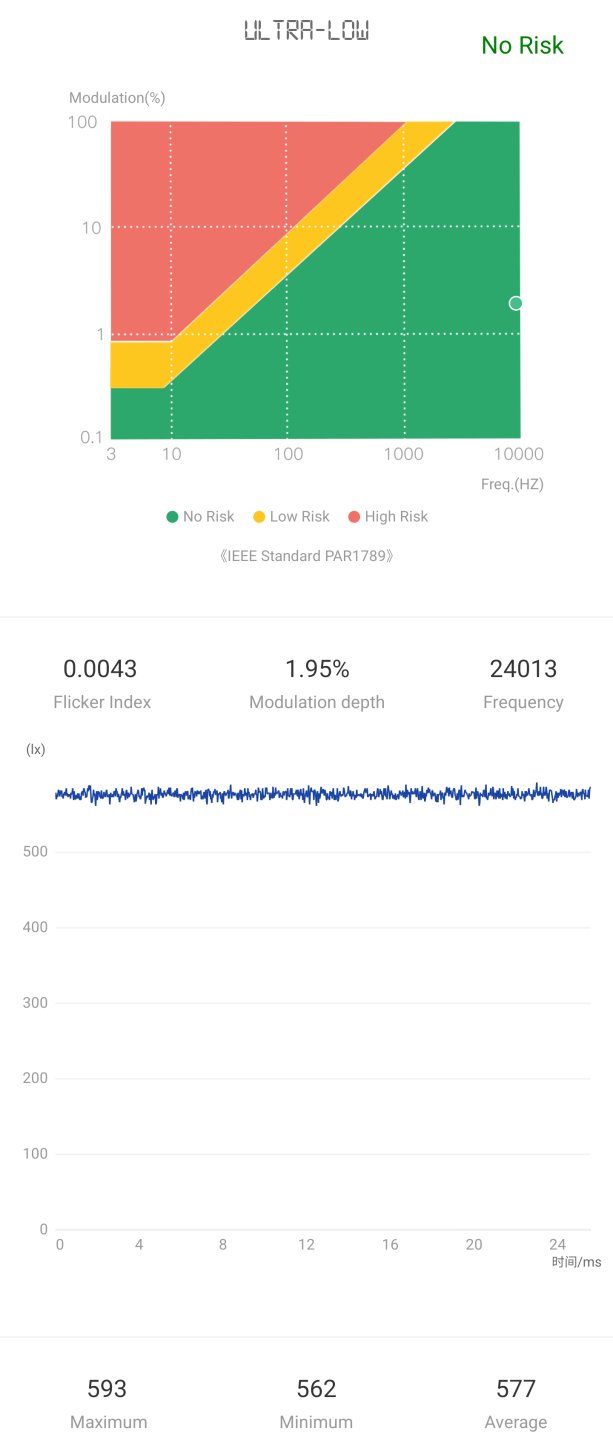
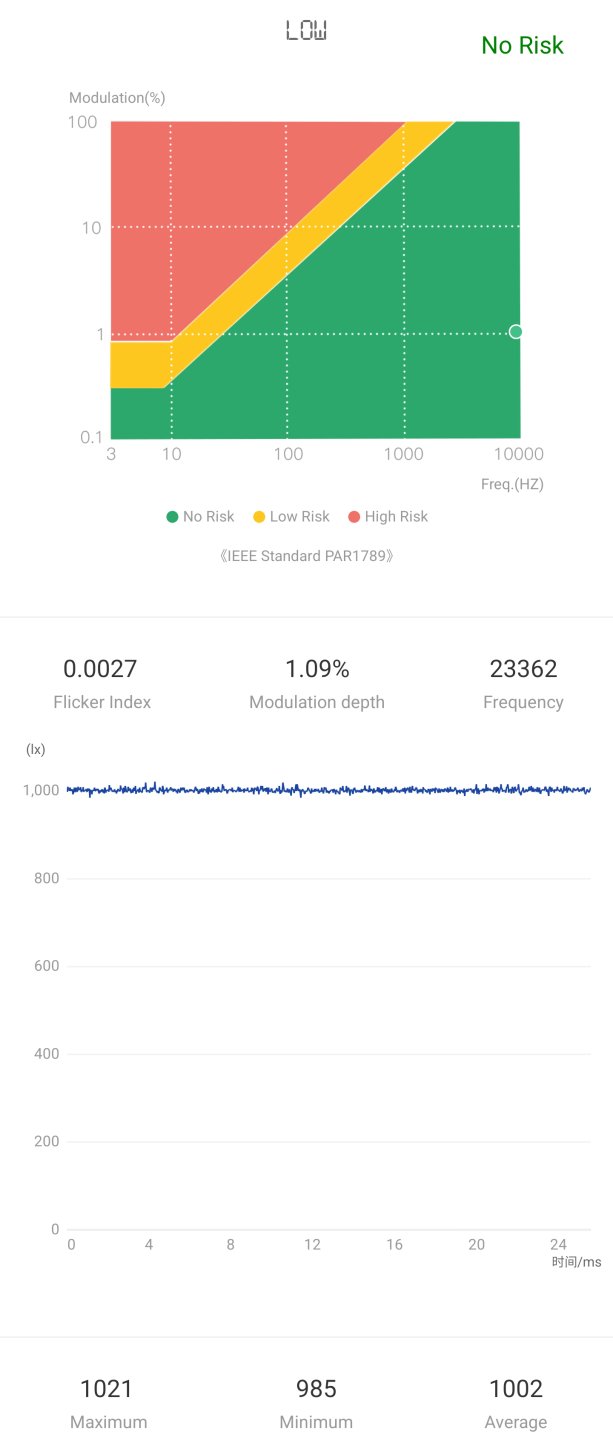
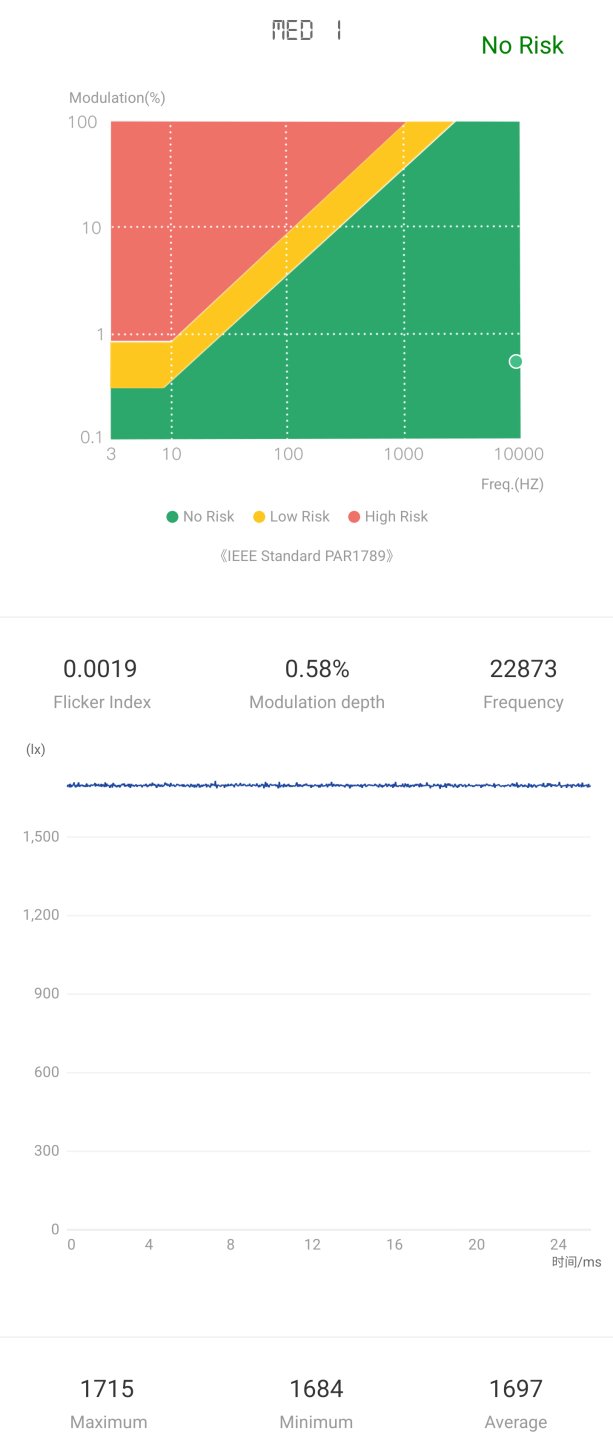
There is no PWM, detected or visible, in any of the modes.


Battery Pack and Charging
The Acebeam X75 comes with a proprietary battery pack. This is unappealing for many users but necessary when you are dealing with this kind of configuration of 4 21700 high output batteries in series. The battery pack supports Power Delivery charging at 60W or 100W and also Power Bank functionality at the same power levels.
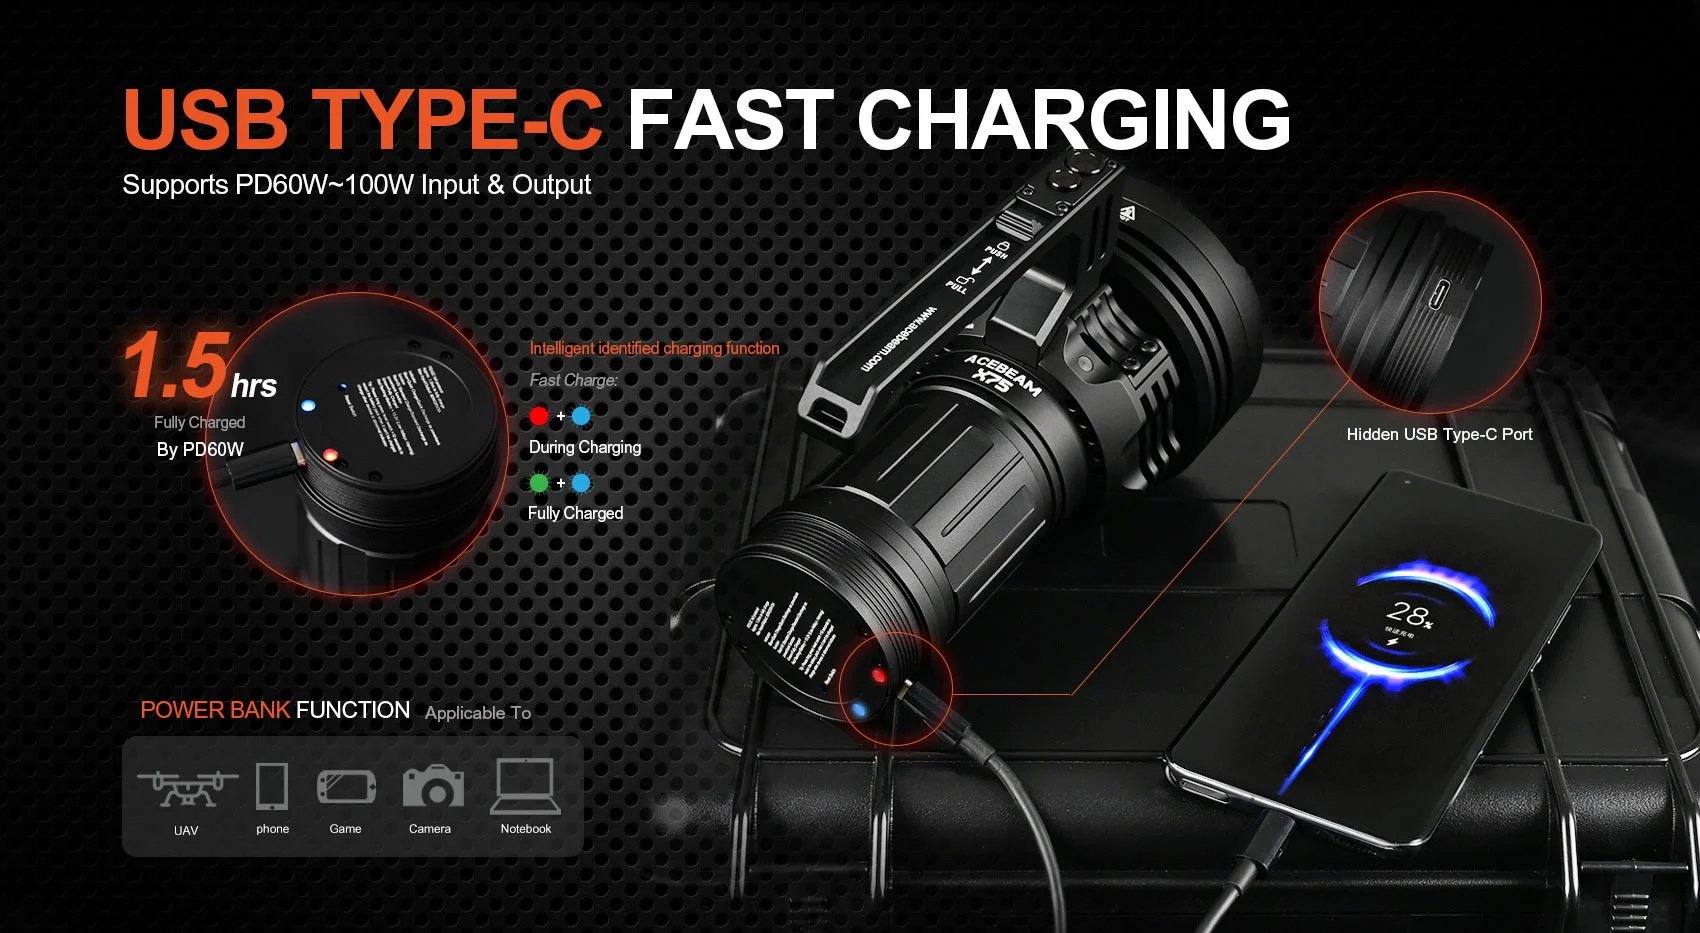
The charger that comes as standard with the Acebeam X75 can provide 60W but it is possible to upgrade to a 100W charger for an added cost of $47.90. I opted to test the 100W charger. The supported modes are listed on the charger itself.
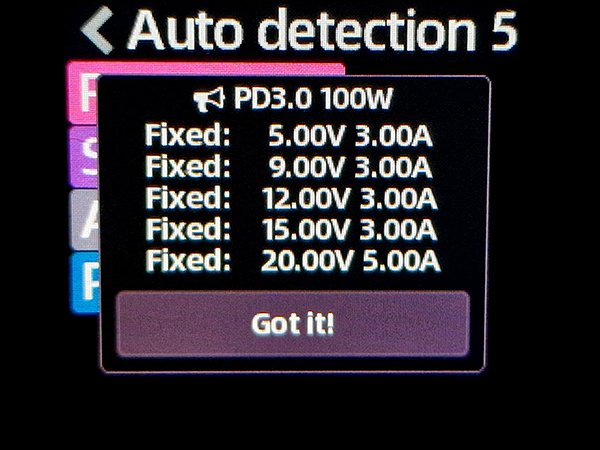
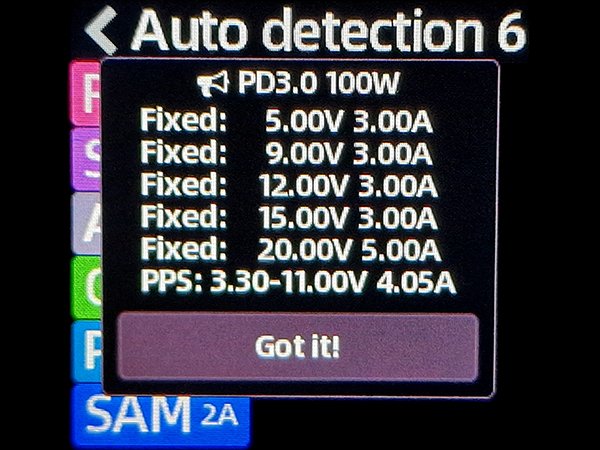
Theoretically, C1 and C2 should be the same, but in reality they do not support all the same protocols.
Here are the protocols supported by C1, C2 and C3 respectively.


And here are the Power Delivery output modes supported by C1, C2 and C3 respectively. Both C1 and C2 can be equally used to charge the Acebeam X75 at 100W but if you want to charge other devices, C2 supports the most protocols, including a set of PPS in Power Delivery.
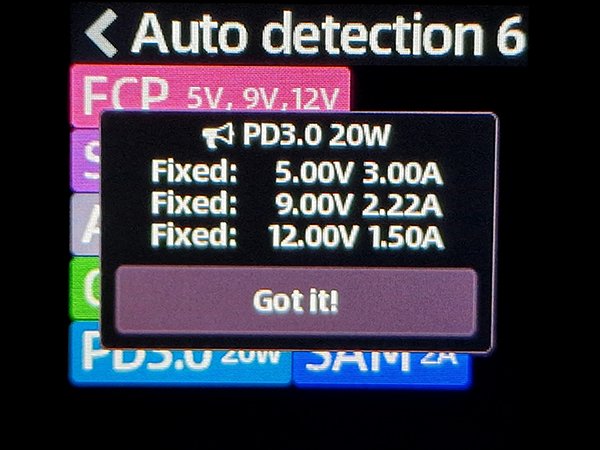
These are the modes supported (in green) by the USB A port.

The cable provided is 1m long and of very high quality. It supports 100W (20V, 5A), as expected, but also supports transfer speeds of up to 20Gbps, which is a pleasant surprise.

The specifications of the battery pack are shown in the table below.

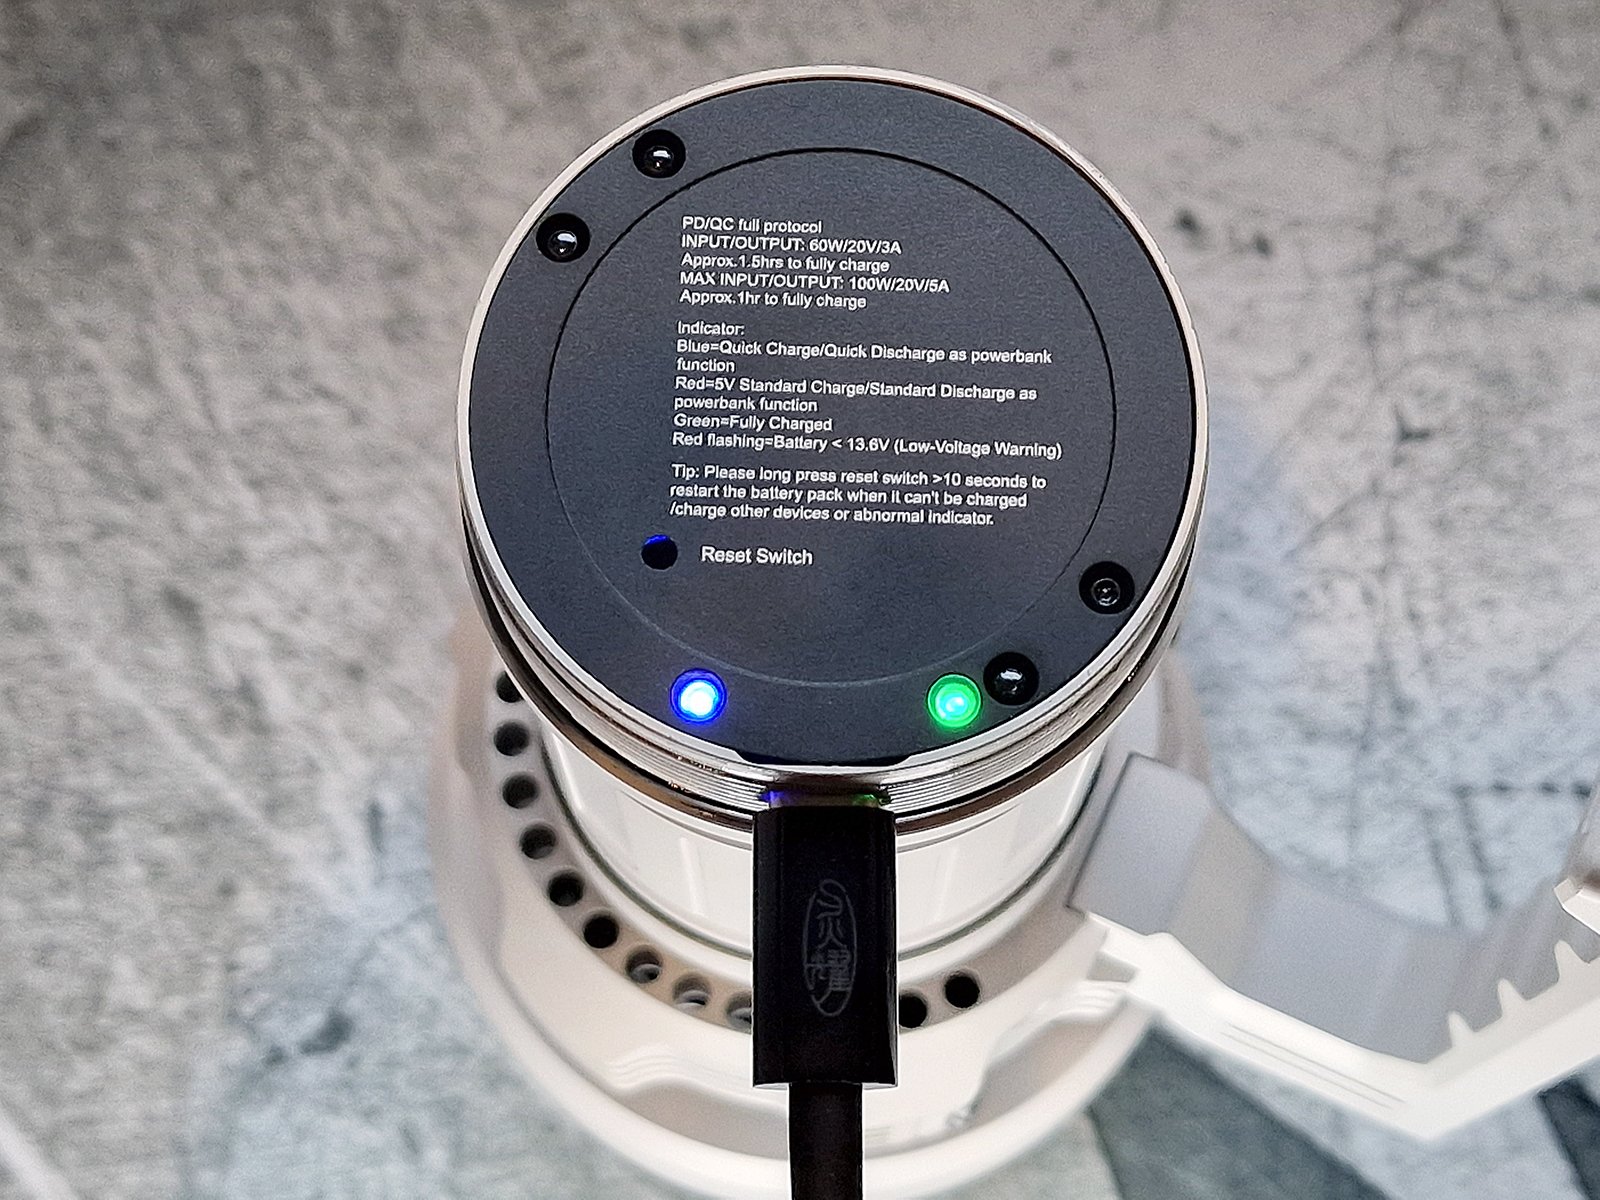
To charge it, you must remove the tail cap and plug in the USB C cable.

The right indicator LED turns red to indicate charging. The left indicator LED turns blue to indicate that the Power Delivery protocol is being used.


The right indicator LED turns Green to indicate that the charging is complete.
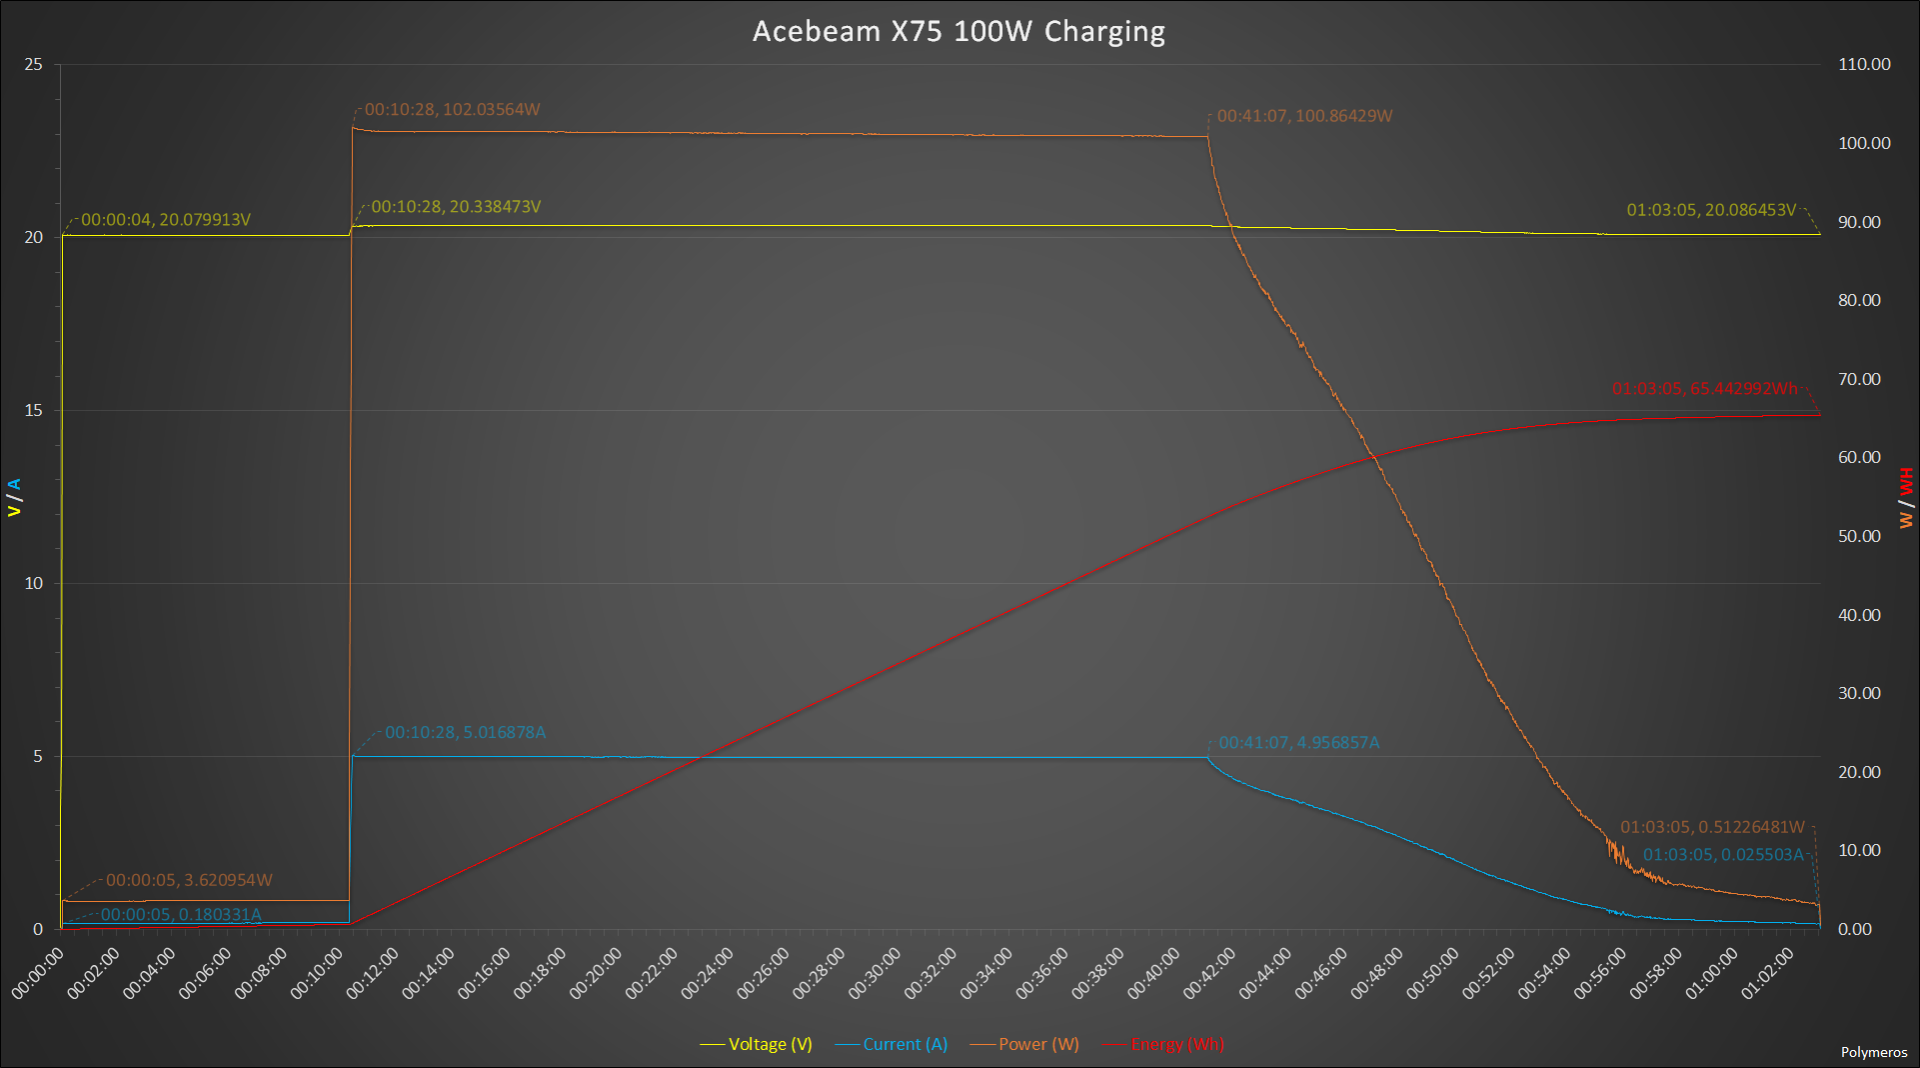
The following chart shows the charging of the battery pack with the 100W charger, after it had been depleted completely to the point where the torch turned itself off at 11.62V. The charging starts at 3.6W for about 10 minutes and then jumps to 100W for about half an hour. Then it gradually declines until the charging is completed at a total charging time of about 1 hour. This charging process used a total of 65.44Wh while the battery pack is rated at 61.2Wh, which is very good charging efficiency. The voltage of the battery pack at the end of charging was 16.73V.
When used as a Power Bank, the battery pack supports Power Deliver 3.0 up to 100W, with PPS.


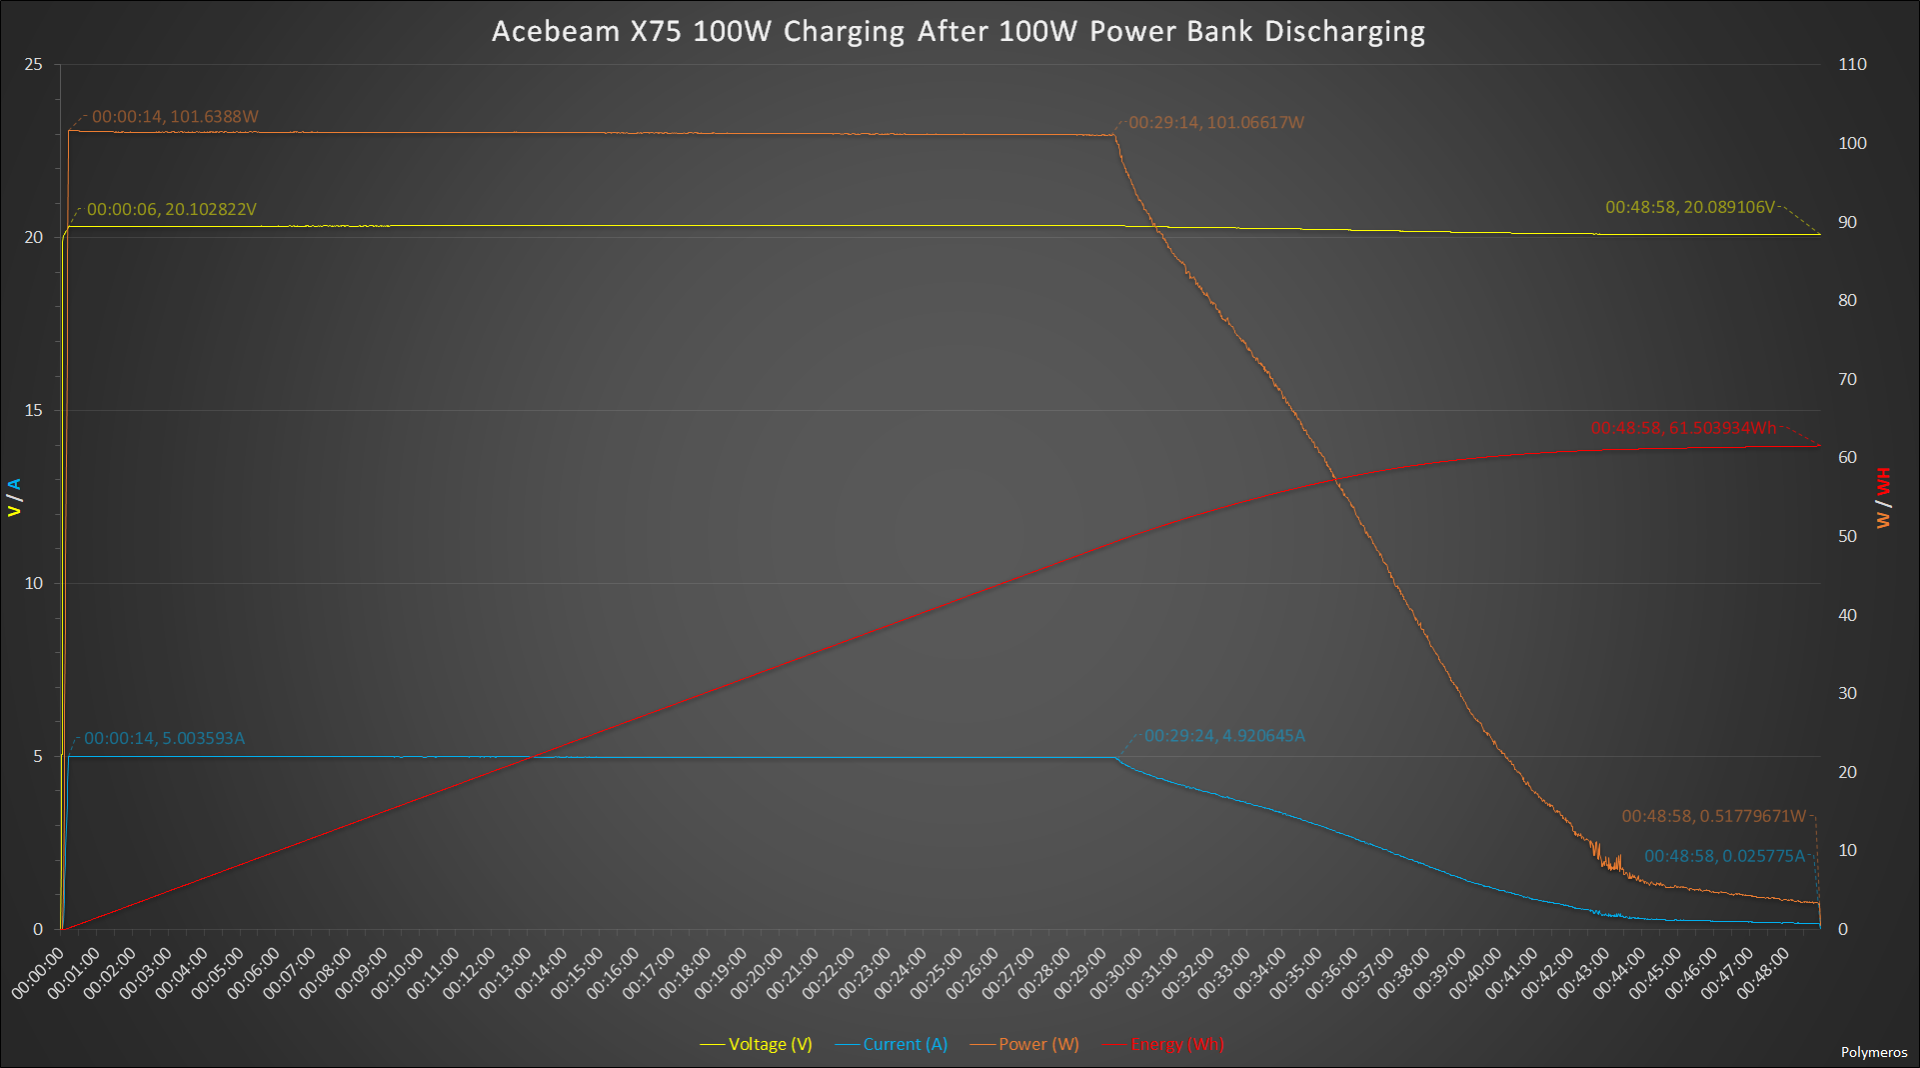
As shown below, it can provide power at 100W for about 30 minutes. The total energy provided in this scenario was 50.24Wh and the voltage of the battery pack at the end was 12.88V. This means that the battery pack was not completely depleted and could still operate the torch, at the lower levels, but it did not have enough power to be able to provide 100W output.

The charging of the battery pack after it has been used in Power Bank mode as above is shown in the following chart. The charging took 49 minutes and used 61.5Wh. The efficiency of the battery pack as a Power Bank is therefore 50.24Wh / 61.5Wh = 82% which is very good.
Runtime Charts
The Acebeam X75 has Power and Eco modes, which differ mainly on how it handles thermals, or in other words on the temperature the driver tries to keep itself below. It also has a Fan On mode (which Acebeam calls Windy mode) and a Fan Off mode (which Acebeam calls Non-Wind mode). I want to make it clear that the Fan On mode does not mean that the fan is running all the time. On the contrary, the fan is temperature controlled and will run only when and at the speed that is needed.
I decided to only test the Acebeam X75 in Fan On mode, as I do not see the point of disabling the fan on such a powerful torch. The torch will still work safely without the fan, as it will regulate itself thermally but as the specs show, it will be severely crippled in high output duration. And to be blunt, I do not see a possible need for aural stealth when you are producing over 60.000 Lumens of light.
The first chart shows the full runtime of both emitter options in Power Mode, on Turbo. All the details are noted on the chart.

Here are the first 10 minutes of the above chart, in greater detail.

The following chart shows the full runtime of both emitter options in Eco Mode, on Turbo. All the details are noted on the chart.
I was initially surprised by the fact that the maximum output of the Cree XHP70.2 6500K emitters is higher in Eco mode than in Turbo mode. So, I verified it several times and it is consistent. The only possible explanation is that the limiting factor of the maximum output for the Cree XHP70.2 6500K emitters is the level of power that the battery pack can provide and that the extra power draw of the fan may be limiting the maximum output on Turbo. Of course the fan is only rated at 0.2A, which means that should not be significant. It would be interesting to see how a larger battery pack, with 2 parallel banks of 4 21700 batteries in a row would work with this torch. I am not sure if I would prefer to carry the extra size and weight in order to gain the extra run time and possible extra output, if any, but I would definitely like to have the option. Acebeam may oblige in the near future (wink - wink).

Here are the first 10 minutes of the above graph, in greater detail.

I also did the full runtime graph on High, for both Power and Eco modes. No surprises here.
High in Power mode is the most impressive achievement of this torch, as the sustained output at this level is unrivalled by any other torch in the world! Most impressive!

Here are the first 10 minutes, in greater detail.

Even in Eco mode, the sustained output on High is impressive.

Here are the first 10 minutes of High output in Eco mode, in greater detail.

Finally, I proceeded to test Med2 and realised that at this output of 10.000 lumens, there is no difference between Power and Eco modes as the fan hardly ever turned on, at very low speeds. So here is the full Runtime graph for Med2. This is definitely a very useful mode, as it will provide around 10.000 Lumens for an impressive 55 minutes!

Conclusion
The Acebeam X75 is a very impressive torch. It is the second most powerful torch in the world in maximum brightness and the unrivalled first in sustained high output. It has the best cooling system ever implemented on a torch, which is also user serviceable and it features an intuitive user interface, with Mechanical Lock and the control buttons placed on the very comfortable handle.
The design is beautiful and the machining of the host is intricate with no imperfections or sharp edges. Both the black Type-III Hard Anodization and the off-white Micro Arc Oxidation finishes are impeccable!
The driver is a fully regulated boost driver which provides 24V for the 3 banks of 4 in a row 6V emitters . It features constant current output without measurable or visible PWM on any of the modes. The Cree XHP70.2 6500K emitters provide the highest Lumen output while the Cree XHP70.3 HI 6500K provide the highest intensity and throw, at the cost of some lost Lumens. That said, they both have plenty of Lumen output and throw and are both just as impressive. The choice is yours, depending on which feature you prioritize. I intend to keep both but I would very much like to see which one you prefer, so leave a comment to let me know.
The proprietary battery pack will probably be considered a disadvantage by some users, but realistically you cannot have a safe, high output battery pack of 4 balanced, high drain 21700 Li-Ion cells that can charge at a rate of 100W, provide Power Bank output of 100W and power such a powerful torch without it being a sealed device. The battery pack will charge in 1.5 hours using the included 60W charger or in just 1 hour using the optional 100W charger, which will set you back an extra $47.90. Well worth it, in my opinion, as it is a great quality PD 3.0 charger that you can use to power most of your other devices, including phones and laptops.
The most negative thing I have to say about the Acebeam X75 is the location of its charging port, which is under the removable tail cap and inside the threads. Even though this design is indubitably very robust in its simplicity, the removable tail cap feels less luxurious that the rest of the Acebeam X75 and it could be lost or damaged while removed. But the most important issue with the design is that having the USB C socket inside the greased threads caused me to smear the grease on my hands and subsequently all over the torch several times, before I got used to the idea and became mindful enough to avoid doing so.
Another thing I would have liked is a lower output mode, as the lowest mode, named Ultra-Low, is actually 900 Lumens. I would have loved an indoor friendly mode that could light up the inside of a room or tent and last for a very long time. Unfortunately, making a driver that is very efficient at high output levels, means that you lose the ability to have very low output levels.


How much will the torch with the highest sustainable output in the world set you back? Well, less than I expected to he honest. The price starts at $399.90 for the black Type-III Hard Anodization finish with Cree XHP70.2 6500K emitters and the 60W charger. You can add $47.90 if you want to upgrade to the 100W charger and $45 if you prefer the Cree XHP70.3 HI emitters. The off-white Micro Arc Oxidation finish is $30 extra, but only comes with the XHP70.3 HI emitters, so you have to factor that into the price as well.
Therefore, the cheapest configuration available is the black Type-II Hard Anodization with Cree XHP70.2 6500K emitters and 60W charger, at $399.90 and the most expensive configuration available is the off-white Micro Arc Oxidation with (compulsory) Cree XHP70.3 HI 6500K and (optional) 100W charger at $522.80.
The prices may seem high to some, but actually the cost per Lumen is lower than most high power torches in the market at this point and that is not even taking into account the excellent quality and high end electronics.
Let's list the Pros and Cons of the Acebeam X75:

Pros
+ Highest sustainable output in the world!
+ The best active cooling solution ever implemented in a torch!
+ 2nd highest output in the world.
+ Digitally regulated constant current boost driver which provides stable output and high efficiency (up to 98%) with no PWM.
+ User serviceable cooling system.
+ Excellent fit and finish in either black Type-III Hard Anodization or optional off-white Micro Arc Oxidation.
+ USB type C 60W or 100W charging.
+ 100W Power Bank functionality with measured 82% efficiency.
+ Low Voltage Protection.
+ Smart Temperature Control.
+ Simple and intuitive User Interface with Mechanical Lock and buttons on the handle.
+ Replacement fan, extra screws, extra O-Rings and torx wrench provided.
+ Silicone protective cover with temperature indication.
+ Excellent quality 100W Power Delivery 3.0 charger (optional) or 60W charger (included).
+ Excellent quality 1m 100W (20V, 5A) USB C cable provided, with transfer speed capability of up to 20Gbps.
+ IP68.

Cons
- Removable Tail Cap.
- USB C charging port in the threads of the Tail Cap.
- A mode that is lower than 900 Lumens would be useful.
Thanks to Acebeam for providing the samples for review

Polymeros Achaniotis 15/11/2022
-
 8
8
 Ακολουθήστε το TheLab στο
Viber για να λαμβάνετε πρώτοι όλες τις τεχνολογικές μας ειδήσεις καθώς και τις τελευταίες μας κριτικές προϊόντων.
Ακολουθήστε το TheLab στο
Viber για να λαμβάνετε πρώτοι όλες τις τεχνολογικές μας ειδήσεις καθώς και τις τελευταίες μας κριτικές προϊόντων.
 TheLab Weekly Digest
Άρθρα, reviews και ό,τι κινήθηκε στο forum. Κάθε Κυριακή.

.thumb.jpg.14a3df6f5853e0ce92219404fd5d940d.jpg)


Recommended Comments
Create an account or sign in to comment
You need to be a member in order to leave a comment
Create an account
Sign up for a new account in our community. It's easy!
Register a new accountSign in
Already have an account? Sign in here.
Sign In Now